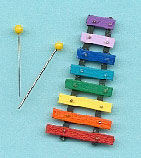
Xylophone Project
Supplies needed:
Tiny holeless gold beads
1/32 x 1/8 wood strip
1/16 x 1/16 wood strip
Acrylic paints -
red
orange
yellow
green
turquoise
dark blue
light purple
deep purple
2 quilting pins - the type with small colored heads
Tools needed:
Tacky glue
Toothpicks
Ruler
Small saw for cutting
Paintbrush
Wire cutters Double sided tape
Instructions:
1) Paint the 1/32 z 1/8 wood strip in the 8 colors - about an inch per color. If you are making two, double that - the wood should be 24" long. Paint the 1/16 x 1/16 black - paint approximately 4" for each xylophone.
2) Cut the wood as follows:
1 each per xylophone of:
Red - 27/32"
Orange - 21/32"
Yellow - 19/32"
Green - 17/32"
Turquoise - 16/32" (1/2")
Deep Blue - 14/32" (7/16")
Lt. Purple - 12/32" (3/8")
Dk. Purple - 10/32" (5/16")
2 each per xylophone:
Black - 1-3/8"
3) Dab the cut ends with the appropriate colors. (It is easier to paint the whole stick and then the ends then trying to paint little tiny pieces.)
4) Take 2 pieces of double sided tape approximately 2" long side by side on your work area. Place the red piece first and then, place the Dk. purple strip approximately 1-1/8" away. This means that you will have 1-1/8" of empty space between the two pieces.
5) Place the other colored wooden pieces between them with approximately 1/16" space between colors - centering on the tape. Make sure the sizes are in ascending order (or descending, depending upon which end you started.)
6) Now you will be adding the black wooden base. These 2 black strips get glued onto the pieces of wood, a little in from the outside edges. They are slanted - ranging from 1/8" separation at the Dk purple end to 1/4" in between black strips at the red end. Dry fit first and then put a tiny dab of glue where the black will hit the xylophone.
7) LET DRY THOROUGHLY.
8) While drying, wearing protective eyewear, cut the pointed ends off of the pins - leaving the hammers with which to play your xylophone.
9) When dry, CAREFULLY lift the xylophone from the double stick tape. Turn over to right side. With the tip of the toothpick and Tacky Glue, place a microscopic dot of glue on the outside edges of the notes - about where the black meets on the underside, and again, with a toothpick and saliva - yes - yuck - pick up a microscopic holeless bead and place on the wood to act as "rivets".
10) Most important, enjoy your creation.