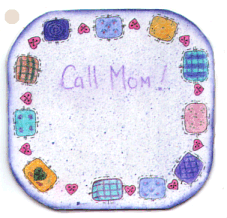
Write-On/Wipe-Off Message Board
Cut out two pieces of cardboard whatever size and shape you want your message board to be. I cut the first one out then traced it on to another piece of cardboard, then cut inside the line.
Basecoat the unprinted side with white acrylic paint. You will have to paint several coats allowing to dry thoroughly between coats. It will curl a little. Since I am an impatient person, I discovered that if you blow-dry at least the last coat, it will smoothen it flat again. I did not paint the second piece which is for the back side and that may have also helped to pull it flat.
Float shade with the blue acrylic paint on the edges. To float shade, you start off with a clean wet flat brush. Tap the brush on the side of the water container slightly to remove the water from the ferrule ( the metal part). Next lay your brush down on a piece of paper towel until the sheen of the water has come off the brush. Dip one corner of the brush into the paint. You do not need to use a lot of paint. You have to blend the paint to make it spread across the brush in a graduated shade. The darkest side of the brush is the side that was dipped into the paint with the color slowing diminishing until it is clear on the other edge. To achieve this you must blend on a palette. I use a piece of freezer wrap that has been folded in half (shiny side out) with a wet paper towel in between the layers. Start blending by stroking your brush straight back for about 1" to 1 1/2" and keep stroking back over across the same stroke mark approximately 7 to 8 times. When you have blended properly you will see the graduated color. To float the brush on the edge, place the brush with the edge that was dipped in the paint on the outer edge and pull your brush around the edge. You will have to load your brush several times to get all the way around. My piece is only about 6" x 6" and I had to reload about 6 times. If you have to go back over something to darken it, you have to wait for it to dry thoroughly first otherwise you will lift off the layer you just painted. Remember, it's always easier to add more color than it is to try and take it away, so try and use the smallest amount of paint that you can and float sheer layers, building them up to the desired color.
If you don't want to float the color on, you could try to use a felt tip marker and edge the design all around. I just like the look of the floated color.
Next, I spattered the blue acrylic paint all over the message board. I dipped an old toothbrush into water and blotted it slightly on the paper towel. Dip one end into the paint and test first on a piece of scrap paper, the more water you have in the toothbrush, the larger and more translucent the flecks are. I like small, almost semi-transparent flecks.
To add the design border, I used colored pencils. I really love colored pencils, because the colors are bright pastels and there's no messy clean up. You can take them anywhere. For this project, I borrowed my kids' box of colored pencils, because the colors were brighter than my oil-based pencils. I colored in little rectangles and put dots, or plaid lines across each one. I colored in a heart between each rectangle. I used a Rapidograph technical pen for the detail work, which is dashed lines representing stitch marks. You can use any fine point permanent marker for this.
Glue the two layers together, printed sides together and place a weight on top of them while they are drying to make sure it lays flat.
When dry, cut a piece of clear contact paper at least 2 times larger than the message board (make sure that the contact paper is larger than the message board). I like to lay the painted piece on the paper first making sure that there are no air bubbles. You can smooth them out by rubbing with the side of a piece of scrap cardboard. Fold the contact paper over and lay it over the back side. Trim around the edges, leaving a slight border of contact paper. When everything is trimmed off, press the edges of the contact paper together to seal the edges shut. To make a pen holder start with a piece of contact paper about 3 1/2" x 3". On the 3 1/2" side make a fold about 1 1/2" wide, this has to fit around the pen. Fold again, creating a cylinder and slightly overlap so you can use the remaining contact paper to hold the cylinder together. The remaining unsealed contact paper is what you use to attach it to the back side of the message board.
Place the self-adhesive magnetic strip on the back and you're ready to place it on the refrigerator.