Workbench Plan
1 Tools
Tools you will need:
|
|
|
||||
| Hammer | Twist Drill | Crosscut Saw & Rip Saw | Screw Driver | Square | Tape Measure | Pencil |
Optional (but recommended) tools:
 |
-or- |  |
| Vice | Clamp |
Kids Can Make It tool recommendations:
1. combination rip and crosscut pull saw
2. solid plastic angle square
3. combination Phillips and square drive screw driver
2 Supplies
Supplies you will need
1 - 2 foot by 4 foot sheet of plywood for the top
1 - 1 foot by 4 foot sheet of plywood for the shelf
5 - 8 foot 2 by 4 boards
2 ½ inch screws
2 ½ inch nails
Kids Can Make It supply recommendations:
1. combination Phillips and square drive screws
3 Step by Step Instructions
1) Perform the basic cross cuts on the 2x4s:
a) Measure the cuts with the tape measure
b) Draw a line across the 2x4 using the square
c) Secure the board in a vice or clamp to a workbench
d) Using a cross cut saw, perform the cut
i) 4 boards - cut to 30 inches (for the legs)
ii) 4 boards - cut to 26 ½ inches (for the legs)
iii) 2 boards - cut to the length of plywood top - measure the length of the top, it should be approximately 4 feet (“long cross boards” - to support the top)
iv) 2 boards - cut to 3 inches less than the width of the plywood top. For example, if the width of the plywood top is 24 inches, cut these boards 21 inches (“short cross boards” - to support the top)
v) 2 boards - cut to the width of the plywood top - measure the width of the top, it should be approximately 2 feet (to support the shelf)
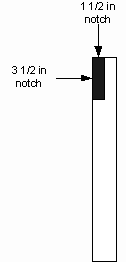
2) Notch the 4 30 inch boards
a) Using the tape measure, measure and mark the 1 ½ by 3 ½ inch notch at the end of the 30 inch boards (see figure above)
b) Mark the cuts using the square
c) Secure the board upright in a vice or with a clamp
d) Using a rip saw, cut down the middle of the board along the mark (3 ½ in. cut)
e) Secure the board on its side
f) Using a crosscut saw, cut and remove the notch (1 ½ in. cut)
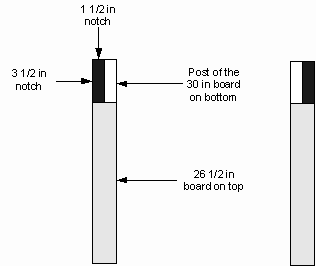
3) Construct the legs:
a) Align and nail the 26 ½ in. boards on top of the notched 30 in. boards -2 with the posts on the right and 2 with the posts on the left as shown above (if the person nailing the board is young, think about drilling pilot holes using a twist drill)
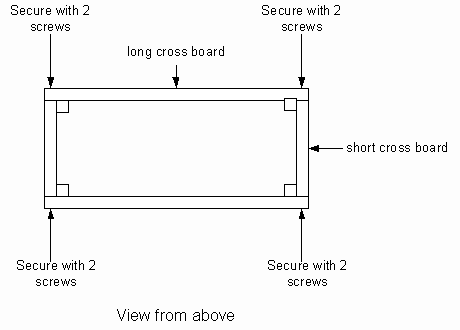
4) Secure the long cross boards that will support the top (the boards cut to the length of the table top) on top of the legs. The cross board should rest on the 26 ½ in. board of the leg, and the posts of the 30 in. board of the leg should be positioned on the inside edge (see above figures above and below).
a) Place the cross board on top of one leg (post on the inside)
b) Using the square make sure that the cross board and the leg are square
c) Using the twist drill, drill a pilot hole. (Note: please do not skip this step, there will be 3 screws going into the post, and to prevent splitting the board, the pilot hole must be drilled.)
d) Secure with a 2 ½ in. screw
e) Repeat the previous steps b-d with one screw on the other leg
f) For each leg, use the square to make sure the leg and the cross board are still square
g) Drill a second pilot hole below the first screw and secure with another screw
h) Repeat steps a-g with the other 2 legs and the final cross board
5) After the cross board has been secure, drill 2 pilot through the cross board into the notch of the leg (see figure below)
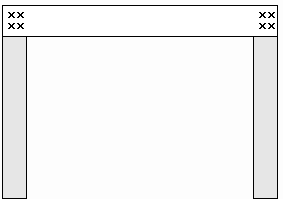
6) Using the 2 small cross boards, secure the two leg assemblies together. (This step may require help from another person.)
a) Place a short cross board between the 2 leg assemblies
b) Use the square to square up the legs and the cross boards
c) Use the twist drill to extend the 2 pilot holes that were drilled through the long cross board into the end of the short cross board
d) Secure with 2 ½ in. screws
e) Repeat for each corner
f) Using the twist drill, drill one pilot hole through the short cross board into the post of the leg (see figure above)
g) Secure with 2 ½ in. screw
h) Repeat steps f-g for all 4 legs
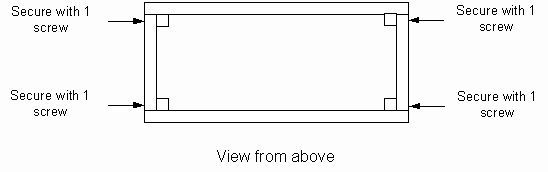
7) Secure the top onto the base.
a) Place the plywood top onto the base (if there is a “good” side of the plywood, place it up)
b) Align the top with the base assemblies and secure with 2 ½ in. nails (if the person nailing the board is young, think about drilling pilot holes using a twist drill)
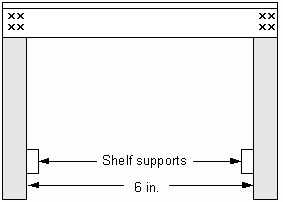
8) Secure the 2 shelf support board to the legs of the table
a) Measure 6 inches from the ground on the inside of each leg and mark
b) Secure the shelf support board to the legs with 2 ½ in. nails (if the person nailing the board is young, think about drilling pilot holes using a twist drill)
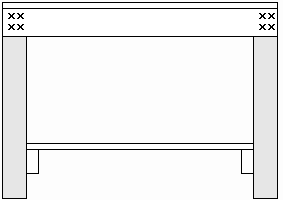
9) Secure the shelf to the support boards
a) Align the shelf between the legs
b) Secure to the shelf to the support boards using 2 ½ in. nails (if the person nailing the board is young, think about drilling pilot holes using a twist drill)
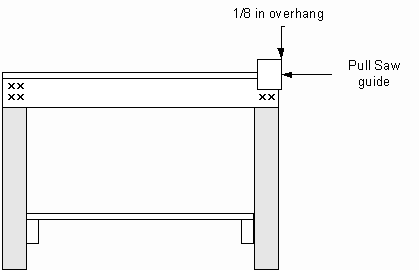
10) (OPTIONAL) If you will be using a pull saw, you may want to attach a pull saw guild to the front of the bench.
(If you or your child is left handed, secure the pull saw guild on the left of the bench.)
a) Find a scrap of 2x4 approximately 5 inches long
b) Align the guild so it extends beyond the end of the bench by about 1/8 in.
c) Secure to the front of the bench with 2 ½ in. nails