|
Materials Needed |
Equipment
Needed |
1 piece ¾" x
3½" x 10" softwood
1 piece 1½" x 2½" x 4" softwood
1 piece 2" x 2" x 2" softwood
2 pieces 3/8" x 2" x 6" plywood
2 pieces 3/8" x 2" x 3" plywood
1½" wood screws, washer and cup washers
1½" brads |
Saber saw or similar product
Drill and drill bits
Try square and measuring tape
hammer and plane
Screwdriver
Awl
Hole saw or similar product
Masking tape
Sandpaper, paint, and paintbrushes |
|
| |
|
Directions |
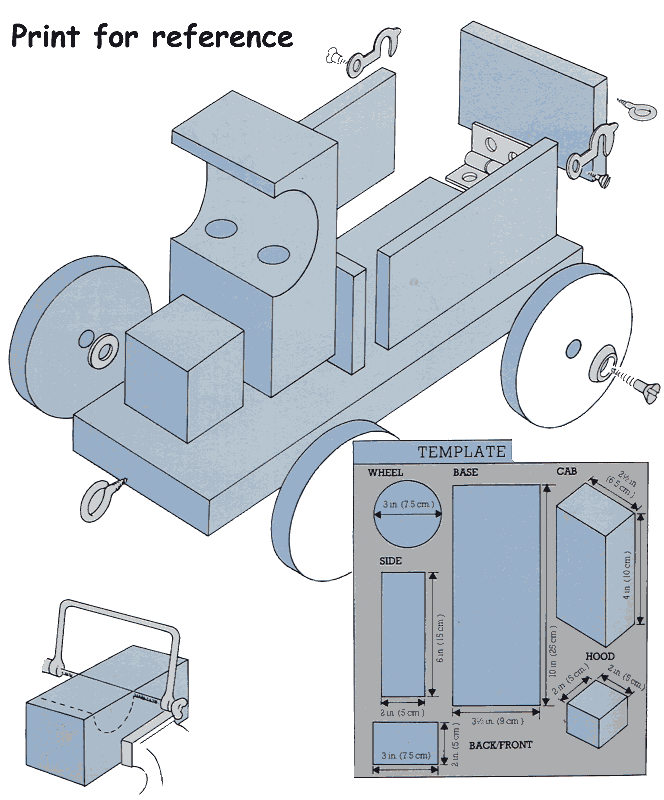
- Print the template we have provided for you by clicking on the
above link.
- You will make the cab first by drawing a semicircle on each
side of the piece of softwood. You can use a round cup or other
round object. Clamp the cab in a vise and remember to insert two
protective blocks of scrap wood on wither side before tightening.
- Carefully cut along the curve of the semicircle.
- Drill two holes in the base and attach the cab to the base
with glue and wood screws.
- To make the hood, drill holes in the base and attach the hood
block in position with glue and wood screws.
- To make the back open, attach the sides and back to the base
glue and brads. If you would like the back to open, each side
should be 3/8" shorter and the back piece ¾" longer than the
measurements given on the template you printed above. Attach a
hinge to the back and base with wood screws. To close the back
flap, you will need two small hooks and eyes. Screw them in
position.
- Make your wheels using a hole saw or similar product up to 3"
in diameter. Using an awl, make starting holes for the screws in
the base. You will need a washer between each wheel and the base
and a cup washer on the outside of the wheel.
- Paint and decorate
|
|
