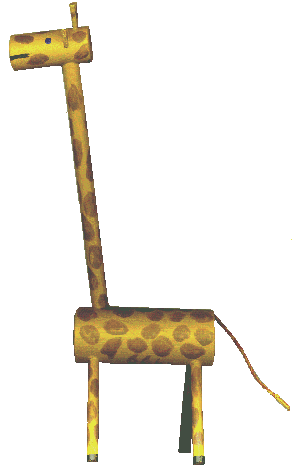
WOODEN TOY GIRAFFE
Let's make a toy giraffe using only dowel rods. Although this is not a
difficult project, you will need to use some woodworking tools, it is best that
it is made in whole or in part by an adult. Here is a picture of a completed
giraffe.

Your completed giraffe will be about 15 1/4 inches tall.
You will need several different size dowel rods. Here is the list of
materials needed:
- Body 1 1/4" dowel, 3" long
- Neck 3/8" dowel, 5 1/2" long
- Legs 1/4" dowel, 2 1/2" long (make 4)
- Head 3/4" dowel, 1 3/4" long
- Horns #6 finishing nails (2 required)
- Ears Made from a craft stick (2 required)
You will also need: glue, saw, drill, sandpaper, paint, yarn
Read all of the directions before starting construction.
- From a 1 1/4" dowel (closet pole), cut a piece 3" long for the body.
- a. The body needs to be prepared to receive the other parts.
- b. Draw a line down the center of what will be the bottom of the body.
- c. Mark a point, 3/8" to each side of the center line and 3/8" in from
each end of the body. You will mark 4 points where the legs are to be
attached.
- d. Position the body with the bottom up (it is easiest to hold the body
if you place it on a block of wood that has a groove cut in it to hold the
body.)
- e. Drill a 1/4" diameter hole, 1/2" deep, at each of the 4 places you
have marked. These holes need to be drilled at an angle of approximately 20
degrees to the vertical.
- f. Turn the body piece so the top will face up. Mark a point that is
1/2" from one end, in the top center of the body.
- g. Drill a 3/8" diameter hole, 1/2" deep, at the point you have marked.
This hole should have a forward slant of about 10 degrees.
- Next, prepare the head.
- a. On the underside of the head, mark a point 1/2" from one end on the
center.
- b. At this point, drill a 3/8" hole (vertically), 3/16" deep.
- c. Turn the head right side up.
- d. Mark 2 points, 1/8" either side of a center line, 1/4" from the same
end of the head where the hole was drilled on the underside.
- e. Drill a 3/32" hole at each of the marked points, 1/4" deep.
- f. Next, you must cut 2 slots to hold the ears.
- g. Mark 2 points, 1/2" each side of a center line and 3/8" in from the
same end described in step 2d.
- h. Using a saw, cut 2 slots each centered on the marked points. Make the
slots about 1/8" deep and the width of the ears.
- Next, prepare the horns. Number 6 finishing nails are suitable for horns.
Cut 2 nails so that the top of each nail has a length of 3/4". Discard the
lower part of the nails.
- Next, prepare the ears.
- a. A craft stick (popsicle) is a suitable width for the ears. However,
you can use any thin piece of wood, plastic, or metal.
- b. See the following diagram for the shape of each ear.
- c. The triangular part is 3/8" high and 3/8" wide. The rectangular part
is 1/8" high and 3/8" wide.

- Before doing any assembly. Sand any rough or sharp edges on each of the
parts.
- You are now ready to assemble the giraffe.
- a. Glue the 4 legs into the 4 holes on the underside of the body.
- b. Glue the neck into the hole on the topside of the body.
- c. Glue the horns into the holes that were drilled for them in the head.
- d. Glue the ears into the slots provided for the ears.
- e. Glue the head onto the neck.
- Allow the glue to set.
- If necessary, sand off any excess glue or rough edges. (Note: If your
giraffe wobbles, you need to level the legs. Lay a sheet of sandpaper on a
level surface. Push the giraffe back and forth on the sandpaper until the legs
are all the same length.)
- Paint the entire giraffe a brownish yellow (Note: If you want to make a
pink giraffe with purple spots, that is OK.) You may need to apply 2 coats
of the body color. Let the paint dry after each coat.
- After the base coat is dry, paint hooves, eyes, mouth, and nose, to suit
your own ideas.
- Let the head colors dry and then using brown paint (or purple, etc.)
paint spots all over the body, legs, neck, and head.
- Let the paint dry.
- a. Braid a tail using a suitably colored yarn.
- b. Drill a hole in the rear of the body that is about the same diameter
as the tail.
- c. Glue the tail into the drilled hole.
You now have a complete toy giraffe.


![]()