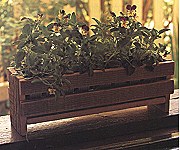
| Window Box |
| |
|
|
| Materials Needed |
Pine Wood, 21" x 4" x ½"
Plain lath or door strapping, 50" x 1-1/8" x ½"
12 Finishing nails, 1" long
Clear varnish or paint in a color of your choice
Pencil
Ruler
Medium grade sandpaper
Masking tape
Drill and 1/8" drill bit
Hammer
Handsaw |
| Directions |
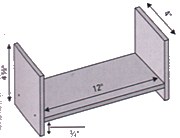
A: Cutting the wood
- Using a pencil, ruler and handsaw, cut the ½" x 4" wood into
one 12" length for the base, and two 4½" lengths for the ends.
Then cut the lath into four 12½" strips.
- Sand all the pieces, paying particular attention to the edges
and corners.
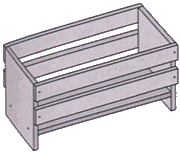
B: Constructing the box
- Drill two holes in each of the end pieces, 3/4" up from the
bottom and 3/8" in from each side. Nail the ends to the base,
nailing one end on at a time. The end pieces should protrude below
the base piece to form the legs of the window box.
- Position a strip of lath on each side of the box, level with
the tops of the ends. Drill a hole at each end of the strips, and
then hammer in the nails to attach the strips to the end pieces.
- Repeat step 2 to nail the other strips below the first strips,
leaving a gap of about 5/8" between them.
C: Finishing
- Sand the window box all over with the medium grade sand paper.
- Seal with two coats of clear varnish or with paint in your
chosen color.
D: Filling the Window Box
- Look for small plant pots that will fit into the window box.
You should be able to fit three or four in. Make sure that the
pots have saucers and that these will also frit into the box. Put
a few small pebbles in the bottoms of the pots to assist in
drainage, and fill the pots with soil. If you are using good
quality potting mix, you will not need to add the pebbles.
- Plant the pots with seeds from dwarf varieties of herbs or
flowers. For best results, use plants that require similar growth
conditions.
|
 |
 |
|