Valentine Address Book
Materials Needed: Address book 5 1/2" x 7"; 1/4 yard fabric; Scrap of contrasting fabric. 3/4 yard 1" eyelet lace; 5" x 7" photo-frame foundation; 8" x 15" batting; Small button; 1/2 yard 1/8 ribbon; Glue.
Instructions:
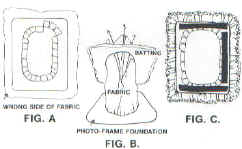
Step 1. Measure the width and height of the inside of the address book. The width measurement should be taken from the spine, where the rings are, to the outside edge. Add 1/2" allowance all around. Cut 2. (Fig. A. below.)
Step 2. Hem 1/2" along the inside edge of inside cover fabric. (Fig. B. below). Repeat for other inside cover fabric.
Step 3. Using a tape measure, measure the outside of the album, from edge to edge. Measure while book is closed. Add 1/2" allowance all around. Cut 1. (Fig. C. below.)
Step 4. Cut 1 high-loft bonded polyester batting 1" larger than the outside cover measurement.
Step 5. Place outside cover, wrong side down, on batting. Pin inside sections to cover (right sides together) and batting as shown in (Fig. D. below) Take a 1/4" seam all around book cover. Sew curved corners if the book corners are curved. Clip excess batting at corners. Turn right side out.
Step 6. Glue a strip of fabric 2" x 4" over the spine edge top of book. Repeat for bottom. (Fig. E.) below.
Step 7. Carefully put the cover on the address book by folding back the book covers and slipping the fabric over the backs.

Step 8. Cut 1 piece of fabric 1" larger on all sides than the photo-frame foundation.
Step 9. Cut 1 piece of high-loft bonded polyester batting, using the photo-frame as a pattern. Trace the center opening and cut away the center shape.
Step 10. Center the photo-frame foundation on the wrong side of the fabric. Trace around the center opening with a pencil. Cut out center to within 1/2" of the pencil line. Clip the 1/2" allowance just to pencil line. (Fig. A. below.)
Step 11. Re-center the photo-frame foundation on the wrong side of the cut fabric. Fabric should be 1" larger on all sides than the foundation. Glue the 1/2" clipped allowance to the frame around the center opening. Keep the opening smooth and free of rough or raw edges.
Step 12. When the glue is dry, turn photo-frame foundation right side up. Lift the fabric and push it through the hole in the batting. (Fig. B. below.) Smooth the front fabric over the batting.
Step13. Turn the photo frame to the back side. If the frame is square, you will need to miter the corners and glue them down before yo proceed. Glue the fabric to the foundation. Carefully smooth the fabric over the batting as yo glue in place.
Step 14. Measure the outside edge of the photo frame to estimate the amount of eyelet lace you will need. Add lace by gluing around the back of the frame, close to the edge.
Step 15. Create 1/2" cardboard strips from lightweight cardboard to fit the back of the frame, along three sides. These should be placed 1/8" to 1/4" inside the edge of the frame. These cardboard spacers allow the photo to be inserted or removed after the frame is in place on the album. Glue spacers in place. (Fig. C below.)
Step 16. Position photo-frame on the front of the album. Place a pin in the center of the photo opening to mark position. Lift photo frame and put glue on the spacers. Press onto cover. Weigh down with a heavy book until dry.
Step 17. Glue eyelet lace all around edge of frame.
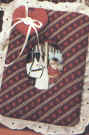
Step 18. Trace small heart pattern below onto contrasting fabric twice; cut out 2. Sew the pieces together, right sides together, using a 1/4" seam allowance. Make a small slit in the back of the heart. Turn heart right side out through this slit. Stuff lightly with batting and slip-stitch the slit closed.

Step 19. Tie a bow through the button with 1/2" ribbon, adding extra ties if so desired. Sew button to middle of heart. Attach the heart to photo-frame with glue or stitching.