Tall Clock


    This tall clock may look like it was built from clear pine [that can run upward of $6 a board foot (bf)], but it was actually built using #2 grade ponderosa pine that went for $1.41 a foot. And I only pitched four of the total 31 bf I purchased cutting around knots. When you're on a budget, it pays to buy smart.

    With no jointer nor planer in this shop, I bought nominal 1 x 12 material already surfaced on four sides (S4S). The wide stock meant no edge gluing was necessary, saving some time. In all, you'll need about 18 to 20 hours to build and finish the clock.

    I based my project dimensions on two factors: the clock's 8- 1/8" diameter face and the lumber's 11- 1/8" net width. Refer to the Schedule of Materials for a complete cutting list.


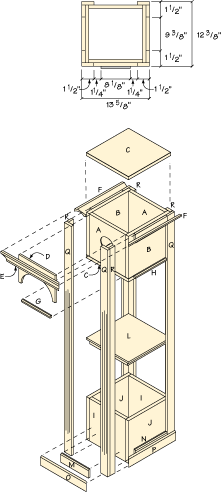
When you review the diagram at the bottom of this page, you'll see the clock's basic elements are an upper and lower box with four vertical supports. Take away the crown and base moulding, and it looks like an oversized box kite. To begin construction, cut out the parts to make the two boxes. No fancy joinery is required, so simply butt joint the parts, fastening them with glue and nails. The sides overlap the front and back. Note that the lower box bottom is inset and the top has a rabbet on four sides to produce a 1/4" lip (photo 1). Leave the lid loose and you have a secret storage compartment! The lid on the upper box is also loose to allow access to the light fixture while the bottom overlays the four sides.

Before assembling the upper box, cut the holes required for mounting the clock and the "can"-type recessed light fixture. Center the hole for the light, but refer to the diagram at the bottom of this page for locating the clock hole. Cutting these holes presented a problem for the tools that I initially purchased for the shop, so an additional expense was required. Do we buy a power jigsaw on a tight budget? Of course not Ñ so a narrow-bladed, $9.95 compass saw was the solution.

Cutting rabbets on the table saw is a two-step process. First, run the part on edge to the depth required, as above. Next lower the blade, reset the fence and run the part flat to cut away the waste.


After cutting the holes (photo 2), assemble the box then presand with 120 grit paper.

Make the four legs that tie the two boxes together from two pieces of 3/4" material, one 1- 1/2"-wide and the other 3/4"-wide. The two pieces are nailed and glued to form an "L" shape that's 1 1/2"-wide on each outside face. Before joining these pieces, though, two operations are necessary.

My inexpensive solution to cutting the round cut-outs for the clock, light fixture and applied clock surround moulding is a narrow-bladed compass saw. Before sawing, I drilled relief holes.


First, use a sanding block (photo 3) and sand the edge to be joined, eliminating the ragged edge left by the saw. (One drawback to the inexpensive table saw is that the arbor run-out produces an unacceptable rough sawn edge. In the next issue, we'll solve this problem with a router table edge-jointing system.) The second operation is to use the table saw to cut the three quirk details on the front face of the uprights.
Before gluing and nailing the two piece uprights, I block sanded the rough edge left by my inexpensive table saw. The sanding assured the butt joint would seat properly on the mating part.


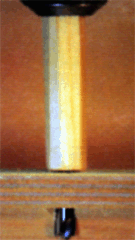
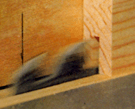
Lay out and mill these 1/16"-deep details by marking start/stop reference lines on the rip fence which then correspond to reference marks on the back side of the uprights (photo 4 & diagram 2). Start the cut by indexing the first layout line on the back of the stock to the line past the blade on the fence. Then slowly lower the stock onto the blade and push the piece through until the opposite layout line matches the line on the fence at the front of the blade. The quirk details used here have a 1/4" space between them with the middle one 1 1/2" longer at the top and bottom. With this complete, assemble the legs, then presand them.

This assembly is a breeze. Start by placing the two boxes so they're the proper distance apart and oriented as they should be when assembled. Next, apply glue to the box corner edges and lay the upright in place, making the ends of the upright flush with the top of the upper box and the bottom of the lower one. Now nail the upright to the box. Use the finish nails sparingly and on the side edge only. Continue with this until all four are attached. At this stage the project looks more like a box kite than a clock!

Before applying the mouldings, add filler pieces to the front and sides. These build-up pieces go between the uprights at the top of the upper box and bottom of the lower one. The upper pieces simply back up the crown and give you something to nail to. The lower one projects above the base moulding, providing the additional chamfer detail.

Let's begin with the easy mouldings with the chamfer detail. Cut them (with the exception of the clock surround moulding) to width, but wait to cut them to length. The clock surround piece is fit so that it's the full width between the uprights and long enough to extend down to the horizontal center of the clock hole. Use the compass saw again and cut out the half circle so that a 1/4"-gap will be created between the edge of the cut-out and clock frame.

With this done, set up your router in a router table with a 45-degree chamfer bit. I installed my router in its designated workstation location as described in the last issue. (I also purchased a chamfer bit, adding an additional $19 to my equipment total. I could've cut the straight chamfers on the table saw, but the round for the clock face would've been too time consuming to make by hand.)

Before running the quirk details, mark the saw fence where the front and back of the blade breaks the plane of the saw table top.


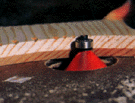
I ran the bevelled edges on the base moulding, the piece just above the base moulding, the clock surround (photo 5) and the moulding which is applied to the top box's bottom edge. I cut each piece to length, then nailed and glued them in place, mitering the corners of the base moulding.

Now it's time for the most challenging part of the project Ñ making the coved crown moulding and cutting the required compound miters using only the table saw. To mill the cove, first clamp a board at an approximate 33-degree angle on the saw blade's infeed side. The board serves as a fence to run your stock against as you make the series of shallow cuts which create the cove. Determine the distance of this auxiliary fence to the blade by raising the blade to the highest point of the cut you'll make, about 3/8". Position the fence so that the width of the stock is centered on the blade when it passes over it at an angle.

The chamfer detail is cut on the half circle clock surround moulding by running the part face down on the router table.


When satisfied, run each piece of moulding over the blade, raising the blade about 1/16" for each pass (photo 6). When complete, you'll be left with some elbow grease sanding to remove the saw marks, but it's not a terrible task.
The coved crown mould is made using the table saw. Run the stock over the blade at an angle against an auxiliary fence set about 33 degrees askew to the fence.


To complete the moulding profile, remove the temporary angled fence and use the regular fence with the blade tilted to 45 degrees. Make the four bevel cuts shown.
Complete the crown mould profile by making four, 45-degree cuts on the corners of the stock.


The finished moulding profile.
The three completed crown moulding parts ready for cutting to length.


To cut the compound miters on the crown's front corners, tilt your saw blade to 30 degrees and set your miter gauge to 35 degrees. To make a right side miter, set the miter gauge in the slot to the left of the blade. Position the stock face down with the top edge exiting the cut (photo 9). To make the left miter, move the miter gauge to the right slot, only this time position the stock face up with the top edge leading the cut. When attaching the crown to the project, first nail the front piece after very carefully positioning it not only side to side, but also square to both sides. After it's attached, mate the side pieces to it, gluing the miter joint and nailing the sides in place.
The compound miters for the crown mould are cut on the table saw by tilting the blade to 30 degrees and setting the miter gauge to 35 degrees.


Before final sanding and finishing, holes need to be drilled for the wood pegs that support the adjustable glass shelves. To make certain the shelves sit level, I made a simple drilling jig from a piece of scrap material (photo 10).
Two simple drilling jigs assure correct location and depth of drilling. Shown at in step 11 is a detail of the two jigs at work and the results they produce.


I also made a simple depth stop to make sure I didn't accidentally drill all the way through the soft pine (photo 11). Set all the nail heads and putty them, then sand the project completely using 150 grit paper. Now you're ready for the pickled pine finish. To produce the white effect, use white or off white latex paint thinned one part paint to 11/2 parts water. Work one section at a time, using either a brush or rag to apply a modest amount of the thinned paint. Immediately wipe off most of the paint. After it's dry, apply two coats of clear finish over the white, lightly hand sanding between coats with 360 grit paper. Install the light fixture according to the manufacturer's directions. Make sure you drill vent holes in the back of the upper box near the top to allow heat build-up from the fixture to dissipate. Run the plug wire down an outside back leg of the unit, holding it in place with small, insulated "U" nails. I installed an inline switch at a convenient location about midway down for easy on/off control. The clock unit press fits into the hole so it can be removed to adjust the time or replace the battery. All in all, "The Little Shop That Could" in fact did, and I concluded my $73.40 worth of wood, clock and light fixture was a darn good investment. Especially when you compare it with a not too dissimilar unit in the Spiegel catalog for twice the money. It, of course, is smaller, and doesn't have a light, fancy coved crown or quirk details, either!
Two simple drilling jigs assure correct location and depth of drilling. Shown above is a detail of the two jigs at work and the results they produce.


No. Item Dimensions (T W L) Letter
Upper Box
2 Front & Back 3/4" x 11 1/8" x 13 3/8" A
2 Sides 3/4" x 11 1/8" x 13 3/8" B
2 Top & Bottom 3/4" x 11 1/8" x 12 7/16" C
1 Clock surround 3/4" x 10 5/8" x 7 1/4" D
1 Crown mld fnt 3/4" x 2 1/2" x 18 " E
2 Crown mld sds 3/4" x 2 1/2" x 14 1/2" F
1 Bot mld fnt 3/4" x 3/4" x 10 5/8" G
2 Bot mld sds 3/4" x 3/4" x 9 7/16" H
Bottom Box
2 Front & Back 3/4" x 11 1/8" x 5 3/4" I
2 Sides 3/4" x 11 1/8" x 8 " J
1 Bottom 3/4" x 9 5/8" x 11 " K
1 Top 3/4" x 11 1/8 x 12 7/16" L
1 Fnt mld/filler 3/4" x 2 3/4" x 10 5/8" M
2 Sds mld/filler 3/4" x 2 3/4" x 9 7/16" N
1 Base mld fnt 3/4" x 3 " x 15 " O
2 Base mld sds 3/4" x 3 " x 13 1/8" P
Legs
1 Uprights 3/4" x 1 1/2" x 70 " Q
24 Uprights 3/4" x 3/4" x 70 " R
The clock face was purchased from Klockit. Request part #15140 and with a 8 1/4" Roman dial. The current price is around $29.95. For more information, call 800.KLOCKIT.

All parts are made from Pine.