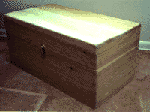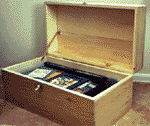

This chest was designed to have a dual purpose: firstly (and most obviously) as a storage unit and secondly as a coffee table in a small living room. The shape is very basic, but is the most functional for storing toys and games in. In order to improve the aesthetic appeal of the chest it was decided that dovetail joints would be used to join the sides. Details of how to create easy dovetail joints has been included in the Joints section. However, it is not necessary to use dovetail joints: any form of jointing, such as dowel joints, could be used.
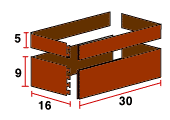
The sides of the base piece were made out of pine with the front and back being of dimensions 30 x 9 x 3/4 inches and the sides 16 x 9 x 3/4.
Having cut these pieces to size, the first job is to create the dovetail joints. These were done using a router and a dovetail template (see joints section for more details) with the dovetail showing on the side pieces, not on the front and back.
Once the dovetails have been cut, the next job is to create a means of attaching the base wood into the front and sides. The base was made out of a piece of 1/2 inch thick plywood. To attach the base plywood to the sides and front, a slotted tenon joint was cut 1/2 inch from the bottom of the sides, back and front. The size of this slot is 1/2 inch wide (the same as the thickness of the plywood) and 3/8 inch deep. The size of the base plywood is 29 1/2 inches long by approximately 16 inches wide. It is important that you take your own precise measurement of this piece once you have cut the dovetails as the exact dimensions will depend on the depth of the joint and so on. To measure this size, dry fit the four sides together and measure the dimensions of the inside of the box. Then add on a measurement of 3/8 inch at each end for the depth of the slotted tenon joint.

When you have cut the base to size, glue the four sides and the base together and clamp for several hours, ensuring that the sides are at 90 degree angles to the front and back pieces.
The lid is built in a very similar way. Cut out the front and back to the dimensions 30 x 5 x 3/4 inch, and the sides 16 x 5 x 3/4 inch and route out the dovetails. Take a moment to ensure that you are cutting the dovetails out of the sides (as you did on the base unit) rather than the front and back.
Unlike the base unit, you do not need to route out a slot for the lid. Instead, the lid is made from pine, of rough dimensions 30 x 16 x 3/4 inches. Again, take your own measurement by dry fitting the four sides. Obviously, to make a piece that is 16 inches wide, you will need to join two pieces of pine together by doweling them.
Glue the four sides together and then glue the top on. There is no need for screws or nails, simply use a strong wood glue and leave the whole unit clamped over night.

Sand the entire chest, taking extra care to make sure that all of the corners are neatly rounded off - the last thing you want is sharp corners that you may bang you leg into - and then wax it.
Add two hinges to the back of the unit and a clasp to the front. In this project it is worth buying ornamental hinges and a clasp as it adds to the design - hiding the hinges will make the chest look rather dull.
Finally, add a chain or similar mechanism to the inside of the chest to stop the lid from swinging open too far, and consequently damaging the hinges.