|
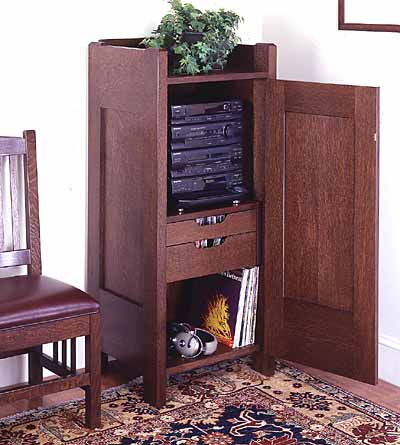
| Our cabinet stores modern
stereo components neatly out of sight. With the door
shut, it looks like a traditional Arts & Crafts
hutch. |
|
|
There is a staggering variety of stereo systems
available today, and depending on your finances and your
level of enthusiasm in these matters, you can spend
hundreds or thousands of dollars on equipment. For
serious audiophiles, the sleek, black cases of stacked
stereo components are the only way to go. But most of us
would rather shut the works behind closed doors and
concentrate on the music.
Our Arts & Crafts style cabinet is a perfect home
for a basic stereo system. It easily accommodates a
receiver, CD and tape players. And although
high-technology audio components are the preferred means
for many people to play music today, we kept in mind
that many others are loathe to give up their vinyl
collections. For that reason we have provided space for
a turntable on top and a shelf for a modest LP
collection as well. There are also two drawers, one for
tapes and one for CDs. In keeping with traditional Arts
& Crafts pieces, we used quarter-sawn white oak for
the cabinet. If you have trouble locating quarter-sawn
oak where you live, one mail-order supplier is Talarico
Hardwoods, RD 3, Box 3268, Mohnton, PA 19540;
610-775-0400. | |
|
|
|
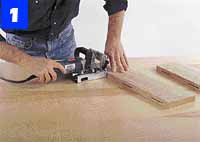
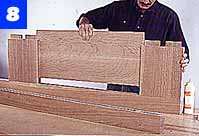
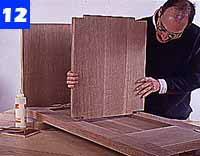
To assemble the case, spread glue in the plate slots,
dowel holes and on the dowels and plates, then join the
shelves to one of the case sides (Photo 12). Take
care not to get any glue on the portion of the middle
shelf that abuts the side panels. The panels must be
free to expand and contract seasonally, and a glue bond
will cause a panel to crack when this happens. With a
helper, position the other side over the ends of the
shelves, and then clamp the assembly. Compare opposite
diagonal measurements on the case to check for square,
then let the glue cure. |
|
|
| Apply glue to
the slots, dowel holes, joining plates and dowels, then
assemble the shelves to one case
side. | |
|
|
|
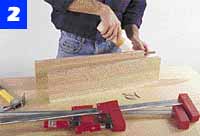
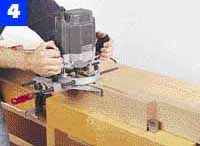
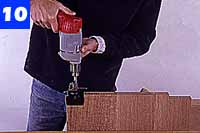
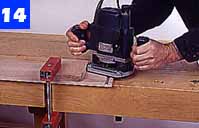
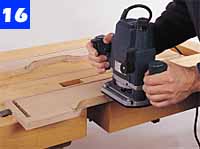
After marking the curved cutout on the drawer faces,
make the cuts with a sabre saw. Use a router and cove
bit to shape the edge of the cutout (Photo
16).
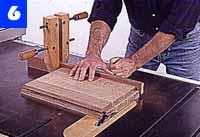
Next, apply glue to the mating parts of the drawer
joints, and then slide the parts together--you should
not need to clamp the assembly. Now rip and crosscut the
plywood bottom panels and screw each bottom to the
drawer back.
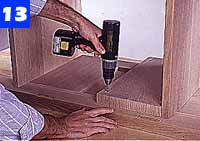
Install drawer slides in the case and drawer rails on
the drawers, using screws only in the slides'
positioning slots. Adjust the slides so the drawers move
smoothly and the drawer faces have a 1/16-in.-wide
margin on all edges. Install the remaining
screws. |
|
|
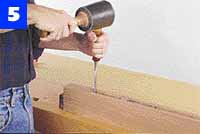
| Cut out the
profile on the top edge of each drawer front. Next, use
the router to cut the cove along the
edge. | |
|
|
|
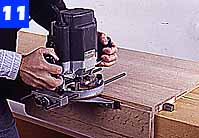
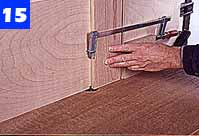
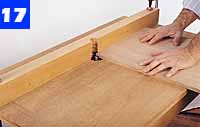
The cabinet door is built in essentially the same way
as the rest of the cabinet. Keep in mind, however, that
the panel groove is only 3/8 in. wide, so you must cut a
shallow rabbet around the inside edge of the panel. To
do this, use a straight bit in the router table, and
push the panel slowly over the bit (Photo 17).
Cut the cross-grain rabbets first, then cut the rabbets
along the grain. Any small amount of grain that is torn
out while cutting across the grain will then be
removed.
Like the drawers, the door is installed on the case
with a 1/16-in.-wide space on all four sides. Transfer
the locations of hinge mortises to the door edge, and
then cut the mortises using the same techniques you used
on the case. Mount the door pull and catch. The pull
shown in the photo has been discontinued, however, a
pull that looks similar to it is specified in the
materials list. |
|
|
| Install a
straight bit in the router table, and then slide the
door panel over the bit to cut the rabbet on the inside
panel edges. | |
|
|
|
For staining, remove the door, drawers, back and all
hardware. Sand all parts as you did the side panels. We
stained our cabinet with water-soluble aniline dye-based
stain (Brown Mahogany, Item No. W1370, Woodworker's
Supply, 1108 N. Glenn Rd., Casper WY 82601;
800-645-9292).
This water-soluble stain is more resistant to
sunlight fading than other aniline stains, but it will
raise the grain--the water in the stain makes wood
fibers on the surface stand up, giving the surface a
fuzzy texture. To prevent this, wipe the wood surfaces
with a lightly dampened sponge, and let all the pieces
dry--this will raise the surface fibers. Next, gently
sand off the raised fibers using 220-grit sandpaper,
then apply the stain.
To finish the cabinet, apply three coats of Waterlox
Transparent according to the manufacturer's directions.
When the last coat is dry, burnish the surface with 4/0
steel wool, and polish it with a soft cloth. Complete
the project by reassembling all the pieces and
installing the cabinet hardware.
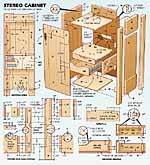
| MATERIALS LISTSTEREO
CABINET |
| Key |
No. |
Size and description
(use) |
| A |
4 |
1 3/4 x 3 3/4 x 54" white oak
(stile) |
| B |
4 |
1 3/4 x 10 x 15" white oak
(rail) |
| C |
2 |
1/2 x 13 1/2 x 30 5/8" white oak
(panel) |
| D |
2 |
1 x 3 7/16 x 44 7/16" white oak
(stile) |
| E |
1 |
1 x 4 15/16 x 15 1/2" white oak
(rail) |
| F |
1 |
1 x 10 x 15 1/2" white oak
(rail) |
| G |
1 |
1/2 x 14 x 30 5/8" white oak
(panel) |
| H |
1 |
1 x 6 x 20" white oak (rail) |
| I |
1 |
1 x 19 x 20" white oak
(shelf) |
| J |
1 |
1 x 18 3/8 x 21 1/4" white oak
(shelf) |
| K |
1 |
1 x 18 3/8 x 20" white oak
(shelf) |
| L |
1 |
1/2 x 22 x 45 1/2" plywood
(back) |
| M1 |
2 |
3/4 x 9 1/4 x 17 5/8" plywood
(blocking) |
| M2 |
2 |
3/4 x 1 x 9 1/4" white oak (edge
band) |
| N1 |
1 |
3/4 x 3 1/2 x 18 3/8" oak (drawer
face) |
| N2 |
1 |
3/4 x 5 5/8 x 18 3/8" oak (drawer
face) |
| O1 |
2 |
1/2 x 2 3/4 x 16 3/4" maple (drawer
side) |
| O2 |
2 |
1/2 x 4 7/8 x 16 3/4" maple (drawer
side) |
| P1 |
1 |
1/2 x 2 1/4 x 17" maple (drawer
back) |
| P2 |
1 |
1/2 x 4 3/8 x 17" maple (drawer
back) |
| Q |
2 |
1/4 x 16 1/4 x 17" plywood (drawer
bottom) |
| R |
2 |
3/4" No. 6 rh woodscrew |
| S |
as reqd. |
1" No. 6 rh woodscrew |
| T |
4 |
2 1/2" No. 8 fh woodscrew |
| U |
as reqd. |
No. 20 plate |
| V |
as reqd. |
3/8"-dia. x 2" wood dowel |
| W* |
3 |
1 5/8 x 3" butt hinge |
| X1** |
1 |
door pull |
| X2* |
1 |
door catch |
| Y** |
2 |
pair 16-in. drawer slides (Accuride
3037) |
| Z1** |
1 |
vent grille |
| Z2 |
as reqd. |
1/2" escutcheon pin |
| Z3** |
1 |
oak grommet |
| *Hinge (No. 106HI) and
catch (No. 141CD3) available from Whitechapel
Ltd., P.O. Box 136, Wilson, WY 83014;
800-468-5534. |
| **Drawer slide (No.
32813), vent grille (No. 62661), door pull (No.
62935) and grommet (No. 62372) available from
Rockler Woodworking and Hardware, 4365 Willow Dr.,
Medina, MN 55340; 800-279-4441. |
| Note: All plywood to be veneer- or
MDF-core with oak face
veneers. | |
|
|
|
|
|
|
|
|