Make an extra seat for the kitchen and get a mini step ladder into the bargain. By Malcolm Stamp
![]()
Make an extra seat for the kitchen and get a mini step
ladder into the bargain. By Malcolm Stamp
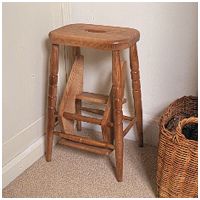
The first step stool that I made was fiendish to make, with a complicated mechanism. My sister bought one version and I sold the other six that I had made, but I produced no more as they took me so long to make.
Not long after this a customer brought in a lovely antique step stool for repair. It was brilliant: solidly built, everything in proportion, and simple. I took this and used it as the basis around which I created my current design of step stool, modifying some pieces which had proved not to be strong enough over the years and others which could be made more economically in a modern workshop. Over the years I have sold hundreds of these both at craft shows and from the workshop, even another one to my sister who is a lady of impeccable taste. Lastly, I have one that adorns our kitchen which is now an indispensable item of furniture.
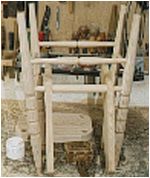
Preparation
![]()
This is a lovely piece of furniture to make: it looks good and it is easily made with no templates. If more than one is to be made however then the templates are really a must if they are to be made economically. Any of the usual hardwoods may be used; I even mix them sometimes to good effect. It is another of those projects that is great for using up all those odds and ends of timber.
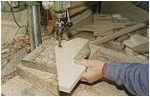
Cutting Out
![]()
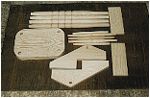
For the seat, first cut out the timber to size and plane it top and bottom. It should then be put in the circle-cutting jig to have a three-inch radius put on all the corners. Needless to say if you don't have a bandsaw, you can chop the corners off with a jigsaw. Two side cheeks may be cut out of the size of timber given in the cutting list for the side cheeks. It is something of a Chinese puzzle to get the two side cheeks out of the wood given, but you can. Cut the legs next and then the other smaller components out of the remaining scraps of wood.
Turning
![]()
The legs are quite long thin components for turning and can whip around a bit. Once the corners are knocked off, a hand judiciously wrapped around the wood behind the cutting tool can support the leg and stop it rattling around so much. I like to do most of the work of turning with a roughing gouge which removes great quantities of wood fast, only using a skew chisel to make the final cut. Any turnings can be used, whatever takes your fancy with the proviso that the leg should remain as close to full dimension as possible where the stretchers locate. As I normally make these in batches, I will do a turning unique to that batch which gives me a way of knowing when I built a particular stool. The step rotor can be a bit of a problem so check that the side cheeks will slide over it and make a nice snug fit but not so tight that it squeaks.
Drilling Holes
![]()
Drilling the holes for the seat should present no major problems. All the leg angles are the same and drilled using the template to get the correct line. If you can not run to a pillar drill then a hand drill is quite effective enough, just using a jig as an angle guide. The hole in the centre of the seat I leave until after the seat is assembled. To drill the holes for the stretchers it is necessary to put the legs in the seat. I have a right angle drill attachment that fits on the drill to reduce its effective length radically. This allows me to drill the stretcher holes with the legs in position thereby ensuring that I get all the angles correct. If you can not get your drill in between to make the holes then make a dummy leg which is shorter that you can use as a guide without it getting in the way. I use a flat drill bit that is cut short and has a depth of cut mark engraved on it.
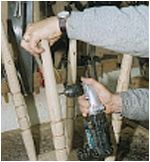
Assembly
![]()
This is the fun bit, there are a lot of pieces to put together in a short space so there is a need to be organised and understand where every thing goes. Start with the two cheeks for the steps; assemble them onto the step rotor. Place the step rotor and the lower stretcher into the holes in the front legs being very careful that the side cheeks are facing the correct way, it is too late to rectify it when the stool is glued up. Don't lock the joints up solid for the moment, as they need to be a little free to move for a while. Now gather up the two back legs and connect these up loosely with their stretchers. This whole assembly may now be positioned over the seat and the legs positioned into their sockets. Hammer the legs home at the same time as the stretchers are driven tight into their sockets.
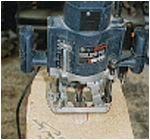
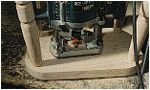
With everything secure, turn the stool the right way around and check that the step cheeks are rotating freely. Now is the time to finish the seat. Cut out the hole in the centre I use a jig in conjunction with a router and the appropriate bush (see photo) which makes life very easy when making a number of steps. Once again, for a one off, it would make sense just to drill a couple of holes and chop out between them with a jig saw. The final job on the seat is to round off the corners of the central hole and the seat edges, it is even possible to turn the seat upside down and round over the underside of the handle hole which makes it that bit more user friendly. The last job of all is to screw the step treads in place; there is no magic formula for this, just take care that the steps are able to rotate inside the stool.
Finishing
![]()
The customers favourite colour always seems to be light oak with an occasional request for a pine flavoured one. I use spirit stains sprayed on, which is especially suitable for intricately shaped objects like this. Follow this up with a coat of sanding sealer and a couple of coats of satin lacquer.