|
Snowman Basket
Size: 4" x 1.5" x 6" |
Easy to make and lots of fun, the Snowman Basket
measures 4" x 1.5" x 6". The base is an open plain weave, and the sides
are independent rows of 3/16" Flat Reed. The green stripe and small wire
Snowman complete this 1999 Holiday Ornament Basket.
To make the Snowman Basket you will need the following materials:
12 ft. 3/8" Flat Reed
2 ft. 1/4" Flat Reed (Dyed)
30 ft.3/16" Flat Reed
1 ft. #5 Round Reed
3 ft. 3/8" Flat Oval Reed
1 Small Side Handle (Item 2302)
1 Small Snowman Wire Hanger (Item 2438)
1 ft. Yarn (for Snowman's scarf) |
| 1. This basket can easily be woven
and shaped by hand or woven over a wooden mold. If you'd like to use a mold,
a two-by-four of wood is simple and easy to find. Cut off a 5" piece from
the end of a two-by-four. (The two-by-four will measure 1 1/2" x 3 1/2" x
5".) Sand the edges and corners of your mold with 100 - 150 grit sandpaper.
The edges should be round and smooth. Also, sand the sides of the mold if
needed. Notes: Work with your material fairly damp while weaving. Rinse
the dyed reed and wipe it with a paper towel before using. As you weave,
gently adjust the stakes to keep them vertical and to maintain a pleasing
shape. Keep your weaving even, and do not leave spaces between rows. |
|
2. Cut 5 pieces (stakes) 13" long from 3/8" Flat Reed.
3. Cut 3 stakes 15" long from 3/8" Flat Reed.
4. Cut 1 stake 13" long from 1/4" DYED Green Flat Reed. You now have 9
stakes for your basket.
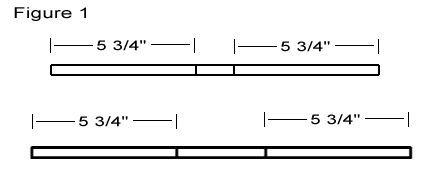
5. Mark each stake 5 3/4" from each end. Make the marks on the rough side
of the reed. See Fig. 1. |
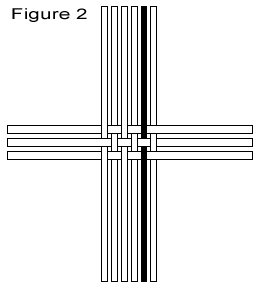
| 6. Wet your stakes and interweave them (rough side up) to
form a 3 1/2" x 1 1/2" base. Use the pencil marks as placement guides. See
Fig. 2. Holding the 3 15" stakes on the table, weave 4 13" long stakes, the
green 1/4" stake and the last 13" long stake across the 15" stakes. About 5
3/4" of each stake should extend beyond the woven base. |
 |
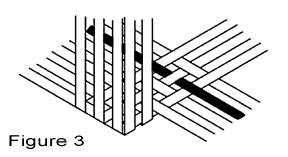 |
7. Re-wet the base. Bend each stake upward and crease each
stake at a right angle to the edge of the base. See Fig. 3. Now you have a
base with uprights. |
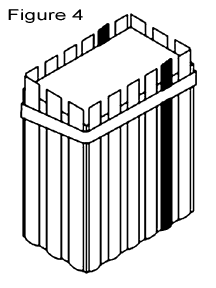
| 8. If using a mold, place the base on the end of your mold
and hold the uprights against the mold with a rubber band. Position the
rubber band at the end of the mold farthest from the base of your basket.
See Fig. 4. |
 |
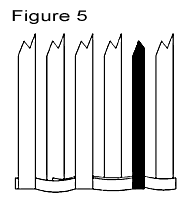 |
9. Using a wet thin piece of 3/16" Flat Reed, weave over and
under the uprights around the basket just above the base. When you have
woven completely around, cut the weaver to overlap on itself for a distance
of 4 uprights. Hide the ends of your weaver behind the uprights. Keep the
basket against the mold as you weave. Note: It's easier to weave if you
release the upright from the rubber band when you weave behind that upright.
Replace the upright under the rubber band and proceed with the next
"stitch." See Fig. 5. |
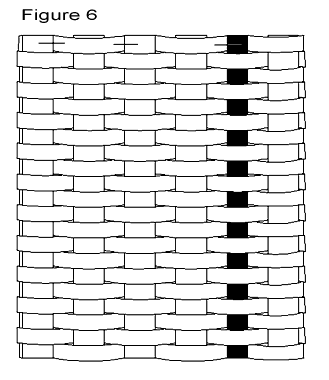
| 10. Start the second row on the opposite side of your
basket. Alternate the overlaps from one side to the other side as you weave.
After three or four rows of weaving, remove the rubber band from the mold.
IMPORTANT -The mold will get trapped in the basket unless you slide the
basket down the mold after weaving every 3 or 4 rows. There should be only 3
or 4 rows of weaving on the mold at any given time. If the basket will not
move, let it dry and remove 1 row at a time until you are able to slide the
basket down the mold. Continue weaving 2 or 3 rows, slide the basket down 2
or 3 rows, continue weaving, etc. until you have woven 19 to 21 rows.
Staple the top row of weaving to the uprights with a regular desktop
stapler. Staple 6 to 8 places (spread evenly) around your basket. Using
pliers, squeeze the tips of the staples into your reed if needed. Cut the
end of each upright even with the top of your last row. See Fig. 6. |
 |
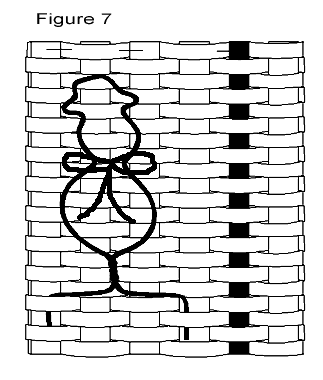
| 11. Insert the base of the wire Snowman behind some weavers
on the outside of your basket and tie the Snowman to the basket with a piece
of yarn. See Photo and Fig. 7.
|
 |
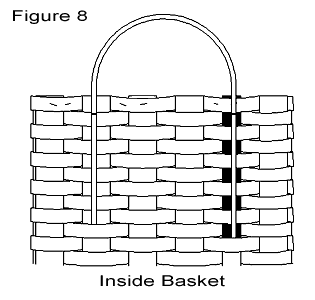 |
12. Position the handle in the center of the "back" of the
basket. Insert the ends of the handle behind a weaver on the inside of your
basket. The shelf notch should be level with the bottom of the top row. You
may have to sharpen or taper the ends of your handle so they will slide
behind the weaver. See Fig. 8. |
| 13. Cut your inside and outside rims from 3/8"
Flat Oval Reed. The outside rim length is the distance around the top of
your basket plus about 2" for the overlap. The inside rim will be a bit
shorter. Carve away some of the thickness where the rims overlap to form a
less bulky overlap. Cut a piece of #5 Round Reed for your rim filler. Soak
rims and filler; attach these with twist ties or clothespins around the top
row of your basket. (Place the flat side of each rim toward the basket.)
Position the inside rim overlap at the front of the basket and place the
outside rim overlap at the back. Push the #5 Round Reed down between the two
rims and either trim the ends of the #5 Round Reed to form an overlap or cut
the ends so they butt together. |
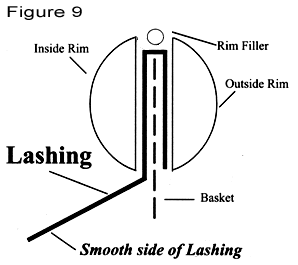 |
14. Secure a piece of 3/16" Flat Reed (from the inside of
the basket) between two uprights, under the inside rim, under the filler and
under the outside rim. Turn the lashing so that its smooth side will be out
as you lash over the rims. See Fig. 9. |
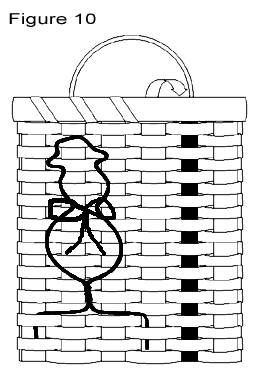
| 15. Working left to right from the outside of your basket,
lash over the rims and between each of the uprights. Pull the lashing tight
around the rims with each stitch. Remove the clothespins or twist ties as
you progress. See Fig. 10. |
 |
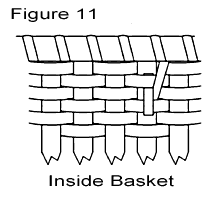
| 16. To finish, tuck the end of your lashing behind one
weaver on the inside of your basket. Bend that end upward and tuck it under
one weaver. Trim the excess lashing See Fig. l1.
Gently shape the basket if needed.
Enjoy your Snowman Basket! |
 |


