| Shopping List Holder Plan | 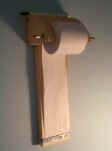 |
| Shopping List Holder Plan | |
This shopping list holder makes a great gift for an adult but many children decide to keep theirs.
Tools needed:
| Square | Pencil | Saw | Brace and No. 8 Auger |
 |
 |
||
| Twist Drill | Clamp | Coping Saw | Hammer |
Supplies you will need
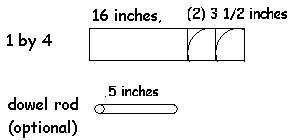
1 inch by 4 inches board, 2 feet long
7/16 inch dowel rod, 5 inches long -or- a pencil
6 finishing nails (1 ½ to 2 ½ inches long)
Wood Glue
Roll of adding machine paper (3 to 3 ½ inches wide - from an office supply store)
Serrated teeth from a foil or cling wrap box, 5 inches long
String (optional)
| Type of Saw | Wood Dimensions | Length to cut | How Many | What for |
| Crosscut saw | 1 inch by 4 inches | 16 inches | 1 | Back piece |
| Crosscut saw | 1 inch by 4 inches | 3 1/2 inches | 2 | Side pieces |
| Keyhole saw or coping saw | 1 inch by 4 inches | 3 1/2 inch radius quarter circles | 2 | Side pieces |
| Crosscut saw | 7/16 inch dowel rod | 5 inches | 1 | Roll holder |
This is a good project to use estimates rather than strict measurements (Helping Children Design their Project).
Perform the basic crosscuts on the wood:
Measure and draw a line across the wood using the square. Clamp the board to the
workbench and cut the wood.
The wood grain of side pieces should be oriented in the same direction as the wood grain on the back piece. After the project is assembled the pieces will all expand and contract in a similar way if the grains are oriented the same causing the joint to be stronger. Explain this idea to children while showing them the grain on each of the pieces of wood.
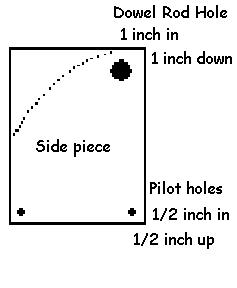
Drill the dowel rod holes with the brace and one-half-inch (No. 8) auger bit before sawing the quarter circles. Mark a point one inch in and down from one corner. Remember to put scrap wood under the exit hole to prevent break out. Clamp the wood securely so that the drilling is easier. Adults can help children by holding the ball of the brace so that it is straight and has more pressure on it. The child should put one hand on top of the adults and operate the crank. Even very young children love to use the brace (with an adult stabilizing it) and twist drills (with no help).
If curved side pieces are desired mark a curve on one of the side pieces with a
pencil. The curve can be marked freehand, using a compass or the edge of a
bowl. Cut the two quarter circles with either a keyhole or a coping saw. When
cutting shapes that are not strictly cross cuts it is best to clamp the piece to
cut down as much as possible. Clamp the wood bottom side up in a vice and rotate
the wood as the curve is cut. Most children will need help from an adult (at
minimum for encouragement).
Drill two pilot holes (with a twist drill and 1/16" bit) in each side piece 1/2 inch in from the edge.
Drill a hole in the Back piece about 1 inch down in the center with a 3/8" bit. This will be used to nail the shopping list to the wall without splitting the back piece.
2) Assembly:
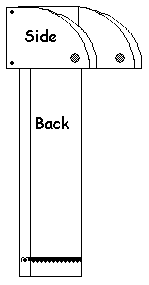
Glue the side piece in a line across both pilot holes onto the back piece. The adult helper should position the side piece onto the back piece and let the child hammer the finishing nails in through the pilot holes. Repeat for the other side piece.
Center and fold the sides of the serrated strip over the edges of the back piece. Nail the two ends of the serrated strip on the sides of the back piece. The adult should start the nail to get through the metal strip and start straight into the wood.
Optional: Tie string to a pencil or pen to be kept on the list holder and tie the other end to the dowel rod.
3) Finishing the Project:
The shopping list holder can be finished many ways. Children can paint it with any paint (or stencil or stamp it). The adult can then spray it with shellac. Or the wood can be easily finished by wiping it with Tung oil (wear gloves) or linseed oil.