 While it's not a
substitute for a sturdy workbench, a compact workstation like this will be
welcomed when you need some extra bench area in the shop. With four casters
it easily rolls out from the wall, so you can work completely around the
bench ? a feature we find helpful for many projects. Also, since glue won't
stick to the plastic laminate top, it makes an ideal glue?up table. The
casters have a brake, allowing the workstation to be locked in place. A
lightduty vise is not mandatory, but we find it often comes in handy.
While it's not a
substitute for a sturdy workbench, a compact workstation like this will be
welcomed when you need some extra bench area in the shop. With four casters
it easily rolls out from the wall, so you can work completely around the
bench ? a feature we find helpful for many projects. Also, since glue won't
stick to the plastic laminate top, it makes an ideal glue?up table. The
casters have a brake, allowing the workstation to be locked in place. A
lightduty vise is not mandatory, but we find it often comes in handy.
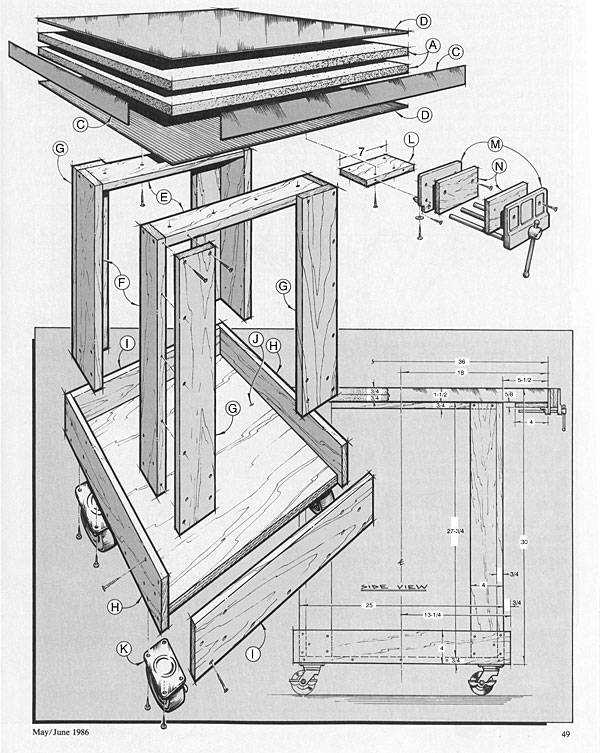
The top (A) can be made first. Cut two pieces of 3/4 in. thick particleboard to 36-1/4 in. square, then apply a thin coat of white or yellow glue to each of the mating surfaces. Clamps can be used to apply pressure at the edges while several 1-1/4 by no. 8 flathead wood screws are driven to apply pressure at the center. Be sure to countersink the screw heads just below the surface. Allow the top to dry before using the table saw to trim it to 36 in. square.
| Part | Description | Size |
Number Required |
| A | Top | 3/4 x 36 x 36 | 2 |
| B | Upper Laminate | As needed | 1 |
| C | Laminate Edging | As needed | 4 |
| D | Lower Laminate | As needed | 1 |
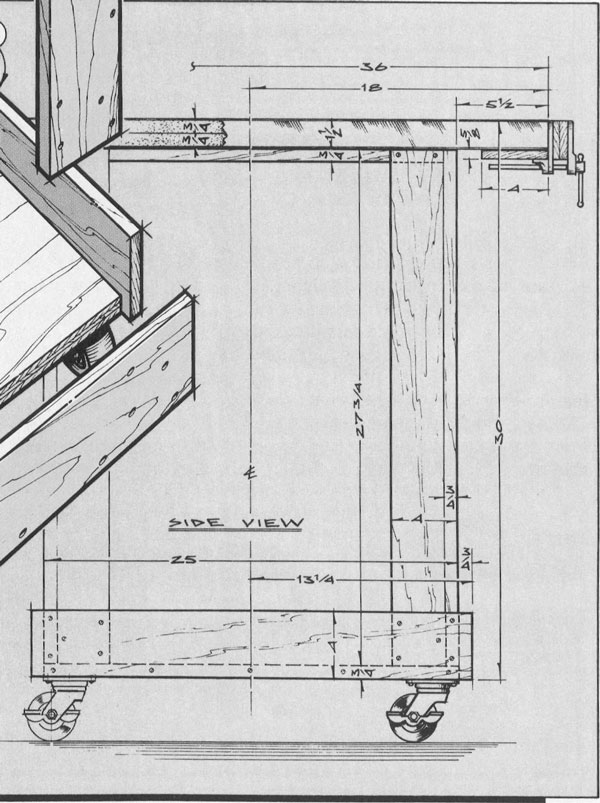
| E | Stretcher | 3/4 x 3-1/4 x 23-1/2 | 2 |
| F | Narrow Leg | 3/4 x 3-1/4 x 27-3/4 | 4 |
| G | Wide Leg | 3/4 x 4 x 27-3/4 | 4 |
| H | Long Apron | 3/4 x 4 x 26-1/2 | 2 |
| I | Short Apron | 3/4 x 4 x 25 | 2 |
| J | Bottom | 3/4 x 25 x 25 | 1 |
| K | Casters | 3 inch | 4 |
| L | Vise Cleat | 5/8 x 4 x 7 | 1 |
| M | Vise | 4-1/2 inch capacity | 1 |
| N | Vice Face | Made to fit the vise | 2 |
Apply the lower laminate (D) first. Cut it about X in. oversized all around, then glue it in place with contact cement. A router with a laminate trimming bit is used to trim the edge of the laminate flush with the top. Next, following the same procedure, apply the laminate edging (C). The upper laminate (B) is added last.
The two stretchers (E), four narrow legs (F), and four wide legs (G) can now be cut to size from 3/4 in. thick stock. Using glue and flathead wood screws, the parts are assembled as shown in the exploded view.
Next, cut the bottom (J) to 25 in. square from 3/4 in. thick plywood stock. The two long aprons (H) and the two short aprons (I) can now be cut to size, then glued and screwed to the bottom as shown.
Join the leg assemblies (parts E, F, and G) to the base assembly (parts H, I, and J) with glue and wood screws. Check for quareness as the parts are assembled.
The casters we used have a brake, a feature we find useful with our workstation.
The vise (M) is a Jorgenson Pony Vise. It has a twin guides ensure smooth operation. Jaw faces measure 3-3/4 inches X 7 inches with an opening capacity of 9 inches. To keep the top edge of the vise flush with the work surface, the vise cleat (L) was added as shown. Two coats of paint were applied to the leg and base assemblies; then the laminated top was attached to the leg assemblies using four wood screws driven through each stretcher and into the underside of the top. The addition of a pair of vise faces (N) completes the project.