Scroll picture frame
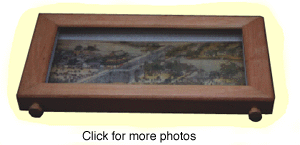
This scroll frame was one of the more unusual challenges that I have been given in the past couple of years. A relative had picked up a Chinese scroll while on vacation and needed a method of displaying it on the wall. However, the scroll is about 20 feet long - too long to fit in a small apartment - and so we needed to develop a method of allowing a section of the scroll to be viewed at a time, but with the ability to easily (and the word "easy" was stressed to me) change the view. The result was this Cherry scroll cabinet which has small dials underneath it to allow the scroll to be moved on or rewound as required.
Although not relevant to the actual making of the project, it is interesting to note the origin of this scroll (which is a replica). The scroll is entitled "A city of Cathay." It is a joint work painted by five court painters Ch'en Mei, Sun Hu, Chin K'un, Tai Hung and Ch'en Chih-tao during the first year of Ch'ien-lung reign (1736-1795) in the Ch'ing dynasty.
Construction
Tools required: saw, sander, drill, jigsaw (or preferably a bandsaw)
Wood required: (Cherry)
| Description | Qty | Width | Thickness | Length | |
| Rear sides | 2 | 3" | 1/2" | 13 1/2" | |
| Rear top and bottom | 2 | 3" | 1/2" | 30" | |
| Front-facing sides | 2 | 3" | 1/2" | 13 1/2" | |
| Front-facing top/bottom | 2 | 2 1/4" | 1/2" | 30" | |
| Dial knob | 2 | 1 1/2" | 1 1/2" | 1/2" | |
| Dial dowel | 2 | 7/8" | 7/8" | 1/2" | |
| Joining dowel | 2 | 3/16" | 3/16" | 2" | |
| Collar | 2 | 1" | 1" | 1/2" | |
| Scroll dowel | 2 | 1/2" | 1/2" | 12" | |
| Plywood disc | 2 | 2 1/2" | 1/8" | 2 1/2" | |
| Top scroll dowel | 2 | 3/16" | 3/16" | 1 1/4" | |
| Glass restraints (side) | 2 | 1/4" | 1/4" | 9" | |
| Glass restraints (top/bottom) | 2 | 1/4" | 1/4" | 18" | |
| Back restraints (side) | 2 | 1/4" | 1/4" | 9" | |
| Back restraints (top/bottom) | 2 | 1/4" | 1/4" | 18" | |
| Back wall (plywood) | 1 | 12 1/2" | 1/8" | 28 7/8" |
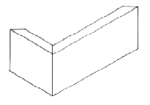
The first step towards building the scroll frame is to build the rear frame. Cut the four rear pieces to size, with a 45 degree miter at each end of each piece. Then glue the sides, top and bottom pieces together to from a basic frame that is 3" deep (see diagram). Make sure that this frame is square when gluing and subsequently clamping.
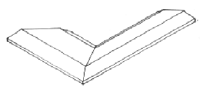
Next, cut out the four pieces that make up the front-facing frame. The two side pieces should be cut at an angle of 55 degrees while the two top/bottom pieces should have an angle of 35 degrees (thus the combination of putting a side piece together with a top/bottom piece would result in 35 + 55 = 90 degrees). The reason for the odd angle, rather than the more usual 45 degree cut is due to the disparity in wood width between the sides and top/bottom pieces (see diagram).
![]()
Next, cut a 45 degree bevel along both of the front facing sides (see diagram for side profile). This is done to avoid the problem of making a frame that is too square and "boxy." The bevel is cut into both the inside edge and the outside edge (obviously on the side that will be the up-facing side) and will later be sanded down to round out the project.
Once all the pieces are cut to shape, glue the front pieces onto the underlying frame (and to each other). To attach the front pieces to the underlying frame use small brad nails (sink these nails just below the surface and use filler to tidy up the small holes). Ensure that the front pieces are tightly pressed together (and square) before nailing into place. Once the glue is dry, sand the unit heavily to produce a rounded feel to the beveled edges. The main unit is now complete and we can now begin to concentrate on the scroll mechanism
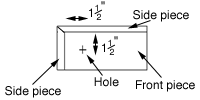
Before we work on the actual scroll mechanism, nominate which end of the main frame is the bottom. Then mark positions for holes in the bottom side of the frame. These holes should be 3/16" diameter, and should be 1 1/2" from the side and 1 1/2" from the top of the inside (see diagram). Drill these holes all the way through. These bottom holes will be used to connect the underneath dials to the internal scroll mechanism. Then, make the same marks on the inside of the top frame (i.e. 1 1/2" from the side and 1 1/2" from the back) and drill a hole 1/4" deep. Important note: this hole does not go all the way through. The top of the internal scroll mechanism will sit in this hole.
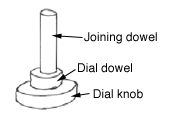
To build the scroll mechanism, first cut out two circular pieces of cherry that are 1 1/2" diameter and 1/2" thick. These will be the small dial knobs that sit underneath the scroll frame. Drill a hole 1/4" deep and 3/16" diameter into the center of one side of these knobs. This will accommodate the small joining dowel that attaches the dial knob to the main internal mechanism. Next, cut two pieces of dial dowel 7/8" diameter and 1/2" long and drill a hole 3/16" diameter through the center of each one. These small dowels will sit between the dial pieces and the main frame (see diagram for more information).
Now that we have prepared all of the components that make up the dial knob, build the complete construction by gluing the dowel and dial knob pieces together, with the 3/16" diameter (2" long) dowel through the middle of it. Repeat for the second dial unit.
Once the dial knob is complete, it is time to work on the internal part of the scroll mechanism. First, take the 1/2" diameter scroll dowel (12" long) and drill a 3/16" diameter hole that is 3/4" deep in each end. This may seem a little tricky to begin with but is actually very easy. It is important to take the time to make sure that you are drilling the hole in the center of the dowel, however. To make sure that you drill to the correct depth, measure along the drill bit to the correct distance and then wrap some tape tightly around the drill bit just above this point. Once the tape reaches the surface of the wood, you will know that you have drilled deep enough.
Glue a 3/16" diameter, 1 1/4" long dowel into one end of each scroll dowel. This should result in 1/2" sticking out. This will be the top end of the scroll dowel. The small 3/16" dowel protruding from the top of the scroll dowel will slot into the small hole made in the inner frame previously (thus holding the top of the scroll dowel in situ). Lightly sand this small dowel to ensure that it will not stick unduly when placed in the hole.
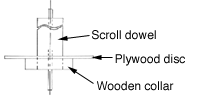
Cut a small wooden collar out of some 1/2" thick cherry stock. The collar should be 1" diameter and should have a hole in the center of it that accommodates the scroll collar (1/2" diameter). Once the collar is complete, cut a disc of plywood (1/8" stock) that is 2 1/2" diameter. Again, drill a hole that is 1/2" diameter in the center of it to accommodate the scroll dowel. Note that it is often easier to drill the hole in the plywood (and the collar) first, before then cutting the collar/disc to the correct size.
Now prepare the scroll by stapling and gluing one end of the scroll to each of the scroll dowels. The best glue to use for this is an almond paste or other paper glue. While wood glue will work adequately, a paper-specific glue will give better results.
At this point, finish the dial unit and main frame by either waxing or varnishing. We chose to use a rub-on varnish which gives a nice rich finish (and requires little maintenance moving forward), but whatever type of finish you want is perfectly acceptable. It is important to apply the finish now, before putting the mechanism together in order to ensure that the finish does not glue up the mechanism.

Once the finish is dry, place the glass into the frame and add in the glass restraining pieces. To stop the glass from rattling we recommend that you apply a thin sliver of felt between the restraint and the glass. This allows you to push down more on the glass, giving a tighter fit. To attach the restraints, screw through the restraints into the side walls of the frame. Position the restraints in the center of each frame side.
Now put the scroll components together, as shown in the diagram above. Note that the dowel that protrudes from the dial unit, though the main frame and into the scroll dowel should not be glued into this scroll dowel. Instead, it should be attach via a screw that goes through the collar, into - and through - the scroll dowel and into the dial dowel. Note that to ensure that the wood does not split when attaching this screw, drill a small (1/16" diameter) hole through the collar and scroll dowel.
Once the mechanism has been installed, and the scroll moves freely when the dial knobs are rotated, it is time to add the back to the frame. To do this, we must first add in the back wall restraints. These are attached via screws (as with the glass restraints). Do not be tempted to use nails as if you do so, you will not be able to replace the glass if it breaks. The back wall restraints should be positioned in the center of each side 1/4" from the back (thus leaving room for the back wall to slot in without overlapping the sides).
Finally, add in the back piece of plywood and attach it by nailing small brad nails part way into the side walls, thus loosely holding the wall in place (but still allowing removal of the nails and back wall if you need to get inside the frame again.