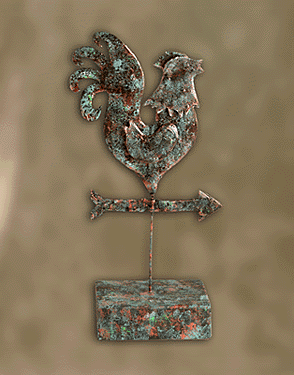
Rooster Weathervane
Materials Needed:
Instructions:
For best results, please read all instructions before beginning project. Refer to photo for color and design placement.
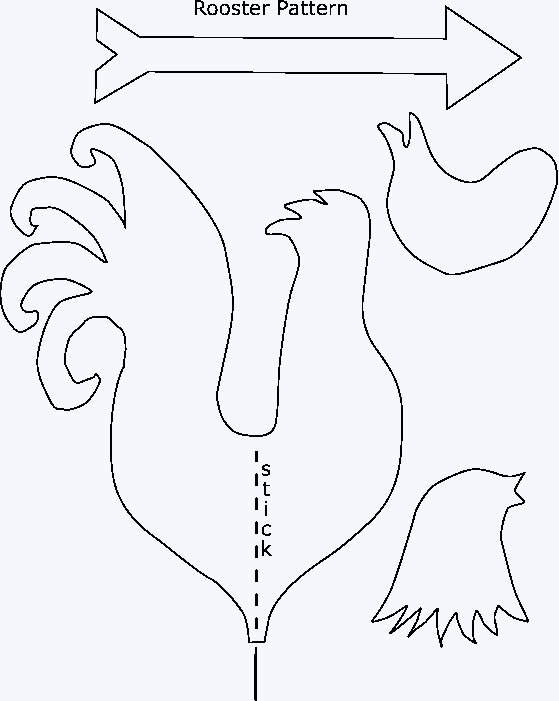
| 1. | Cut off the bottom section of the paper bag and cut up back seam. Open bag and trace pattern onto the inside of the bag. Be sure to save space on the bag as you will need four to five layers of brown bag for each pattern piece. The printed side of the bag will be glued to the inside. |
| 2. | To glue the layers of the brown bag together, use a piece of cardboard to squeegee the glue onto the back of the bag with the pattern. Repeat process until all layers are glued together. Place wood skewer between the last layers, lining up with pattern on the front. Let dry. Cut out with scissors. Continue process for the rooster head, wing and arrow. The head and wing will be burnt before attaching to the rooster body. The arrow will be glued to the stick before burning the glue. |
| 3. | For a metal look, wet glue and, using your finger, apply to the prepared brown bag rooster shape. Immediately place as close over candle flame as possible, being sure not to snuff out the candle. Move the design around over the flame until all of the glue is black and sooty. The burning process takes about 1-1/2 to 2 minutes and will produce a little smoke. Using a scrap of fabric, gently wipe away soot. If any brown bag shows through, the glue is not completely burned. To finish the burning process, hold the piece over the flame again. To create a textured surface, use a scrap of fabric to press and mold the soft glue, slightly ruffling the surface as you wipe away the soot. Repeat with the rooster head, body and arrow. Let dry overnight. |
| 4. | To finish the metal-look rooster, apply Gold acrylic with the tip of your finger, lightly rubbing over the surface, being careful not to use too much Gold. |
| 5. | For a patina/verdigris look, dab a small amount of Copper onto surface with sponge. Repeat using Dusty Spruce or Verdigris. Sponge True Green and White here and there for highlights. |
| 6. | Let dry. |
| 7. | Insert skewer in base. |