
| MATERIALS LIST | ||
|---|---|---|
| Part | Dimensions | Quantity |
| 1. Rocker | 3/8" x 3 1/2" x 11" | 2 |
| 2. Spacer | 3/4" x 1" x 2 1/2" | 1 |
| 3. Links | 1/8" x 1" x 2 1/2" | 2 |
| 4. Pins | 1/4" dia. x 1 3/4 | 2 |
| 5. Pins | 1/4" dia. x 1 1/2" | 2 |
| 6. Body | 1/2" x 4 1/2" x 9 1/2" | 1 |
| 7. Front Legs | 1/4" x 1 1/4" x 4" | 2 |
| 8. Rear Legs | 1/4" x 1 1/2" x 4" | 2 |
| 9. Pins | 1/4" dia. x 1" | 2 |
| 10. Support pin | 1/4" dia. x 4" | 1 |

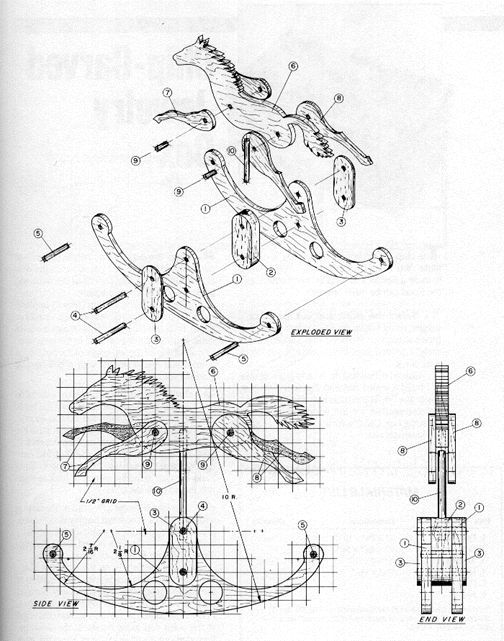
1. Select the stock. Make the pins from dowels. Note the flat pieces are made from several different thicknesses of wood. For the greatest strength, orient the wood grain as shown in the drawing.
2. Transfer the pattern and cut the parts to shape. Draw a grid with 1/2-in. squares. Enlarge the individual parts of the drawing onto it to make five different patterns. Transfer the enlargements to the wood and cut out all the parts. Drill the holes for the dowel pins and the two decorative holes in each rocker. Sand thoroughly.
3. Assemble the base. Stack the rocker, spacer, links, and pins (parts 1, 2, 3, 4, and 5); align the holes. Brush glue on the dowel pins and drive the pins through the holes. Clamp the pieces together. When the glues dries, drill a hole in the top of the spacer for the support pin (part 10).
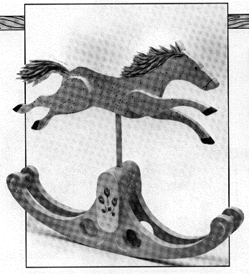
4. Assemble the horse. Stack the body, front and rear legs, and pins (parts 6, 7, 8, and 9) and assemble as above. Then spread glue on the ends of the support pin and mount the horse.
5. Apply finish. I suggest pastel colors for this project.