Portable Wood and Wire Composting Bin

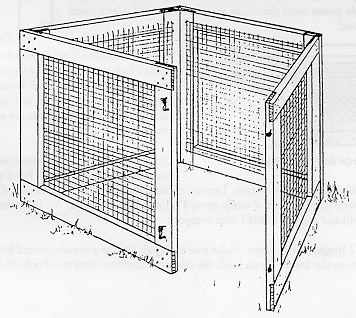
This portable bin, which holds approximately 1 cubic yard of material, provides a convenient way to compost moderate amounts of yard waste with minimal labor. Yard waste is simply added to the bin as it is generated. With little effort, except for occasional moistening during dry weather, compost will be ready in 6 months to 2 years. Chopping or shredding the materials, maintaining adequate moisture by watering or covering with plastic or other suitable material during rainy weather, and occasional turning of the materials will speed up the process of producing finished compost. Mixing fresh greens, such as grass clippings, with brown yard wastes, such as fallen leaves, will produce the best results.
This bin is very versatile. It fits well in small spaces and may be used as either a yard waste holding bin or as a portable turning unit. The bin can be easily moved to turn piles or to harvest finished compost and begin building a new pile; simply undo the gate latches, pull the sides apart, and move it. Compost can then be turned into the bin at its new location and finished compost can be removed. Costs will vary with current lumber prices. Costs will be less if recycled materials are used.
Materials Needed
Tools
Hand Saw and chisel or
Circular Saw or
Table Saw or
Radial Arm Saw with dado blade
Hammer
Screwdriver
Tin Snips
Pencil
Carpenter's Square
Construction Details
Cut each 12' 2 x 4 board into
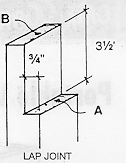
four 3' pieces. Allow for the saw kerf (saw cut). Cut a lap joint (below) 3/4"
deep and 3 1/2" wide at both ends of each 3' piece. There will be 32 such lap
joints. If using handsaw and chisel, cut 3/4" down at the 3 1/2" line (at A in
diagram). Then cut 1/4" deep groove into the end of the board (at B in
diagram). Place a wide wood chisel into the end groove. Use a hammer to help
split wood to the 3 1/2" cut. If using a radial arm saw, circular saw, or
table saw, set the depth of cut to 3/4" and make multiple passes until the
whole section is removed. Use a wood chisel to remove any excess wood.

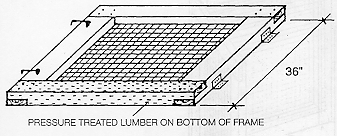
Make four 3' square frames from
the lap jointed 2 x 4's. Use one 3' length of pressure-treated 2 x 4 on each
frame. Fasten each joint with four screws; two screws on each side. Check that
frames are square (by measuring the diagonals).

Cut the hardware cloth with tin snips into four 3' square sections. Bend the edges of the cloth back over 1" on all four sides of each section. Lay one section on each of the four frames. Center and tack each corner with poultry wire staples. Place a staple every 4" along all four edges of the hardware cloth. Try to tension the cloth so it will not snag when filled with compost.
Pair the frames together using 2 hinges at the joints. Make sure each pair has the pressure-treated boards on the bottom and the hardware cloth on the inside. Then latch the two pairs together using two hook-n-eye gate latches at the corners.