|
Make the
Screen Before cutting the panels out, let's talk about plywood selection. When you purchase the ply for this project, you want to make sure you get a nice sheet of material. Look for book-matched veneer panels with a pattern centered on the 4' x 8' sheet. Start by cutting out the parts according to the Schedule of Materials. Crosscut the sheet first then lay out the cuts for the panel rips. |
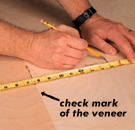
After crosscutting the panel to length, begin laying out the rip cuts by finding the center mark of the bookmatched veneer pattern. Lay out the center panel first and then the outer panels. |
Edge
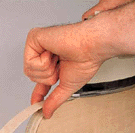
Taping Lay out and cut the radiused corners on the outside panels and cut out the 6" radius semicircles on the bottom of the panels. After cleaning up these cuts, apply heat-sensitive edge tape to all of the panels. File the edge tape flush and finish sand the panels to 220 grit. |
The proper way to iron on edge taping is to heat the tape with a household iron (don't tell your spouse you're doing this) and apply pressure with a roller while the hot melt glue is still soft. |
An Arc
on Top The distinctive arced trim on top of the screen is simply a lamination of three pieces of thinner wood, cut at the panel joints and doweled in place on top of the screen. Begin making the arc by milling out blanks of maple and cherry a little larger than the size given in the Schedule of Materials. Lay out the arc using the method suggested in the caption. Cut the arcs out on the band saw and sand the edges. Finish sand to 220 grit and find a spot to do the laminating. Start by making sure that your work surface is clean and flat. Mark the centers of each arc on its bottom edge. I used a fast-tack glue to laminate the arcs. This worked well because it has a short open time and you don't have to put a lot on the surface to get a good joint. Apply glue and line up the three pieces with the center line flush on the bottom edge. Place the first clamp on the center with a backing strip of wood. Add more clamps as needed. Make sure to check the bottom edge for slippage and adjust accordingly. When the glue is dry, clean off the bottom edge and joint if necessary. Apply the 4" medallion to the front of the arc with glue and small nails. On your work surface, place the panels together as they would be attached. Place the arc on the top edge and center it on the assembly. Mark where the joints are and follow them to the top edge of the arc. Using a handsaw, cut the arc into three pieces. Clean up the sawn edges with a block plane and dowel the pieces into their respective panels. You can glue these arc sections in or leave them loose. I left mine loose to make it easy to move the screen. Apply two coats of clear finish to all the panels and arc sections. Go ahead and rout the notches for the double-swinging hinges and attach them. |
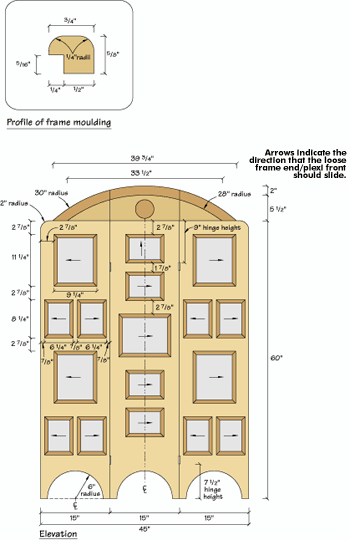
The easiest way to make this radius is to get a piece of butcher paper for layout. Lay down a center line and mark a square line at one end. Mark off the two radii from this mark as well as the two trim heights. Determine the bottom edge of the wood trim and set it on the appropriate trim height mark. Using trammel points, lay out the radius according to the diagram. |
Cutting
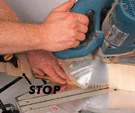
Moulding After attaching the hinges, set the screen aside. Make the moulding according to the diagram. It takes about five 8' lengths to make all of the moulding. After sanding, apply two coats of clear finish to the moulding stock. Take the moulding that you made and begin cutting the frame parts as shown in the photo. After setting your chop saw to 45 degrees, make the first miter cut by trimming the end of a long piece of moulding with the top down and the rabbet against the fence. Then turn the moulding around with the rabbet facing you. Put the piece against your stop and make the second cut. Be careful and accurate. Your results will speak for themselves. Never get complacent in these repetitive operations and pay attention to where the saw blade is at all times. Safety first. |
Setting your miter saw to the left will decrease kickbacks when making repetitive cuts. Screw a piece of plywood across the blade as a fence and cut through it with your saw set to 45 degrees. Measure from the inside of the miter cut to the left for the four different lengths. Cut the longest lengths first. |
Nailing
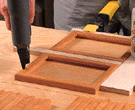
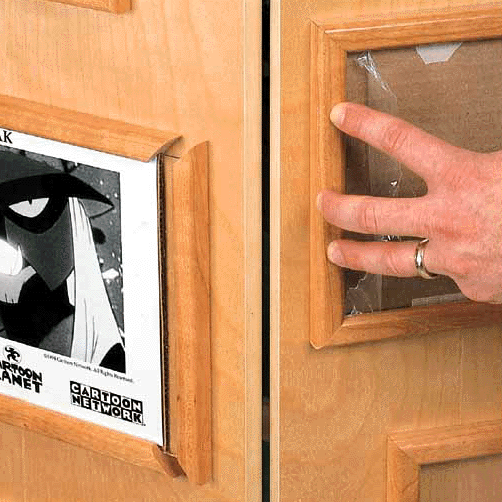
the Frames After the frame pieces are cut, lay the screen on a flat, soft surface such as a piece of cardboard or a blanket. Begin laying out the frame locations according to the diagram. To make this easier, cut the spacers in the Schedule of Materials to locate the first two frame pieces in each frame. Attach the frames as shown in the photo. |
The object is to nail down three pieces with some of that fast-tack glue and leave the fourth side loose so it can slide out when the Plexiglas is attached. All of the loose sides on the panels should slide to the left or right. It doesn't matter which way, just that you can get past the double-swinging hinge barrel when you slide out the Plexi-frame end. The only exception was the top frame on the middle panel, which slides up. |
Mount a
Picture After mounting all the frames, it's time to attach the Plexiglas to the loose frame parts. Stand the screen upright for installing the Plexi. This lets the Plexi settle out in the frame. Check to make sure that the Plexiglas fits into the opening in the frame piece. Next, slide a piece of cardboard into the opening. Peel back the protective plastic that covers the front of the Plexiglas and insert it into the frame. Shim it out until it is pushed all the way forward in the frame. Mount as shown in the photo. Finally, if you need to place a photo only, cut out a cardboard backer to fill the opening. If you have a matted photo, simply make sure that the matte fits the opening. |
Take the fourth frame piece and attach it to the Plexiglas with cyanoacrylate glue while it is in place. Gently pull the frame piece and Plexiglas assembly out of the frame. |
No. | Item | Dimensions (T W L) | Material |
3 | Panels | 3/4" x 15 " x 60" | Birch plywood |
1 | Arc cap | 3/8" x 7 1/2 " x 40" | Cherry |
2 | Arc cap | 1/8" x 5 1/2" x 34" " | Maple |
1 | Medallion | 1/4" x 4" diameter | Cherry |
10 | Lrg. frame pieces | 5/8" x 3/4" x 11 1/4" | Cherry |
10 | Lrg. frame pieces | 5/8" x 3/4" x 9 1/4" | Cherry |
24 | Sm. frame pieces | 5/8" x 3/4" x 8 1/4 " | Cherry |
24 | Sm. frame pieces | 5/8" x 3/4" x 6 1/4" | Cherry |
12 | Face Plexi | 1/4" x 3 3/16" x 4 1/8" | Plexiglas® |
5 | Face Plexi | 1/4" x 3 3/16" x 3 " | Plexiglas® |
2 | Spacers | 1/4" x 2 15/16" x 3 7/8" | Plywood |
2 | Spacers | 3/8" x 1 " x 1 " | Plywood |
2 | Spacers | 1/4" x 2 15/16" x 3 7/8" | Plywood |
Hardware: Four double-swing hinges, Edge tape Plexiglas: Available at most large hardware stores (Home Quarters, Home Depot, Lowes, etc.). |