|
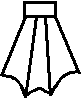
Cut feet in one of the shapes to the right out of green construction paper. Bend the tabs at the top of the feet and glue or tape the tabs onto the INSIDE of the paper bag. That will give the feet a 3D floppy feel. |
|
MATERIALS NEEDED:
a paper lunch bag
a printer and paper
green paint (or construction paper)
scissors
glue and/or tape
something to color with
GET FAMILIAR WITH YOUR PAPER BAG:
We're going to hop on through this
slowly, so bear with me.
Look at your paper bag.
It should be closed and flat like a piece of paper. Just like when they are brand new.
On one side, it's all smooth. This will be the BACK of your puppet
It's important that all the kids get the back and front straight at the beginning!
On the other side there's a flippy tab (which is typically the bottom of the bag when you're carrying your lunch around...)
This flippy tab will be the puppet's HEAD
Lift the flippy tab up a bit. Underneath of the FLAP will be the puppet's mouth,
When the child put's her hand in the bag, she'll be able to make the puppet talk.
Look at the rest of the front of the bag. (The 3/4 or so of the bag below the part with the flippy tab) This will be the BODY.
Look at the sides of the bag. There should be a SIDE FLAP of paper.
We'll be slipping the arms into this flap.
If the kids goof and glue the arms onto the front or back of the bag, it isn't a big deal.
OK, now that we're comfy with our bags, let's craft (you can always peek at the photo above if you get confused)!
PUTTING THE PUPPET TOGETHER
Paint the front of your paper bag
green (we don't have many paints in our house -- just red, yellow, blue, black
and white. We mix all of our own colors which is loads of fun for the girls).
Set aside to dry.
OR
As an alternative to painting:
trace the body of the paper bag and the head of the paper bag onto green
construction paper. Cut it out and glue it to the bag.
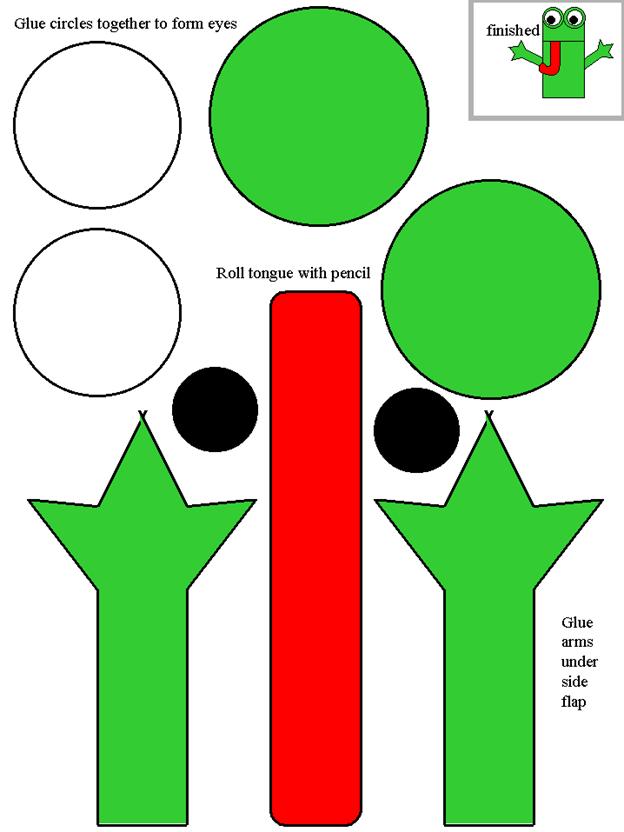
Print the template pieces.
Color the largest circles and arms green (or whatever color your frog is going to be
Color the long rectangle (ish) piece red (FRONT AND BACK!)
Color the smallest circles black
Cut out the pieces
Put one of the green circles in
front of you. Glue the medium sized (white circle) onto it. Glue the small
(black) circle onto that. Repeat with the other set of circles. Now you have
two eyes!
Take the red long rectangle and
wrap it around a pencil to give it a curl. This will be the tongue.
By this time, your bag should be
dry.
Glue the eyes onto the top of the
HEAD. You can see from the photo above that
the eyes stick up over the top of the head.
OPTIONAL: draw two tiny black
lines (nostrils) onto the head.
Lift the
FLAP and glue the tongue underneath.
Glue the arms into the
SIDE FLAP. When you do this, glue or tape
them onto the top of the flap not the bottom. That way when you're using the
puppet, it's arms will reach forward in a hugging motion instead of bending way
backwards.
OPTIONAL: You can personalize your basic frog puppet in a lot of ways. By this point the Age 2 thru 4 group will be happy (going further may make the project too time consuming for their young attention spans), but older children might like to extend the craft. Here are just a few ideas for them:
put a construction paper or gift wrap bowtie on the frog
Draw marker or paint speckles/warts/dots on your frog's body
Take a small black pom pom. Attach some wax paper wings and small googly eyes to make a fly. Glue it to the frog's tongue.
Glue something into the frog's
hand
OR
Put a small piece of velcro on the frog's hand. Put Velcro on numerous objects. That allows you to change the frog's "props" during a puppet show. If you chose to do this, you'll want to back the frog's arm with a thin piece of cardboard (old cereal box) so it doesn't flop around.
Glue some construction paper
froggy feet to the bottom of the bag
|
Cut feet in one of the shapes to the right out of green construction paper. Bend the tabs at the top of the feet and glue or tape the tabs onto the INSIDE of the paper bag. That will give the feet a 3D floppy feel. |
|
Template: