New Baby Gift
Materials Needed:
Aluminum foil
Batting, approximately 16" x 20"
Embroidery floss
Fabric:
Stamped panels, enough for (4) 5” x 5" squares (we used pink checked and blue
striped)
Side strips and letter area, enough for (2) 2-1/2" x 15" strips; (2) 2-1/2" x
10" strips; letters (we used a fuchsia floral print)
Corners, enough for (4) 2-1/2" x 2-1/2" (we used a yellow floral print)
Area containing name, enough for (1) 5" x 10" piece (same print as for corners)
Area above stamped panels, enough for (1) 3” x 10” piece (same print as for
corners and name)
Tabs for hanging, (2) 5" x 8" pieces
Back of quilt, approximately 16-3/4" x 20-3/4" (we used a yellow print)
Iron
Needle and thread
Pencil
Waxed paper
Instructions:
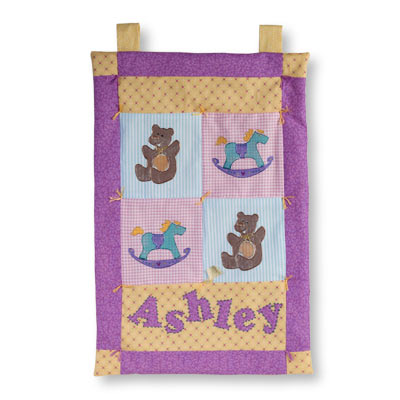
For best results, please read all instructions before beginning project. Refer to photo for color and design placement.
| 1. | Painting the Panels Cover work surface with waxed paper. |
| 2. | Place 5" squares of fabric on work surface. |
| 3. | Squeeze small amounts of Soft Paint colors onto foil. |
| 4. | Load Bear stamp with Chocolate and Golden Tan Soft Paint and stamp in center of each of the two blue striped squares. Let dry. Outline with Espresso and Gold dimensional paint. Squeeze out Espresso dimensional paint dots for eyes. Let dry. |
| 5. | Load Rocking Horse stamp with Cool Blue, Grape and Yellow Soft Paint and stamp in the center of each of the two pink checked squares. Let dry. Outline with Purple, Gold and Blue dimensional paint. Squeeze out Gold for eye, Blue and Gold dots and a Rose heart. Let dry. |
| 6. | Making the Letters Using the letter stencils, trace the letters of the desired name to the back of the fuchsia fabric with a pencil. |
| 7. | To prevent fraying when cutting the fabric letters, place a line of glue over the traced line. Let glue dry. |
| 8. | Cut letters out on traced line. Glue letters to the quilt. Let dry. |
| 9. | Outline the letters with blue dimensional paint dots. Let dry. |
| 10. | Assembling the Quilt Stitch the four painted panels together using a 3/8" seam. |
| 11. | Stitch yellow fabric for name area below panels and area above panels. |
| 12. | Stitch fuchsia top and bottom strips to top of panels and below name area. |
| 13. | For each side, stitch a yellow corner to each end of side strip. |
| 14. | Stitch each prepared side to the side of the prepared panel. |
| 15. | Stitch the back fabric to the front, leaving the bottom area of the quilt open to insert the batting. |
| 16. | Turn quilt inside out. Press. Insert batting. Hand stitch opening closed. |
| 17. | To hang quilt, stitch the tabs together on 8" sides. Turn inside out. Press. Stitch or glue to the top edge of quilt. |
| 18. | Stitch embroidery floss through the layers and tie knots at the front of quilt to hold the fabric thickness together. |