![]()
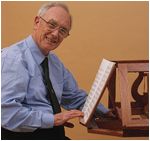
 Having made several music stands in a vaguely Regency style, I decided to
challenge myself by making a stand for my son who regularly plays string
quartets at home. I've only ever seen photographs of two such stands - one a
prize entry in a woodwork competition and the other in a museum in Vienna - both
of which were based on four-legged tables, a design which takes up a lot of room
when not in use. I thought it should be possible to make such a stand based on a
single central column so it could be folded away when not in use.
Having made several music stands in a vaguely Regency style, I decided to
challenge myself by making a stand for my son who regularly plays string
quartets at home. I've only ever seen photographs of two such stands - one a
prize entry in a woodwork competition and the other in a museum in Vienna - both
of which were based on four-legged tables, a design which takes up a lot of room
when not in use. I thought it should be possible to make such a stand based on a
single central column so it could be folded away when not in use.
Design: Down To basics
![]()
A string quartet playing at home sits down to play with the players facing one another in a square. They aim to be as close as possible without the 'parts' - the sheet music - touching. Most string parts are about 450mmx295mm when opened out (French music is a little bigger, but you can't have everything), and are inclined at about 65¡. All this means that the bottom of the music desks should form about a 750mm square - draw it out for yourselves if you don't believe me!
The desks themselves need to be about 700mm from the floor (so that the players can see one another over the music), and from previous experience I've found that the ideal size for a music desk is 300mm high and 430mm wide. It was immediately apparent that desks of that size set out as above would not fold down without overlapping. I decided to introduce a small difference in height between the desks to enable them to overlap - an effective solution which doesn't detract from the appearance of the finished desk.
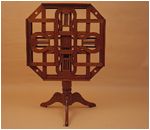
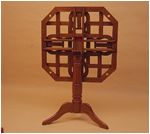
The stand therefore consists of four music desks (for clarity, I'll refer to them as points of the compass) mounted on a square frame with the corners cut off. To accommodate the overlap, the north and south desks are raised above the frame by 9mm, and the east and west desks by 18mm. The frame is attached to the central column by a cross of four bearers, and pivots around a central block. I thought I'd need an elaborate catch to hold the table in position, but the off-centre design of the pivot means that it's quite stable in both the horizontal and the vertical positions without any extra fittings.
Top frame construction
![]()
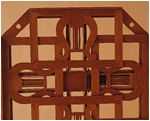
This is the heart of the project. The 'ring' is made of 50x14mm pieces tenoned at the eight corners. The cross-bearers are also 50x14mm tapered in depth to the ends where they are let into the ring by 3mm and fixed with screws.
The bearers running north-south are full-length and separated by two short pieces joined with double tenons to allow for the pivot to be well off-centre. The east and west bearers are, in turn, double-tenoned into the north and south bearers as shown. The hole for the 8mm brass pivot must be drilled before the east-west bearers are glued in.
The centre block itself is 75mm wide and 35mm deep so that a 15mm piece (removable to allow for fine adjustment) can be fitted above it between the bearers to support the top in the horizontal position. The end of this piece bears on the block in the vertical position when the centre of gravity of the top is well outside the pivot (see detail drawing 3)
Music Desks
![]()
The desks are made from 40x9mm material (the lyre sides are 65x9mm) morticed and tenoned together as shown. The lyre joints were fitted but not glued before the sides were cut to shape. Similarly, the holes for the four brass rods were drilled and the rods fitted before gluing. As a matter of interest, I used aliphatic resin glue throughout except for the veneer, for which I used Franklins (Ohio) liquid hide glue which I have been unable to get in this country.
Clean up with a finely-set smoothing plane and sandpaper, and then varnish, remembering to protect the rods with masking tape. I varnished the faces with the rod holes before gluing as it's impossible to do it afterwards.
The music rests are 30x8mm and are simply glued to the front of the bottom edge of each stand. The props (8mm) are hinged to the back of the cross-piece of the lyre using 40mm solid brass hinges and 1/4in No.3 brass screws. The completed desks are hinged to the sides of the ring with 40mm brass hinges. The north and south desks are raised on a 9mm baton, and the east and west desks on an 18mm baton, both cut out in the centre to accommodate the folded prop. The ratchets are raised by the same amount as their stand, which rests on them when folded.
Centre column and legs
![]()
The column was turned from a 100mm square (actually two pieces of 100x50mm glued together). The three legs are at 120 degrees to one another and are joined to the column with a sliding tapered dovetail. They are 27mm thick with the grain running as shown. The central block of the main frame is drilled with a 1.75in hole (my Forstner bits aren't metric) and the column has a spigot turned on the end to fit.
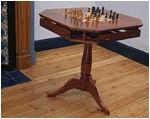
How to make the table top
![]()
 To finish the project I made a detachable table top from 9mm birch ply with
solid edging veneered on both sides, with a chess board and cartouche inlaid in
the upper surface. The top is then mounted on a 12mm subframe (using halving
joints this time) which in turns fits to the mainframe with four turned columns.
These are tapped and screwed into the subframe and a loose fit in the mainframe
with brass pegs to stop them falling out when the top is vertical. The cartouche
(I cheated here and bought it from Art Veneers along with the other veneers) is
essential to show which way the top fits onto the bottom.
To finish the project I made a detachable table top from 9mm birch ply with
solid edging veneered on both sides, with a chess board and cartouche inlaid in
the upper surface. The top is then mounted on a 12mm subframe (using halving
joints this time) which in turns fits to the mainframe with four turned columns.
These are tapped and screwed into the subframe and a loose fit in the mainframe
with brass pegs to stop them falling out when the top is vertical. The cartouche
(I cheated here and bought it from Art Veneers along with the other veneers) is
essential to show which way the top fits onto the bottom.
How did I do that?
![]()