Materials:
- Cutting board (Note: If you don't feel like making the cutting
board top, but you really fancy the cart, buy a length of IKEA's
laminated birch counter top. Cut it to size (roughly 19" x 31") and
proceed with the cart instructions.)
- Legs: 4 - 2" x 2" x 33 1/2" maple
- Apron: 7' of 1" x 4" maple
- Shelves: 8 - 1" x 3" x 29"
- Shelf supports: 4 - 1" x 2" x 33 1/2" 1" x 1" maple strips: two10"
pieces, two 24" pieces
- Screws - About 40 - #8 - 1 1/4" zinc coated pan-head
- Screws - 16 - #6 - 3/4" zinc coated pan-head
- Screws - about 20 - #8 - 2" zinc countersink screw
Special hardware (available from Lee Valley Tools: 1-800-267-8767)
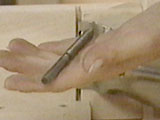
- Heavy-duty leg braces - Four 2 1/2" x 4 3/4"
- 4 - Hanger bolts and nuts
- 4 - 2" locking plate casters
|
Tools
- Eye/ear protection
- Circular saw
- Belt sander/orbital sander
- Drill and bits
- Tri-square
- Chisel
- Pencil
|
Steps:
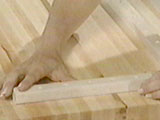
Locate the legs on the bottom of the cutting surface |
Be sure they are in exactly the right place |
Mark their location |
Legging for It
Cut and sand the 2" x 2" legs. To determine the desired height for
the finished cart, measure the distance from the floor to your
navel. Don't forget to account for the height of the casters and the
thickness of the cutting board top. Or use my shortcut: Just cut the
legs 2" longer than your inseam.Next, turn the cutting board
upside down. Place the legs in the corners. They should be set in
from the edges about 1 1/4". Trace the outline of each leg position.
Now measure the dimensions between the marks to determine how long
to cut the apron pieces, then cut 'em. |
|

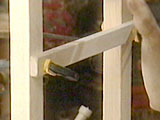
Put the apron lumber in place and mark it for cutting |
Put all the apron pieces in place and number them according to their
location |
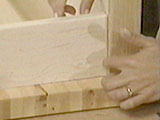
Inset the apron about a quarter of an inch |
| Put the apron pieces in place between the legs. For eye appeal,
inset the apron pieces about 1/4". Mark a pencil line along the
inside edge each apron piece. Then set aside the apron pieces and
legs.
TIP: Number the parts as you remove them! Each leg should have a
number, and the ends of each apron board should be marked with the
number corresponding to the leg they abut. |
|
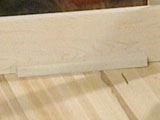
Make one-inch strips to support the apron |
Drill holes every three inches for the screws |

Use a counter sink bit or larger bit to cut a space for the screw
head |
| In the 1" x 1" strips, pre-drill holes every 3". Screw the
strips to the cutting board, attaching them along the inside of the
apron line. |
|
Put the blocks in place and attach with screws |
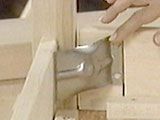
Cut the slots for the leg braces |
Set the brace on top of the apron to locate the slots |
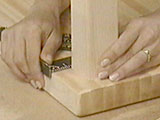
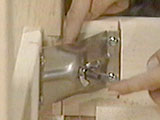
Slotty Outfit
Put the legs and apron pieces in position. Set the heavy-duty leg
braces on top of the apron at each corner. The brace must be
well-centered in relation to the leg! Mark the location of the slots
required by the brace. |
|
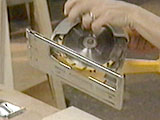
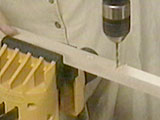
Set the depth of the blade to fit the brace |
Attach the bracket in place with four screws |
|
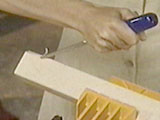
| Now cut the slots in the apron using a circular saw with the
blade set to a depth of about 3/8" (check the depth required by the
flanges on your braces).
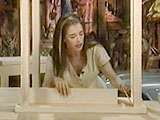
After cutting slots for the braces, place the apron pieces back
in position. Glue and clamp them to the 1"x 1" strips. |
|
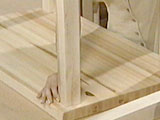
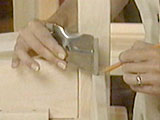
Make a flat spot on the inside corner of the legs |
|
|
| While the glue is drying, mark the approximate height of the
apron on the inside corner of each leg. Remove each leg and chisel a
flat spot on the inside corner of each leg mid-way between the apron
line and the top of the leg. |
|
Use the hanger bolt to mark the location to drill |
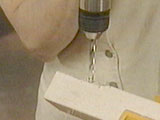
Drill for the hanger bolt |
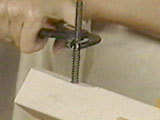
Drive it in with tongue-in-groove pliers |
Leg Cetera
Put the legs back in place and slide the leg braces into their
slots. Pass a hanger bolt through the hole in each brace and push
against the wood to mark its position on the flat spot you've just
chiseled. Pre-drill each leg to accept the bolt and install it using
tongue-in-groove pliers (for a faster method, insert the machine
threaded end into a drill and drive it in).Install hanger bolts
and secure them with washers and nuts. |
|
Clamp the shelf supports in place and screw them to the leg
|
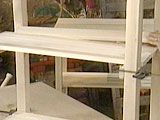
Space the shelf boards evenly and screw them down |
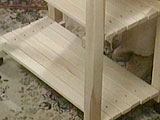
Shelf boards in place |
| Install 1" x 2" shelf supports and attach the shelf boards,
pre-drilling so you don't split the wood. |
|
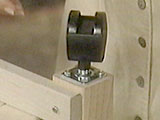
Attach the casters to the bottom of the legs |
|
|
| Attach casters to the bottom of each leg with screws provided.
Apply mineral oil to entire cart regularly to prevent drying,
cracking and splitting. Some people use a urethane finish everywhere
except on the actual cutting surface, which they oil. I eschew
urethane and use oil all over everything. That's just the kind of
girl I am.
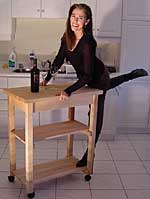
Now, just think of the possibilities! You've got a portable unit
for barbecuing, a homework station for kids, storage for extra pots,
bowls, or wine bottles. And, for a real icebreaker at parties,
install a golf-cart motor on that baby and you've got a Rider Cart
for serving hors d'oeuvres in style. |
|
| |