With other types, there is a risk of loosening the wedge.
The cutter is made from the end of a hacksaw blade, ground to shape and inset with its outer face flush with the stem tip.
To reach to the face of the rebate wall, you'll need to ensure that the screw head does not project, but since the blade will be hardened, don't try to countersink the hole with a drill or countersink bit. Ideally; you'll need a conical grinding stone for the job.
Since you would otherwise be screwing into end-grain, use a small-diameter wall plug to receive the screw.
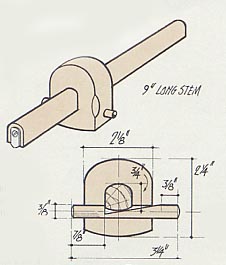
File a comfort chamfer for your thumb.
Give a professional finish by slightly cambering the remote end of the stem and the ends of the pin.
Of course, there's no reason why you should not make a conventional point by grinding the end of a broken drill (or perhaps a fine masonry nail).
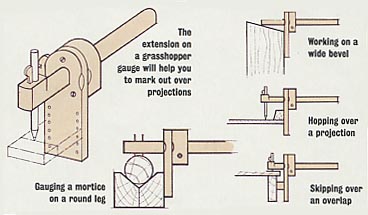
- First drill and pare (or file) to form the stem hole. If paring, you will need a scribing gouge for the curved parts.
- Plane the stem to offer a nice sliding fit.
- Drill for the pin. Its centre line should be level with the lower face of the stem.
- Insert the pin and use a gouge or file to make a cut that indents the pin almost level with the lower face of the hole.
- Pare the wedge, using this 'witness mark' as a guide to the required depth. (Be careful how you hold the pin - holding it in you hand is just asking for trouble. Make a dinky little vee-block).
- Finally fit by trial and error until tapping a pin end on the bench top will both either lock or unlock the stem.
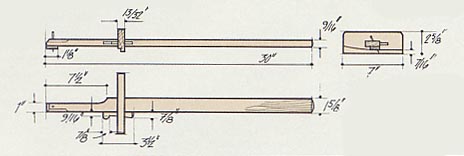
When used one-handed, the drag can also cause a slender stem to become quite whippy, so I've shown a stock that is wider for most of its length.
Common marking gauges are tilted in use but in this case the point has been tilted instead.
Panel gauge stocks are usually provided with a rebate (rabbet), just why, I'm really not sure. Unusually, mine is shaped to allow some tilt that helps you to see the cutter when starting the mark.
Note that the pin need project no more than 1/16in (1.5mm).
You can adjust the gauge by the usual method of tapping one end or the other, but with this model there is a chance that the wedge will be loosened.
These gauges, while often nice to look at, are expensive, and apart from the Ultimum (Ultimate?) pattern, can't be satisfactorily adjusted by tapping one end or other of the stem against the bench end. (The screw that bears on the brass slider tends to move the slider as well, usually taking up the backlash (lost movement) in the collar at the thumbscrew end. The Ultimum pattern has the slider inside a cylindrical stem operated by a screwhead inset in the far end).
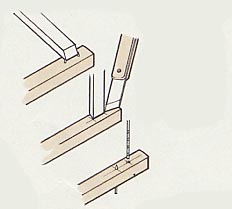
The diagram should be self-explanatory. Some people arrange that the mortise chisel should just be able to fit between the points at their extreme tips. This marks a tenon very slightly wider than the mortise.
If anything, aim to make the separation slightly too small. If you don't get the distance quite right, you can adjust the pins by filing or abrading with a hone.
Shanks of broken drills make good points (fine masonry nails less so, but possible). Grind them by using an egg-whisk type handrill to rotate the pin. Finish by hand to form a polished surface.
From experience, I have learnt that it is not a good idea to follow the earlier tip by filing vertical faces to the pins
I got a screw adjustment by fixing a facing to an old on