CAUTION: THIS IS AN ADULT ACTIVITY AND GREAT CARE IS NEEDED TO AVOID GETTING HURT. PROCEED AT YOUR OWN RISK.
There are many, many wonderful woods in the world. Some are soft (like pine) and others are hard as nails (like oak). You want to make spoons from woods hard enough to stand up to the job they do, yet not so hard you get frustrated on your first carving project. I recommend starting with something like cherry wood. It's hard enough for any kitchen spoon and fairly easy to carve. The color of cherry wood can vary from a deep pink to almost stark white. That has to do with what kind of cherry tree it was and whether it's heart or sap wood. Many of the cherry woods darken some with age and use but I rather like that look. Whatever wood you choose, it will need to be about 11 inches long, 3 inches wide and about an inch thick. Next decide which side of your piece of wood is the top of the spoon. Trees grow in rings. The top of your piece of wood should have the rings on the end sweeping up towards you. Important note: Do not use aromatic woods (like cedar for instance) for eating or kitchen utensils.
However, my first carving was made from a madrone log because that's what happened to be in my wood pile out back. I didn't know enough to pay attention to the ring pattern and it worked just fine. So grab a piece of wood and let's go to the next step.
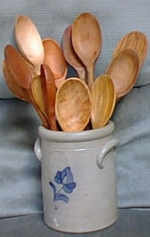
There are so many different types of wooden spoons. Some have long handles and deep bowls that are good for stirring big pots of chili or stew; some have shorter handles and make excellent batter spoons; and there are as many more styles as there are imaginations. Handles can be flat or round or a combination of the two. I suggest for your first spoon you make a standard, simple wooden spoon excellent for a number of kitchen tasks. This would be about 10 inches long including the 2 1/2 inch long bowl of the spoon and it would have a round handle. Rather than draw a spoon pattern, load it into my scanner and put it up on this page, I suggest you use one of your own kitchen spoons for a pattern (if you don't have one check a local thrift store...they'll have an old one you can use for a pattern). Lay the old spoon face down on your piece of wood and with a pencil, outline it. I've made a number of patterns over the years, from hard plastic. If you really get into this hobby, you can get more creative in your patterns later.
Now it's time to cut away all that excess wood from around the pattern you drew on the slab of wood. You can do this quickly with an electric band or scroll saw, or you can use a hand held "people powered" saw. If you do it by hand, put it in a vise and keep your hands away from the cutting area (this is the voice of experience here). Make sure you leave the pencil line of your pattern -- or in other words -- cut outside the lines. If you don't have the tools or the space for cutting a chunk of wood (talking to condo dwellers here mostly), I'll soon be selling "spoon blanks" in a number of different woods and styles starting at $5 and up
The tools I use for the rest of the project are: 1) a palm carver or hand held #5 spoon scoop with about a 6mm sweep; 2) a small carving knife; 3) handled rasp; 4: goose neck scraper; 5) a small file; 6) a piece of thick leather to lay across your thigh; A chunk of leather glove with a thumb hole cut in it; 7) lots and lots of sand paper (more on the type later).
There are two schools of thought on where to start carving first. Some spoon makers swear you must start with the back - others are equally as adamant that it must start with the front. And the handle is on both the front and the back, so when do you start working on it? It's all a matter of personal preference. I like to do the back and handle first and then carve out the bowl of the spoon. You will discover your preference as you go along. But for the sake of this page, we are going to start with the back and handle.
Sometimes it's easier to work the back while the spoon is in a vise (is for me anyway) but you can do it in your hand -- but be careful and make sure your tools are sharp, it's the dull tool that will hurt you most! With the spoon handle in a vise so the full back of the spoon is facing you, start working with a rasp to make the back rounded and a smooth sweep down to the handle. Just where the handle meets the spoon, you will use the Botz type knife to carve in a smooth sweep. Make sure you are working with the grain in this process. Once the back is rounded to your satisfaction (I lay it on a table and if it rocks smoothly it's ready), take some 80 grit sand paper and begin smoothing it down. Once the large gouges are sanded out, you can use the gooseneck scraper (again with the grain) to make it even smoother. This usually takes me a couple hours.
Now it's time to work on the handle. Remember we decided on a round handle -- well it's another job for the rasp. With the bowl of the spoon in a vise, begin taking the sharp edges off the handle which is still square at this point. You keep turning it in the vise and rasping down all four corners with a rounding motion until it begins to get more and more round. This job is faster with a spokeshave -- but not everyone has one of those tools and they are a little more expensive. The rasp is inexpensive and will do the trick, it's just more work. Once it begins to take a fairly round shape, take it out of the vise and smooth it out more by drawing the neck of the gooseneck scraper down the shank of the handle. We'll work in sanding it smooth in the finishing process.
By now your spoon is really beginning to take shape -- but it lacks having the bowl dug out. This is when I sit up on my stool, put the leather over my thigh, turn the music on, and sharpen my spoon scoop. Next I draw a pencil line around the outside edge of the bowl, then about a 1/16th of an inch in toward the center of the bowl, I outline it again. That is the bowl edge and you carve inside the second outline. OK! The spoon is ready, the tools are ready, you have a piece of leather protecting the palm of your hand (if you don't, you'll have blisters for sure!), so now it's time to begin the fun part of making a wooden spoon: Carving the bowl.
Once again there are number of ways you can approach this task and no one of them is the "right" way -- it's personal preference. I like to go to the dead center of the bowl and start carving it out from there. Others like to start working the edges and move into the center. Try both and see which method fits you best. Give the spoon scoop a little "walking" motion when taking out some wood and make sure you take tiny pieces out at first, until you get a good feel for how the spoon scoop works. And remember to keep the carving motion away from you. If you are hanging on to the spoon by the top of the handle, and digging out towards your hand you might get into "flesh carving" and folks that hurts! Most of my students want to know how to tell when to stop carving. Well there is no absolute answer. You can carve a thin or thick edged bowl -- your preference. The thing you want to do is make sure the thickness of the bowl is the same on the bottom as it is on the sides. A set of calipers can help you figure this out to the millimeter, but I just close my eyes and feel it with thumbs and forefingers. When it feels close enough, it's done. Once the bowl is carved out, it's time to sand the spoon (well not always - folks that attend the renaissance faires like those tool marks in the bottom of the bowl).
I like my wooden spoons smooth as glass. Lots of folks pick them up and say: "Oh! They're so soft." That's a compliment and I know they mean it's so smooth. Begin rough sanding with an 80 grit sand paper all over the bowl, back and handle; then take an old terry cloth towel and wipe your spoon down good. Feel for "bumps" and sand those out with a new piece of 80 grit. Wipe the spoon down again and take up a 100 grit sand paper and do the same thing; then drop to a 120 grit; followed by 150 grit; 220 grit; 400 grit and finally some fine 600 grit (guess you figure out the higher the number the finer the sand paper). Be sure to wipe the spoon down well between each sanding grit.
Sanding is tedious work but doesn't take much concentration. Your mind is free to tend to other things. So it is during the sanding process that I turn all my wishes, hopes, dreams, and worries God-ward (some call it praying and maybe it is, I call it spending the afternoon with God).
Not everyone wants anything on their wooden spoon (they come
from the store just bare wood!). But I like to put something on that draws out
the beauty of the grain and is safe for humans. At first I was using olive oil
but was told this, like all vegetable oils, can turn rancid if the spoon isn't
used frequently. I search for something better and found food safe mineral oil
is the best bet. Hard to explain the thrill of seeing that grain pop out on the
ultra smooth spoon. You will have to experience that one for yourself.