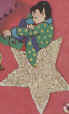
Elf Ornament
Equipment: Coping saw with #20 blade; Clamp; Drill with 1/8" bit; Fine sandpaper; Pointed paintbrush; Turpentine, tracing paper, pencil, scissors; Scrap wood
Materials:
Plywood (1/16" thick) or cardboard
Enamel paint or poster paint and shellac for cardboard: black, flesh, white and assorted colors
Silver or gold glitter
Silver or gold cord for hanging.
Directions:
1. Trace elf front and back patterns below.
2. On wrong side of tracing, go over lines again with a soft pencil.
3. Lay front pattern, right side up, on plywood or cardboard and trace over lines again to transfer.
Note: To protect table when cutting, use scrap wood clamped to edge of table, letting it extend 1/2" beyond edge.
3. Clamp traced plywood to table and carefully saw around outline of elf; sand edges to remove splinters which may pull off surface.
4. Drill hole at top of elf at point indicated on pattern.
5. Transfer back pattern to back of cut-out. (Cut cardboard with single-edge razor blade.)
6. Pencil in features so they may be easily followed when painting.
7. Clean enamel from brush with turpentine. Be sure brush is free from turpentine before applying paints, to prevent "bleeding".
8. Paint faces and hands flesh color. Paint features black. Paint rest of elf as shown in photo or as desired.
9. Paint all lines and outlines with black paint. Leave stars until last.
10. Paint stars white: apply silver glitter to stars while paint is still wet. (If using poster paint, shellac elf and star; let dry and apply glitter with glue.)
Pattern
