|
Cutting Curves With a Router
From "Clamp
Basics and more!" Episode DIT-121
|

This simple jig directs your router to cut perfect
circles.

Figure A
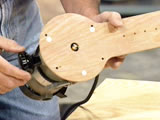
Figure B
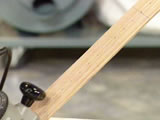
Figure C
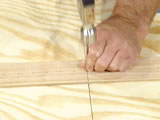
Figure D
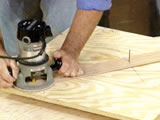
Figure E
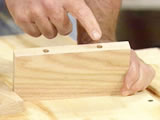
Figure F
This jig guides the router to cut almost any size
circle or arch.
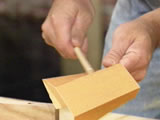
Figure G
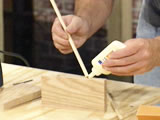
Figure H
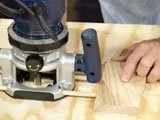
Figure I
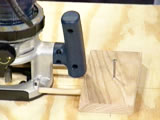
Figure J
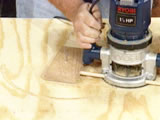
Figure K
|
| |
|
Many projects require cutting a perfect circle or an oval, and you can
accomplish the task with a router and a special jig to guide it. The two
jigs described below can be used with a router when you want to cut circles
or angles.
Circle-Cutting Jig
The first jig acts as an arm that guides the router in cutting circles or
arches.
Materials:
36" x 14" x 1/4" plywood
Drill and drill bits
Router
Screws
Ruler or measuring tape
Hammer
Nail
- Take off the sub-base of the router to determine how big the circular
end of the jig should be. Cut the end of the piece of plywood into a
circle the same size as the router's sub-base (figure A).
- Drill holes into the circular end of the jig to correspond with the
holes in the sub-base. Use the sub-base to guide your drilling.
- Screw the circular end of the jig into the router's base, aligning the
circles on the sub-base with the holes drilled in the jig (figure B).
- Drill small pivot holes into the arm of the jig, spaced 1" apart (figure
C).
- To use the jig to cut a circle, draw a line on the work piece from its
center to the end of the desired radius of the circle. Center the router
atop the end point of the radius. Drive a nail through the appropriate
hole in the jig that corresponds with the center of the work piece (figure
D). Set the router to the proper depth, and make a slow pass through
the work piece, using the nail as a pivot point (figure E). Make
deep cuts in several passes, lowering the router bit slightly after each
pass.
Curve- and Circle-Cutting Jig
The second jig for cutting curves and circles with a router can be made
from scraps you probably have around the workshop. Like the jig described
above, it's attached to the router's sub-base.
Materials:
Two dowels, each about 2' long, with the same diameter as the holes in
the sides of the router's base
Drill
Drill bits of same diameter as the dowels
12" x 4" x 1" wood block (dimensions need not be exact)
Sandpaper
Wood glue
Router
Hammer
Nail
- Drill holes the same size as the dowels into one long edge of the wood
block (figure F). The holes should be as far apart as the diameter
of the router's base.
- Sand the tips of the dowels (figure G).
- Apply a little wood glue to the holes in the wood block (figure H).
Place the dowels inside the holes, and allow the glue to dry.
- Place the dowels through the holes on the sides of the router's base (figure
I).
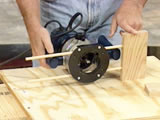
- To use the jig to cut an arch or a circle, nail the center of the
block to the center of the desired circle (figure J). Slide the
router to the appropriate spot on the dowels to correspond with the end
point of the desired radius. Set the router bit to the appropriate depth.
Slowly swing the router through the work piece, using the wood block as a
pivot point (figure K). Repeat the process as necessary, slowly
lowering the bit with each pass.
|
|