Crooked bedside lamps

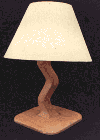
Having scoured the department stores for a set of bedside lamps that would match the rest of my bedroom furniture, I finally gave up and opted for the more entertaining idea of making my own. The specification for the construction of these lamps was simple: they had to be cheap (less than $100 for both) and must use power tools that I already owned. The result was a set of oak lamps that are unique (as far as I know), but were constructed using only a jigsaw and an electric drill.
Construction

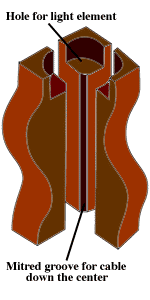
The stem of each lamp is made up of four pieces of oak (cherry would work just as well), 11 inches high, 1 1/4 inches wide and deep. Firstly, number the four pieces of wood and remember the order in which they are put next to each other, thus forming a larger square of 2 1/2 inches wide and deep. Using the template (see diagram on right) sketch the design onto each block. To do this, fold the template in half along the dotted line and position this over the block so that the design can be sketched onto two sides. Before cutting, check that when the four pieces are placed together, the result is the same as the template (i.e. the curved shape that the final lamp should display).
To cut the each of the four blocks of wood use a jigsaw, and try to be as accurate as possible with the cuts (the more accurate you are now, the less sanding must be done later). Use a thin jigsaw blade and workl along the length of the wooden blocks very slowly. Do not discard the waste wood, as this is useful in the clamping stage.
Once each block of wood has been cut, there will be one corner edge of each piece that displays no sign of a curve. This is the edge that is the center of the lamp. At this point, it is necessary to make a slot for the electrical cable to fit through from top to bottom. To do this, chamfer an angle off the central edge of each of the four blocks (see diagram two). When the four blocks are placed together there will be a neat, square hole running all the way down the middle of the lamp.
Glue two of the shaped blocks together - forming a "double block" that is 2 1/2 inches wide by 1 1/4 inches deep - using a good quality wood glue, and clamp for several hours. Note that it is important to ensure that the flat side of the clamped block lines up smoothly, as this is what the second "double block" will be glued to. As the blocks are curved, it can be difficult to use clamps. However, if the previously discarded waste wood is used to fill the curves, this issue is easily resolved. Repeat this gluing process on the remaining two blocks.

Finally, when both double blocks are securely glued, glue the two halves together, thus forming the final shape of the lamp stem.
At this point, the top of the stem should have a 1 1/4 inch diameter hole drilled in it, to an approximate depth of one inch. This hole will house the light bulb electrical element (the item into which the light bulb is screwed).
Once this is done, sand the stem using coarse, medium and fine grade sandpaper, until the stem is suitably smooth.
Base construction
The base is almost an anticlimax after the rest of the project. Cut a piece of wood 8 1/2 inches square and 3/4 inch deep and mark the center of this lamp base by drawing a line from corner to corner, thus forming an "X". Place the finished lamp stem over the center of this "X", and draw around it carefully, thus marking the size of the hole needed to be cut in the base piece. Again, this can be cut out using a jigsaw. However, be careful not to cut out too much as the resulting hole should be a tight fit around the stem. To ensure this tight fit, make the first cut one sixteenth of an inch inside of the pencil markings, and then expand this cut outwards if necessary.
Once the hole is a satisfactory fit, all that is left to do is to miter the base to the design of your choosing, rather than leaving is as one big block. On the lamp shown above, the miter cut down to a depth of 1/2 inch at each side, leaving the center as the full height of 3.4 inch. This in turn was sanded down to a smooth curve when the base was sanded.
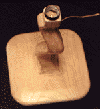
On the underneath of the base, cut out a rough groove from the center hole the one edge of the base. This groove is used to run the wire along from the stem to the edge of the lamp. Note that the edge chosen should be to poorest of the four edges, as this will be the back of the lamp.
Putting it all together

The lamp stem should now be glued to the base, and left for several hours to dry. It is obviously important to ensure that the stem is perpendicular to the base during this stage, but if the base hole was a tight fit, this should not be too difficult to achieve.
Once the glue is dry, thread the electrical wire through the stem. Connect the wire to a light bulb electrical element and push this down into the hole on the top of the stem.
To finish off the lamp, glue a square piece of felt to the underside of the lamp to prevent the lamp from scratching other surfaces (and also hiding the wire underneath) and wax the wood.