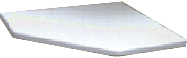
First cut the plywood into a square 16 1/2" by 16 1/2". Then, nominate two
adjoining sides to be the wall sides. Measure 8 1/2" away from one wall side
along one of the non-wall sides and make a mark. Repeat for along the second
non-wall side. Then, draw a line between the two marks. The result should be a
45 degree angle as shown in the diagram. Cut along this line with the jigsaw
(or circular saw) to provide the shape of the shelf.
Next, take the two side edging pieces and rout a groove in the inside edge
(i.e. the edge that will rest against the plywood) that is 3/8" deep, 1/2"
wide and 1/4" from the top side of the edging. This will allow the edging to
slot into the plywood, thus making the construction stronger. Once you have
routed out this groove, cut the two pieces to a length of 8 3/4" each. Note
that the cut made at one end of each piece should be at a 45 degree miter,
thus lining up with the profile of the plywood.
Next, rout out a groove in the angled edging piece (again is 3/8" deep,
1/2" wide and 1/4" from the top side of the edging). Note that this piece is
longer than it actually needs to be.
Once all edging pieces have been routed, glue the two side pieces onto the
plywood. Then glue the angled edging piece on, ensuring that it pushes up
against the two side edging pieces. Use small brad nails to fasten the edging
into place securely.
Once the glue is dry, use a saw to cut the excess wood off of the angled
edging piece, thus completing the desired shape. Now, take the two small plugs
of wood and glue them into the groove ends that are showing (one at each end
of the angled edging piece). Again, once dry, trim off any excess wood.
Now cut out the two underside supports. The end that will fit up tight
against the side edging should be cut down to 1/4" thick, tapering up rapidly
(in either a curve as shown or as a straight line) to the full width of 1
1/2". Note that one side piece should be 16" long, while the other should be
15 1/4" (as it will fit butt-up against the first underside piece. Once both
pieces have been cut to shape, glue and nail them to the underside of the
plywood on the two sides that will touch the walls.
To fasten these shelves to the wall, drill small holes in the underside
supports and use screws to attach to the wall. You should use at least two
screws per support (one near each end).
Finish the shelf by heavily sanding it, removing any sharp edges and
generally rounding off the whole shelf. Then paint.