WOODWORKING GUIDE: CONSOLE TABLE
Put your newfound skills to work by building this solid cherry table.
TEXT AND PHOTOS BY NEAL BARRETT
This simple console table is a great beginner's project. Its straightforward lines are reminiscent of Shaker pieces built over 100 years ago. But simple doesn't have to mean unsophisticated. This solid cherry piece is well-tailored, crisply built and can fit just about anywhere: your front hall, behind a living room sofa, in an upstairs bedroom, or even in your bathroom if it's blessed with enough extra space.

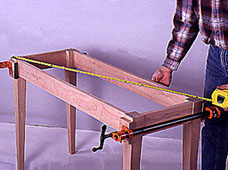
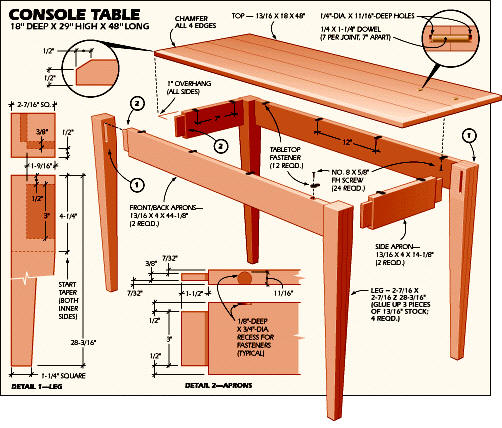
But good design isn't the whole story. This piece is also easy for a beginner to build. It has only nine parts: four legs, four rails and a top. And we show you how to build it with nothing more than hand tools and a few portable power tools. Everything you need is described in "Beginner's Toolbox".

Perhaps the best part of this design, however, is that it puts to good use everything that comes before it in this Woodworking Guide. If you start this table now, your gratification won't be delayed much longer. You should be able to finish it up in just a few weeks of spare time–even if you just learned how to sharpen a chisel or cut a mortise-and-tenon joint.

Cherry Stock

The material we used for this piece is solid cherry stock that we bought flattened on both sides and jointed on one edge. You'll have to pay more for this service, but it's worth the cost. The standard thickness for this type of hardwood is 13/16 in.

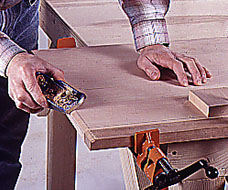
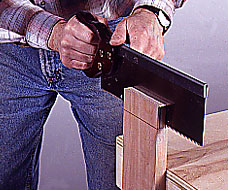
The first step in preparing the lumber is to crosscut all parts to rough length, a couple of inches longer 
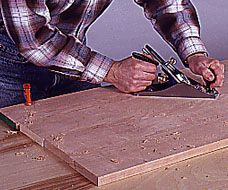
than their finished lengths. Then check the jointed edge of each piece for flatness and square. If some refinements are required, clamp the board to the side of 
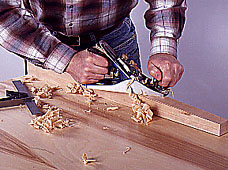
your worktable and use a bench plane to true the edge 
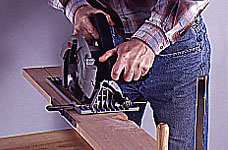
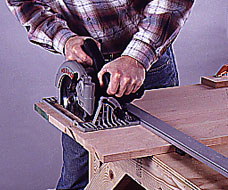
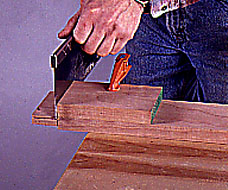
(Photo 1). Next, cut the boards to finished width using a circular saw with a rip guide (Photo 2). Clean up any saw marks with a bench plane.

1--Begin the top by flattening one edge of each board, using a bench plane. Make sure the edge is planed square to the face.
2--Cut each top board to width using a circular saw and rip guide. Make sure the rip guide follows the planed edge.
3--Lay out the location of the alignment dowels on the board edges. Then use a doweling jig and drill to bore the holes.
4--Cover the edges and dowel holes with glue, insert the dowels and bring the boards together with pipe clamps.
Tabletop

This tabletop was made from four smaller boards that were glued together. Using multiple boards helps keep the top flat over time. If your stock is wide enough to use only three boards, that's fine. Begin work by laying the boards on a flat surface and choosing the most attractive grain pattern by arranging the boards in several ways. Then lay out the dowel locations on all the joints and bore the dowel holes using a doweling jig and a portable drill (Photo 3).

Next, place a drop of glue in each dowel hole and gently tap the dowel in place. Then spread the glue evenly on all the mating edges and push the boards together. Tighten the joints, using pipe clamps (Photo 4), and check that the panel is flat before letting the glue set. If it's not, readjust the clamps until the surface is flat. After 20 minutes scrape off any excess glue from the joints and let the panel dry overnight.

When you remove the clamps, check the panel surface carefully. If the joints are flush, set the panel aside. If they aren't, use a bench plane to smooth the surface (Photo 5). Hold the plane at a 30 degrees angle to the wood grain and make shearing cuts.

5--When the glue is dry remove any squeeze-out, then let the assembly cure. Flatten joints if necessary with a plane.
6--Mark the finished length on both ends of the top panel. Then make the cuts with a saw and straightedge guide.
7--Mark the chamfer around the top and plane the edges to this line. A scrap block keeps the side edge from splitting.
8--Cut the leg stock to size, then apply glue to the mating surfaces. Keep the board edges flush when clamping.
Next, cut the panel to finished length, using a circular saw and a straightedge guide (Photo 6). Make sure that both ends are square to the sides before making the cuts. Next, mark guidelines for the edge chamfer around the perimeter of the top and use a block plane to create these bevels (Photo 7). Be sure to clamp a scrap block to each long edge to keep them from splitting when you're working on the end grain.

Complete the tabletop by sanding smooth both sides and all the edges. Begin with 120-grit paper and move through a sequence of 150-, 180- and 220-grits.

Legs And Rails

Crosscut the leg stock to finished length. Note that each leg is formed from three pieces of stock that are glued together. Apply glue to the three boards that make up each leg and clamp them together (Photo 8). Scrape off the excess glue after 20 minutes, and leave each leg assembly clamped for at least an hour. Don't do any further work on these pieces until the glue has cured for 24 hours.

9--Lay out the tenons on the ends of the table rails with a marking gauge. Keep the gauge base flat on the board surface.
10--Make the cheek cuts on the tenons using a backsaw. Keep the blade kerf just to the waste side of the layout lines.
11--Make the tenon shoulder cuts with a backsaw. Clamp a scrap block to the board to help guide the saw blade.
12--Remove the waste from the mortise using a drill and doweling jig. Square the ends and walls with a sharp chisel.
Lay out the mortises on the corresponding legs with a marking gauge. Then use a doweling jig and a portable drill to remove most of the waste (Photo 12). Finish up the mortise by squaring the ends and sides with a sharp chisel.

Once the joinery is done, cut the tapers on both inside edges of each leg, as shown in the drawing below. Use a circular saw and be sure to cut on the waste side of the layout lines. Finish these tapers with a bench plane (Photo 13), making sure to check for square as you work. Before the legs and rails are assembled, it's a good idea to finish sand all the parts with the same progression of grits that was discussed earlier.

Assembly

Begin by joining a long rail to a pair of legs. Spread the glue evenly on the tenons and mortises, and then clamp the pieces together. Do the same with the other legs and long rail. When the glue has cured on these two assemblies, join them together with the short rails. Assemble the parts on a flat surface. Once the clamps are in place, compare opposite diagonal measurements to check for square (Photo 14). If the assembly isn't square, readjust the clamps until it is.

When the base joints have cured, lay out and bore the holes in the rails for the tabletop fasteners. Then turn the top upside down on a padded table and place the inverted base assembly on the underside of the top. Adjust the base so it's centered on the top. Then mark the location of the fastener holes. Bore pilot holes and screw the base to the top (Photo 15).

13--Rough cut the leg tapers with a circular saw. Then reduce the edges to finished thickness with a bench plane.
14--Glue and clamp the legs to the rails. Then check for a square assembly by comparing diagonal measurements.
15--Attach the tabletop fasteners to the rails. Then turn the table parts over and screw the fasteners to the underside of the top.