Concord Table
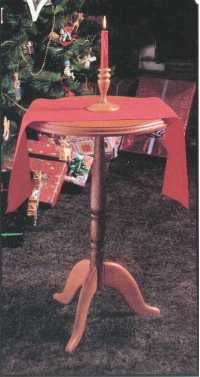
The Concord Table, also known as the candle stand table, is a
traditional American Favorite. Our version lends itself to being a gift project
because, by using a lathe duplicator, you can easily produce multiple spindles.
- Cut stock to size according to List of Materials. Layout
the spindle pattern (A) on a piece of 1/4" thick stock.
- Use a scroll saw, Bandsaw or jigsaw to cut out the pattern
and sand all sawn edges smooth. You now have the template for the lathe
duplicator.
- Mount the template on the lathe duplicator per your
Owner’s Manual.
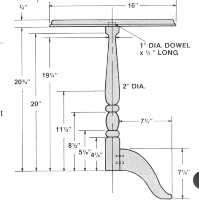
- Turn part A from a piece of 2" diameter x 21 1/4" stock.
- Sand the spindle.
- With the Mark V in the horizontal boring mode, drill the
3/8" diameter holes for the dowels "D" in the legs "C."
- Use the grid pattern to layout the pattern for the legs
"C."
- Transfer the pattern to three pieces of stock 3/4" x 7
1/4" x 7 1/2".
- Use a scroll saw, Bandsaw or jigsaw to cut out the legs.
Save one piece of scrap from the outside curve for future use.
- Use a drum sander to and the curves of the legs.
- Use a router with a piloted 1/4" rounding over bit to
shape the curved edges of the legs. Do not shape the straight section.
- Use a drum sander to sand a concave curve in the straight
portion of the leg. This makes for a better fit when attaching the legs to the
spindle.
- Sand the legs and set aside.
- Divide the base diameter of the spindle into three equal
parts 120 degrees apart. Draw vertical lines on the base of the spindle to
form the centerlines for the leg dowel holes.
- Use dowel centers to mark the holes to be drilled in the
spindle. In the vertical drill press mode, drill the 3/8" diameter holes in
the spindle. Set up the table and rip fence to form a V-block to cradle the
turning.
- Glue and clamp the legs to the spindle, one at a time, to
allow each leg time to set up. The scrap cutting from Step 9 will aid in
clamping. With a square, check the bottom of the leg to assure it’s square to
the outside of the spindle.
- Glue and clamp the stock to form the 16" x 16" piece for
the top (B). Let glue dry for at least 24 hours.
- Layout the 16" diameter circle for the top. Belt and
surface of top blank smooth.
NOTE:Mark the center for future use.
- With a scroll saw, Bandsaw or jigsaw cut out the top (B).
- Disc sand the edges of the top.
- Use a router with a 1/4" Roman ogee bit to shape the top
edge of B. NOTE: The surface with the marked center should be on the
bottom.
- On the bottom of the table top, use a 1" Forstner or
Brad-point bit to drill a 1" diameter hold through to brace (E).
- Sand the table top.
- Cut angled ends on brace with Bandsaw. Sand with disc
sander or belt sander. Drill for screw holes.
- Screw the top brace to the spindle.
- Screw the brace to top.
- Apply the finish of your choice.

LIST OF MATERIALS
Finished dimensions in inches
A. Spindle 2 dia. x 21 1/4 stock
B. Top 3/4 x 16 dia. Stock
C. Leg (3) 3/4 x 7 1/4 x 7 1/2
D. Dowels (10) 3/8 dia. X 1 1/2 (hardwood)
E. Top Brace 3/4 x 3 x 12


