Clothes Tree
A place for clothes and dress-ups!
Needed to be cut and sanded:
| Quantity |
Length |
| 4 molding pieces |
8" |
| 1 2 x 2 |
42" |
| 8 1/2" diameter dowel |
3" |
Plus 8 6 x 1 1/4" wood screws and 4 1" nails
Directions:
1. Saw and sand each piece of wood.
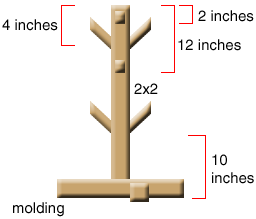
2. Drill the 2x2 for the dowels. Place the drill at a slight angle toward
what will be the top of the clothes tree. As in the diagram, drill two holes
on opposite faces:
2 holes 2 "from the top
2 holes 4" from the top
2 holes 12" from the top
2 holes 10 inches from the bottom
|
 |
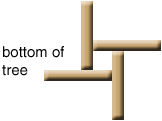
| 3. Attach the feet one at a time. Look at the diagram for the layout.
Nail one in place to start. Then drill two holes for the screws. Dab some
glue in the holes. Drive the screws. |
 |
4. Glue the dowels in place. Let the glue set for at least an hour.
5. Sign and date your work.
This is sized for the clothes of kids under 8. If you are making one for big
kids or even yourself, you will need to make the leg pieces longer.
EVERYTHING IN ITS PLACE
Are you going to put outdoor coats and hats on the clothes tree?
What other kinds of clothes need a place?
Where can you put the clothes tree so that children will use it?
Who in your family will use the clothes tree?
To use it well, what and how many things can fit on the clothes tree?
What clothes will you put on the clothes tree each season?
|
Winter Clothes
|
Spring
|
Summer
|
Fall
|
What other kinds of systems do you have for storing children's clothes at
home?
What are your rules for children helping with:
| Gathering clothes for washing |
Laundry Visits |
| Folding clothes |
Putting them away |
Choosing clothes |
Clothes Tree Materials List
- 2x2
- 1/2" dowel
- Molding, casing or crown, about 3 inches wide
- 8 1 1/4" x 6 wood screws
- Wood glue
- Saw
- Sandpaper
- C clamps
- Drill and 112" wood boring or spade bit and screw bit
Drill for pegs at an angle
What are the low pegs for? Shoes middle pegs? jacket or hat
Glue the pegs in as the last step. Be sure the holes are deep because the pegs
in shallow holes will come unglued.

