|
|
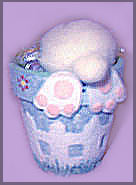
The Easter bunny is digging into this clay pot to find your easter treats.
Paint inside and out of entire pot with country blue. Let dry. Squeeze some country blue onto your palette and add a small amount of whit paint. Mix to create a shade slightly lighter than the original country blue. Take the scrap of cloth and wand it up. Dip the clothe into the mixed paint and blot on a scrap of paper. Next blot the cloth several times over the outside of the clay pot. Repeat blotting procedure several times until you are happy with the look. Let dry.
To paint flowers around the rim you will need to use the blunt end of a paintbrush. You will need one with a small round end. Dip the blunt end of the paintbrush into the yellow paint and stamp several dots around the rim of the pot about an inch apart for flower centers. Clean the end of your brush. Dip the end of the brush into the red paint and stamp several dots around one of the yellow dots. Repeat with different colors around the rest of the yellow centers create the flowers. Let dry.
Trace the fence onto white felt and cut out. Glue around the bottom of the pot. Paint grass around the bottom of the fence using green paint.
Glue small pompom to large pompom. Glue large pompom to the top edge of the pot so the small pompom faces the outside. This will be the bunny’s rear end.
Trace 2 feet onto the white felt and cut out. Trace 6 small circles and 2 large circles onto pink felt and cut out. Glue the pink circles to the white feet as shown in the pattern. Glue the feet just below the large pompom as shown in the picture above.
Fill pot with Easter grass and eggs.