Dave Mackenzie makes a tall chest of drawers to match some existing furniture
![]()
Dave Mackenzie makes a tall chest of drawers to match
some existing furniture
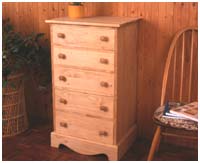 This chest was made because friends who were setting up a new home required some
extra storage for their bedroom. They already had several pieces of commercially
produced furniture so it had to be in the same style and colour.
This chest was made because friends who were setting up a new home required some
extra storage for their bedroom. They already had several pieces of commercially
produced furniture so it had to be in the same style and colour.
I'm at a loss to know why some chest of drawers are short and wide and some are narrow and tall but as they already had a short fat one, this is a long thin one to make up the little and large set. It is made from readily available pre-jointed pine boards and sawn pine that is stained to match the rest of the bedroom furnishings. For the most part it is constructed using traditional joints, although they are made using a router to save time and simplify the work.
Frame Construction
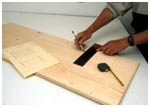
![]() Start on the six frames that
separate the two sides. Cut all of the parts to size and mark the joints on the
corners. These are all the same size and are mortise and tenon joints.
Start on the six frames that
separate the two sides. Cut all of the parts to size and mark the joints on the
corners. These are all the same size and are mortise and tenon joints.
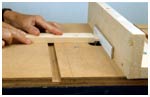
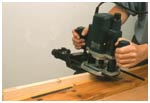
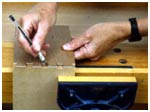
![]() After marking out the joints with a rule and set square, use a router with a
1/2in (12mm) flat cutter to make the tenons (pic 1). It helps if you have a
router table to do this, but it can with difficulty be done without one. Set up
the table and cut all of the tenons before starting on the mortises. The initial
cuts for the mortises are made with a 1/4in (6mm) flat cutter (pic 2) before the
corners are cleaned out with a bevel edged chisel. As each joint is formed test
the fit for accuracy and make any adjustments that might be required.
After marking out the joints with a rule and set square, use a router with a
1/2in (12mm) flat cutter to make the tenons (pic 1). It helps if you have a
router table to do this, but it can with difficulty be done without one. Set up
the table and cut all of the tenons before starting on the mortises. The initial
cuts for the mortises are made with a 1/4in (6mm) flat cutter (pic 2) before the
corners are cleaned out with a bevel edged chisel. As each joint is formed test
the fit for accuracy and make any adjustments that might be required.
![]()
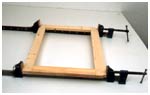
Identify the pieces of each joint tested with a reference so that the same pairs can be glued together when the frames are assembled. Apply glue to the corners, ensure they are square, and clamp until dry (pic 3). Cut the notches from the front corners of each frame, with a tenon saw. Match all of the frames up for size and ensure they are square, which might require removing wood from some of them with a plane.
Making the Sides
![]() The two sides are made from
pre-jointed pine board that can be obtained shrink-wrapped from many of the DIY
sheds. Once the plastic wrapping is removed the board might warp slightly due to
changes in humidity if they are left for any length of time before they are
used. If this is the case then it helps to prevent moisture loss if the edges
are varnished. Any old varnish will do for this. I tend to save the last dregs
in the tin for this job, as it does not matter if it is a bit lumpy.
The two sides are made from
pre-jointed pine board that can be obtained shrink-wrapped from many of the DIY
sheds. Once the plastic wrapping is removed the board might warp slightly due to
changes in humidity if they are left for any length of time before they are
used. If this is the case then it helps to prevent moisture loss if the edges
are varnished. Any old varnish will do for this. I tend to save the last dregs
in the tin for this job, as it does not matter if it is a bit lumpy.
![]()
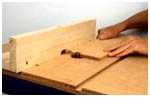
On the boards, mark out the shape for the sides and also the position of the stopped housings for the frames (pic 4). Subsequently cut these with a router to a depth of 1/4in (6mm). In most cases these housings are well away from the edges so the router fence can not be use as a guide. To overcome this, the base of the router is guided along two pieces of flat wood that are made up into a clamp with screws at either end.
![]()
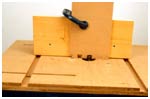
The clamp is fitted in place using a pair of dividers to position it the required distance from the nearest edge, where the housing is required. A first pass is made before a spacer of 1/4in (6mm) plywood is placed between the wood guide and the edge of the router base plate so that the second cut can be made without resetting the position of the wooden clamp. Obviously the spacer has to be the correct width to use with the chosen router cutter to make the width required for the housing. I keep a number of different width spacers so that I can make a range of different housing widths..
![]()
Once this is done, along the inside back edges of both sides cut a rebate measuring 1/4 x 1/4in (6mm x 6mm) with the router that will eventually house the plywood back. On the back corner of both sides cut notches where the sides will fit over the back rail of the plinth and drill holes in the lower end of each side for screws to fix the sides of the carcass to the plinth.
Carcass Assembly
![]()
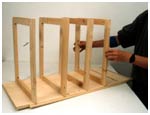
![]()
To assemble the carcass glue the frames into the housings of both sides (pic 5) and clamp until dry. This can be quite tricky and it helps if you can enlist some help from an assistant. Put plenty of glue into the housings so that some is squeezed out. In this way you ensure that the inside faces of the joints are completely covered. Before the glue dries wipe away any surplus with a dampened rag.
The Back
![]()
![]()
Cut the back from some 1/4in (6mm) ply, smooth the edges and fit it into the carcass to test the fit but do not fix it permanently in place at this stage, as it is easier to fit the drawers if the back is not in place.
Making the Top
![]()
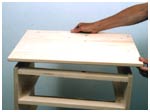
![]()
Mark a rectangle to the required size on pine board, cut it out and plane the edges. Fit a rounding over cutter in the router and shape the front and side edges. On the underside make the stopped housings for the top edges of the sides and also cut the rebate for the plywood back. Once this is done apply glue to the housings and the top frame, place in position (pic 6) and clamp until dry.
Plinth Construction
![]()
![]()
Mark out and cut to size the two sides, front and back. On the front and two sides work a decorative moulding using an ovolo cutter on the top edge. Using the squared up drawing as a guide, mark the curved shape on the front and cut it out with a jigsaw. Smooth the curved shapes with a drum sander mounted on a power drill. On the top edge of the back cut a rebate with a router that will eventually house the plywood back.
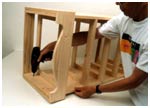
![]()
The joints at the two front corners are mitred and doweled and at the back corners the joints are simple butt joints that are also reinforced with dowels. Cut the mitres on the front with a mitre saw and test them for accuracy before drilling the dowel holes with a jig. If all of the joints fit successfully and it fits onto the base of the carcass, apply glue, push in the dowels and clamp with sash clamps. Before the glue dries measure the diagonals to check the plinth is square. If the diagonals are not the same lengths the plinth is not square so adjust the clamps until they are. Once the plinth is dry fix it to the carcass on the inside with screws (pic 7).
Drawer Construction
![]()
![]()
Cut all of the front parts for each drawer to the required size. Ensure that they all fit into the carcass with about 0.5mm gap all around by reducing the edges with a plane.
![]()
Mark the sides and backs onto a sheet of plywood with as little waste as possible, cut out and smooth the edges. If the surface of the plywood tears when it is being sawn, score the lines with a marking knife before sawing
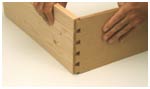
Dovetailing Method
![]() To make the dovetails I used a
combination of routing techniques and hand methods. The sides are joined to the
back with through dovetails and to the drawer fronts with lapped dovetail
joints.
To make the dovetails I used a
combination of routing techniques and hand methods. The sides are joined to the
back with through dovetails and to the drawer fronts with lapped dovetail
joints. ![]()
Start with a marking gauge and scribe a line on both faces of the ends of the sides and back and the inside edges of the ends of the drawer fronts. The gauge is set to the same distance as the thickness of the materials that the back and sides are made from, which in this instance is 1/2in (12mm). To mark out the pins I use plywood templates made from drawings that are set out using a computer but the traditional approach with a pair of dividers and a sliding bevel would be equally effective.
![]()
Draw around the template to mark the pins on the ends of the drawer back and the back edge of the drawer front (pic 8). Draw some cross hatching lines on the waste area between the pins to avoid the costly mistake of removing the tails instead of the waste wood in-between them.
![]()
Put the router in the router table and set a dovetail cutter so that the top of it is 1/2in (12mm) above the table surface. Lay the pieces with the marked out pins on the tabletop and adjust the fence to cut the first pins. When the first area of waste is removed reset the fence to cut the second (pic 9).
![]()
If all of the drawers had been the same size I would have cut all of the first pins on all of the sides before moving the fence and cutting all of the second pins. However to make the visual appearance more interesting the depth of the drawers are all different. This requires that the set up of the fence is changed for each pin of each drawer. The semi-concealed pins on the drawer fronts are cut in exactly the same way. When the pins have been cut with the router the rounded corners that are left are removed with a bevel edged chisel. To make the tails, mark their position on the sides using the pins as a template. Leave the dovetail cutter set to the same height above the router table and present the pins to the cutter as shown in pic 10. How you accomplish this depends on the router table you are using.
![]()
When I made my router table I also made a sliding platform that runs in slots cut in the tabletop. This platform has an upright piece of wood on the front edge to which the drawer sides are clamped. It is a very accurate way of holding the work as the sliding platform fits the grooves exactly and there is not any lateral play to cause inaccuracies.
![]()
The fence is removed before the sliding platform is put in place and a side with the marked out pins is visually lined up before clamping to the platform front. The platform is then slid towards the spinning cutter. When the first tail is cut, the operation is repeated until they are all made. If the drawers have all been the same size the two or three sides could have been clamped on at the same time and all cut in one operation to speed up the task. To save wear and tear on the more expensive dovetail cutters I sometimes remove the majority of the waste wood with a flat cutter first. Test the joints for accuracy and adjust where required (pic 11).
![]()
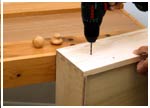
Put a 1/4in (6mm) cutter in the router and using the fence as a guide cut the grooves that will house the plywood bases. Cut the bases from some 1/4in (6mm) plywood ensuring that they are square as this will ensure the drawers are square. Apply glue joints on the drawer back and join them to the sides. Immediately slot in the bases, apply glue to the front dovetails, push them together and clamp. The plywood bases are not glued in place but simply left loose. When dry, clean up the joints with a plane. Obtain some pine knobs, drill holes (pic 12) and attach them to the drawer fronts with screws and glue. Cut the drawer stops to size from some scrap pieces of pine. Fit the drawer so that the fronts are flush with the front of the carcass. Attach the drawer stops to the top back edges of each frame butted up to the back of each drawer. Fit the plywood back to the carcass with glue and panel pins.
Finishing
![]()
![]()
The entire outside surface was glasspapered with medium and then fine grade glasspaper. The chest was lightly coloured using light oak stain so that it matched other pieces of the furniture in the bedroom. The stain is rubbed over the surface on a rag pad. For safety reasons this should be done wearing rubber gloves in a well ventilated room. After this had dried the chest was given a single coat of clear matt varnish.