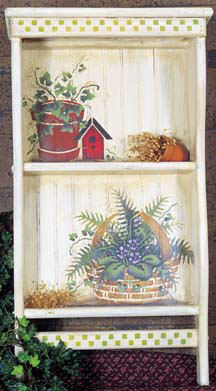
Celebrate Spring
| Instructions
|
| Preparation Sand the wood piece and wipe free of dust. Basecoat the entire shelf with White Wash using a 2-inch sponge brush. Let dry and sand smooth. Sand edges heavily for a weathered look. Shade the inside corners of the shelf with thinned Dark Chocolate on 2-inch sponge brush. Leave the middle and front as light as possible. Note: One advantage of acrylics is being able to over-paint any areas for easy correction. if you are not satisfied with your lights and darks, re-highlight or re-darken. Painting Instructions Fern Basket and Violets Score the back of the stencil under basket and bend forward so basket will sit close to the shelf. Tape basket stencil in place. Basket 1. Basecoat Honey Brown, shade with Dark Chocolate. Use 1/2” Stencil Brush. Stencil entire basket and handle with Honey Brown. Let dry. Shade dark shadows with almost dry Honey Brown, 3/8” Stencil Brush. Pat thick Honey Brown inside basket. Fern 2. Hauser Dark Green, Hauser Medium Green, Hauser Light Green. See pattern for placement and shading. Stencil all ferns to the right first, with 1/2” Stencil Brush. Base fern, one at a time, with Medium Green. Keep ends of fern light and airy. Add Dark Green to base of fern and blend up into the Medium Green. Wash stencil in warm water, let dry, and do ferns to the left. Ivy Vines 3. Use same greens as fern. See the pattern and gracefully place a few pieces of ivy flowing from the fern using the 3/8” Stencil Brush. Watch for contrast, light over darks, etc. Lighten the ivy with Light Green. Re-lighten with Olive Green, if needed. Violet Leaves and Stems 4. Use same greens and the 1/4” and 1/2” Stencil Brushes. Tape violets in place .Base the leaves with Medium Green. Highlight around the centers and outer edges with Light Green and Olive Green to show over the darker fern. Darken the tips of leaves over any light fern. Highlight violet stems very lightly. Violets 5. Base with Dioxazine Purple plus a touch of Orchid, using the 1/4” Stencil Brush. Pat a tiny amount of the purple mix on the outer tips of the petals. Re-coat if needed, over the dark background. Centers are Honey Brown. Dot in place with tip of a toothpick. Add a tiny scribble dot of White Wash in the center. (See pattern.) Flower Pot 6. Use the 1/2” Stencil Brush and Burnt Sienna + Georgia Clay. Shade with Dark Chocolate. Pat the stencil heavily. Let dry. Heavily dust Dark Chocolate in the shadow areas shown on pattern. Pat in Medium Green for moss on the pot. Small birdhouse 7. Use True Red and shade with Lamp Black. The roof and hole are Lamp Black. Ivy Leaves and Stems 8. Use the 3/8” Stencil Brush and Hauser Greens. Base leaves, stems and vines with Medium Green. Let dry and dust in Dark Green in the dark shadow areas. See pattern shading. Think sunshine, and pat in lighter highlights of Olive Green along the centers and edges. Re-pat with Medium Green to blend. Add tiny vines of thinned Medium Green here and there through the ivy with a Fine Liner Brush. (It helps to thin the acrylic and practice on paper until you feel comfortable.) Ground Shadow 9. Use the Fan Brush and scruff in Honey Brown under the pot, birdhouse and basket. Pick up a little Lamp Black to darken. (If you want to do wall shadowing, thin Dark Chocolate and fill a #12 Flat Brush, blot and lightly drag the shadows up and to the left of the leaves and vines so they will look like they have cast shadows on the wall.) Checker trim 10. Use Light Green plus a touch of Medium Green. Speckling 11. This is the finishing touch. Fill the Fan Brush and blot. Turn brush vertically and pull the bristles down across the tip of an ice pick. Thin Dark Chocolate and speckle across the ground shadows, up through the fern shadows on the wall, through the checkers and all the corners of the shelf. Thin Medium Green and speckle across ground shadow, pot, checkers and lightly through dark areas in the fern and basket. Finishing Instructions When speckling is dry, varnish with Satin Varnish with the 2” Sponge Brush. |