Cassette Holder
Safety Tips
- Safety glasses or goggles should be worn whenever power
tools are in use and when chiseling, sanding, scraping or hammering overhead.
This is very important for anyone wearing contact lenses.
- Wear ear protectors when using noisy power tools. Some
tools operate at noise levels that damage hearing.
- Be careful of loose hair and clothing so that it does
not get caught in tools; roll your sleeves up and remove jewelry.
- The proper respirator or face mask should be worn when
sanding, sawing or using substances with toxic fumes.
- Keep blades sharp. A dull blade requires excessive
force and can slip which causes accidents.
- Always use the right tool for the job.
- Repair or discard tools with cracks in the wooden
handles or chips in the metal parts.
- Don't drill, shape or saw anything that isn't firmly
secured.
- Oily rags are spontaneously combustible, so take care
when you store and discard them.
- Don't abuse your tools.
- Keep a First Aid Kit on hand.
- Do not work with tools when you are tired. That's when
most accidents occur.
- Read the owner's manual for all tools and understand
their proper usage.
- Keep tools out of the reach of small children.
- Unplug all power tools when changing settings or parts.
KNOW WHERE YOUR HANDS ARE AT ALL TIMES!
Most Common
Mistakes
The single most common mistake in any do it yourself
project is the failure to read and follow the manufacturer's instructions for
any tool or material being used. Other common mistakes include taking the safety
measures that are laid out for a project for granted, and poor project planning.
Here is a list of hints to successfully complete this project and to do it
safely.
- Follow the "Golden Rule" of measuring: "Measure twice,
cut once."
- Provide yourself plenty of time for each step.
- Understand your plan. (if you have questions, review
that part of the videotape).
- When finishing the wood, keep dust and dirt away from
the table.
- Follow the application instructions for your choice of
finish.
- Allow an extra ¼" to " inch when cutting the stock.
- Experiment with scrap wood before you work on the real
piece. This will help with finishing touches.
Project Introduction
Terminology
Before you begin your project, you will want to become
familiar with the woodworking terms shown below.
- Miter Cut - Angle cut across the width or
thickness of the board
- Rabbet - L-shaped cut
- Dado - Channel cut across the board, into which
a second piece of wood is fined
- Kerf - Width of the blade
- Countersink - To set a screw head at or below
the surface
- Dowel - Wooden pin used to provide strength and
alignment
- Chamfer - Corner of a board beveled at a 45
degree angle
- Laminate - Composed of firmly united layers of
wood.
Materials
Wood Selection
The two basic categories of wood used most often in wood
working projects are hardwood and softwood. Hardwood is more durable and less
prone to dents and scratches. It is also more expensive but will finish to a
better advantage. Soft woods, like pine, are more prone to dents and scratches
and do not have the durability of hardwood. Softwoods are much less expensive
and easier to find.
Ask your lumber supplier to show you "Class 1 " or "Select
Grade" lumber. Make sure it is properly dried, straight, and free of knots and
defects. (It may be impossible to be completely free of defects but be sure you
understand how to cut around these.)
Ask your Lumber supplier for assistance when purchasing
your wood. Similar to laying a pattern out on a piece of cloth, often you can
cut several different pieces of the same thickness of wood out of a single
piece. It is a good idea to add up the total number of board feet, being careful
to make sure you group short pieces in a board with long pieces to minimize
waste.
This project could be built out of scrap wood already in
your workshop. If you choose to use new stock from the lumber yard, both
hardwoods and softwood are good choices.
Note: Developing a good relationship with Your lumber
suppliers is important. They can help guide you in making material selections as
well as making special orders for a type of wood you may desire for a project.
Now that you have reviewed safety hints, learned the
mistakes to avoid, reviewed the basic components and gathered your tools and
materials for your projects - you are ready to BEGIN!
Steps to follow:

- Cut the wood to size.
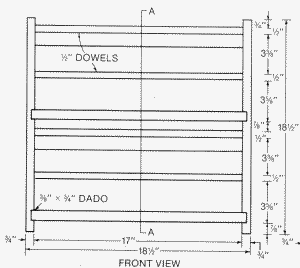
- Cut the dadoes for the shelves.
- Bevel the shelves.
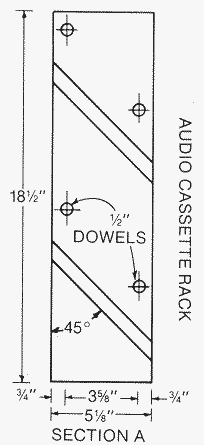
- Drill holes for the rods. (Depending on the size of
your sides you can have one or two sets of rods.)
- Assemble the cassette holder.
Cut the Wood to Size
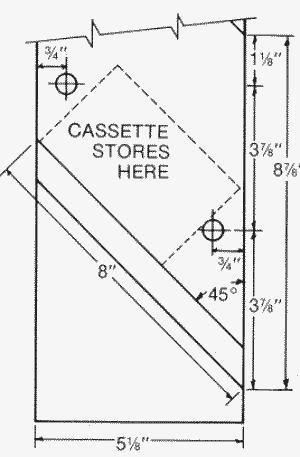
For this project there are two sides, two shelves, and
rods. Wood from a lumber yard may not be square so square the ends before
cutting the stock.
- Crosscut the stock using a table saw with a stop block.
Note: do not cut the shelves at this time because of the bevel cuts to be made
later. Guide the wood through with the miter gauge. Note: Do not use a miter
gauge with the rip fence as it may cause the wood to bind.
- Rip the stock. Measure from the rip fence to the inside
of the blade so that the cut is made on the scrap side of the wood and is the
proper dimension.
Cut the Dadoes for
the Shelves
Check your plans for the exact location of the dado cuts.
- The dadoes on this project are cut at a 45 degree
angle. Use a table saw with a dado set to make the cuts. A miter gauge with an
extension fence and stop block will assure an accurate cut. A router with a
guide board clamped at the correct angle can also be used to make the dado
cuts. Note: Always start the router away from the wood and ease it up after
the bit is up to speed, to make a clean cut.
Bevel the Shelves
 Tilt the table or the
table saw blade at a 45 degree angle. A circular saw can be used for this step
by tilting the guide and blade at a 45 degree angle.
- If you are using a circular saw, clamp on a guide to
assure accuracy.
- Check to make sure the angle is correct, and cut the
shelves.
Drill the Holes for
the Rods
Use a drill or a drill press to make the holes.
- Measure according to the plans for the hole locations
and mark them.
- Set the depth for the hole to be drilled. A depth gauge
can be made with a piece of tape wrapped around the bit if you are not using a
stationary tool.
- Drill the holes for the bars.
Assemble the
Cassette Holder

- Sand the pieces before assembling.
- Assemble the unit dry to check for proper fit.
- Apply wood glue to all edges and rod ends. Then use
clamps to hold tight while drying.
- Apply finishing nails while drying for additional
strength.
- Sand the rack and apply the finish you have selected
according to the manufacturer's instructions.


 Tilt the table or the
table saw blade at a 45 degree angle. A circular saw can be used for this step
by tilting the guide and blade at a 45 degree angle.