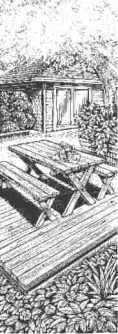
 An excellent weekend project,
this easy-to-build picnic table will soon become the focal point of your
backyard. Redwood’s beauty and durability will ensure countless summers filled
with barbecues, picnics and outdoor parties.
An excellent weekend project,
this easy-to-build picnic table will soon become the focal point of your
backyard. Redwood’s beauty and durability will ensure countless summers filled
with barbecues, picnics and outdoor parties.
An excellent weekend project,
this easy-to-build picnic table will soon become the focal point of your
backyard. Redwood’s beauty and durability will ensure countless summers filled
with barbecues, picnics and outdoor parties.
The economical, knotty redwood garden grades, such as Construction Common or Deck Common, are great choices for building your table. For maximum durability, choose Construction Heart or Deck Heart.
| Materials for Table | |||
| Quantity | Size | Length | |
| Top Slats | 5 | 2x6 | 60 inches |
| Cleats | 2 | 2x4 | 27 inches |
| Legs | 4 | 2x4 | 40 inches |
| Braces | 2 | 2x4 | 30 inches |
| Machine Bolts, Washers and Nuts | 6 sets | 3-1/2 inches x 1/4 inch | |
| Deck Screws | 1 pound | 4 inches | |
Build the Table Top
 Measure and cut
the 2x6 slats. Lay the slats on a clean and stable work surface with their most
attractive sides down. Separate the slats with 1¼4-inch spacers and square.
Clamp the slats together with a bar clamp.
Measure and cut
the 2x6 slats. Lay the slats on a clean and stable work surface with their most
attractive sides down. Separate the slats with 1¼4-inch spacers and square.
Clamp the slats together with a bar clamp.
Fasten the Cleats
 Cut the 2x4 cleats to 27 inches and
trim the ends at 45 degree angles starting 2 inches down from top edge. Place a
cleat on edge 7 inches from each end of the table top. Allow a 3/4-inch margin
from the table's edges. With the combination countersink bit, drill two screw
holes into the cleat above each slat, deep enough to set the screw heads below
the surface. Fasten to slats with 4-inch screws.
Cut the 2x4 cleats to 27 inches and
trim the ends at 45 degree angles starting 2 inches down from top edge. Place a
cleat on edge 7 inches from each end of the table top. Allow a 3/4-inch margin
from the table's edges. With the combination countersink bit, drill two screw
holes into the cleat above each slat, deep enough to set the screw heads below
the surface. Fasten to slats with 4-inch screws.
Assemble the Legs
 Cut the legs to 39 inches with 38
degree parallel angles top and bottom. Loosely clamp legs together at their
centers with C clamps. Adjust the tension in the clamp until you can open the
legs to make a cross with a 28-1/2-inch span at each side, with tops and bottoms
aligned. Mark along the sides of each leg where they cross. Remove the clamp and
cut the half laps from each 2x4 leg. Re-clamp the legs in position. Attach leg
assemblies to table top cleat with two 3-1/2-inch x 1/4-inch machine bolts at
each connection.
Cut the legs to 39 inches with 38
degree parallel angles top and bottom. Loosely clamp legs together at their
centers with C clamps. Adjust the tension in the clamp until you can open the
legs to make a cross with a 28-1/2-inch span at each side, with tops and bottoms
aligned. Mark along the sides of each leg where they cross. Remove the clamp and
cut the half laps from each 2x4 leg. Re-clamp the legs in position. Attach leg
assemblies to table top cleat with two 3-1/2-inch x 1/4-inch machine bolts at
each connection.
Attach the Braces and
Legs
 Mark and cut table braces to fit
between the table leg assembly and the table top with 45degree angles at both
ends. Attach braces to table top with 4-inch screws from below. Drill bolt holes
through the “X” of the legs and completely through the angled ends of each 2x4
brace. Countersink the bolt holes to accommodate washers and nuts. Install the
bolts and remove the clamps.
Mark and cut table braces to fit
between the table leg assembly and the table top with 45degree angles at both
ends. Attach braces to table top with 4-inch screws from below. Drill bolt holes
through the “X” of the legs and completely through the angled ends of each 2x4
brace. Countersink the bolt holes to accommodate washers and nuts. Install the
bolts and remove the clamps.