Arched Bridge

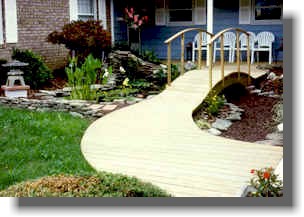
Making curved structures out of lumber can be challenging but quite rewarding. This picture shows a flowing walk leading over a curved bridge in the front courtyard of a home.

The walkway is easy to construct because you use ground contact treated lumber, (.40 cca) supported by the ground.


The bridge is made of two pressure treated 2x12 stringers. Determine the arch needed based on your conditions. You can use a string with a tack at one end and a pencil at the other as a compass to draw the arch. A note of caution…it's easy to have an arch that is too steep. It's better to have a shallow bridge rise that is safe to traverse in any weather. The one pictured above is the maximum rise you would want.

Drawing 1

Begin building the bridge with the two stringers (3 for a bridge over 28" wide). Use  2"x12" pressure treated material and cut as much of the curve as possible out of it starting 3 1/2" up on each end. The dashed line on the drawing above represents where your compass ran off the top of  the lumber when drawing the curve. After the curve is cut take the bottom sliver that was cut out and attach it to the top of the stringer completing the curve.  Fasten the bottom sliver to the top with scabs nailed to the inside where they will not show. 
Use 2x4 material as the walkway joists. Cut straight 2x4 material similar to the drawing following your curves.  Keep the overhang of the decking 4" or less past the 2x4 joists. More than 4" of overhang beyond your substructure will allow the boards to warp. Design a substructure that rests on the ground following the curve you desire. 
The transition piece from the bridge to the walkway will need to be measured and custom made. These dimensions will vary with every project. Do not nail any decking until you have substantial portions of the sub-structure and bridge completed.  Build the walkway to within approx. 3 feet of each side of the bridge.  This allows the transition piece to be custom made to "transition" both in height and width for a smooth flow between walkway and bridge.
Drawing3

Drawing 2

To achieve the desired curve the decking will be trimmed into wedge shaped pieces following the radius of the curves. Cut the 5/4 " decking along it’s length tapering from one end to the other. Reference Drawing 3.  Trim more from some pieces and less (or none) from others. The sharpness of the radius determines how much to cut. 
Measured and cut the taper for each deck board in place as you work your way along. After finishing a large section, recheck the fit and nail that decking in place. When completed trim the deck board ends off with a circular saw for straight and shallow curves. Use a sabre saw for sharper curved areas.