A. The
edges of the drawers, and of the drawer opening are worn to show repeated
use. Distressing: Shown above are a few results of simple antiquing. The stained level of the finish shows through behind the paint, and the paint is worn in areas that would likely see use through the years. The antiquing was done with a grey 3M pad. The mouse hole was done with needle nose pliers. |
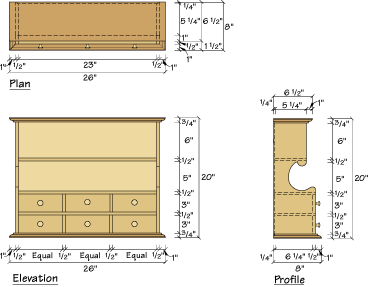
The wood used for this project should have a reasonably tight grain and be fairly inexpensive. In our part of the country, poplar fit the bill. Start by cutting the pieces to the sizes given in the Schedule of Materials. |
Using the template provided. (In order to view the Pullout Plans, you'll need Adobe Acrobat), mark and cut the shape on the sides, then sand the edges to smooth the profile.
Next, cut a 1/4" x 1/4" through-rabbet on the back inside edge of each side, and stopped rabbets of the same dimension on the top and bottom. Stop the rabbets 1 1/4" from each end. |
Now rout the edge treatment of your choice on the front and side edges of the top and bottom pieces. I used a simple ogee bit.
Before the hutch can be assembled, notch the two dividers and the center shelf with bridle joints (also called egg-crate joints) to form the six-drawer openings. Lay out and mark the location for the shelves on the sides and nail the shelves in place. Next nail the top and bottom to the sides, slide the divider section into place and nail through the shelf and bottom to hold it in place. |
Double-check the drawer sizes against the Schedule of Materials, then cut the drawer pieces to size. I used rabbeted joinery to provide a little extra strength to the drawers. Cut a 1/4" x 1/2" wide rabbet on both inside ends of the fronts, and another 1/4" x 1/2" wide rabbet on the back ends of each side. Next cut a 1/4" x 1/4" groove on the inside bottom edge of each drawer side and front, starting the groove 1/4 " up from the bottom edge. Assemble with nails holding the drawer backs flush to the top of the drawer sides to allow the drawer bottoms to slip into the side grooves under the drawer back. Leave the drawer bottoms loose at this time.
Cut the hutch back to size and attach the knobs to the center of each drawer. Now you're ready to put an antique finish on the piece.
The finish is a five-step process. The first is to stain the entire piece as it would have been done originally. While this stain will be covered with paint, you should approach it with almost the same care as if it were your final finish. If your final paint color is light, the underlying stain should be dark to provide strong contrast. I used a brown mahogany gel stain on the piece and stained everything, including the inside of the drawers. |
Have a little fun. Use a ring of keys, hammer or screwdriver and beat on the piece a little. The idea is to provide the appearance of decades worth of wear, not abuse. It's tempting to go overboard. Think about how the damage you are inflicting could have happened — corners on the moulding would be dented, edges would be blunted and the drawers would have seen a fair amount of use. This is only the middle of the antiquing process, so don't go too far.
The next step is to apply a coat of paint to the piece. This would be a point in the hutch's life when it had fallen out of favor and had been relegated to the pantry or cellar. Because of this the paint job wouldn't be too neat or perfect, but rather an effort to cover the damage to the original stain. |
With the paint dry, get the keys back out and add some more “time” to the piece. As a next antiquing step, take some steel wool or an abrasive pad and wear through the paint at points of high contact. This would be around the knobs, where the drawers slide against the top and bottom surfaces of the cabinet, the edges of the shelves and on the edges of the sides.
With the paint finish distressed, add a coat of brown glaze to the piece, immediately wiping most it off after applying. The remaining glaze will leave a discolored look to the paint, and highlight the new dings and scrapes. |
As a final step, add a coat of flat or satin clear finish to protect the paint and glaze.
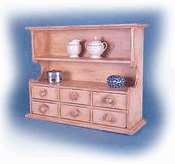
Your completed antique hutch can be placed
on a counter or table top, or can be hung on a wall. Enjoy it, and happy
antiquing!
No. | Item | Dimensions (T W L) | Material |
1 | Top | 3/4" x 6 1/2" x 26" | Poplar |
1 | Bottom | 3/4" x 8" x 26" | Poplar |
2 | Sides | 1/2" x 7" x 18 1/2" | Poplar |
2 | Bott. shelves | 1/2" x 6 3/4" x 23" | Poplar |
1 | Top shelf | 1/2" x 5 1/4" x 23" | Poplar |
2 | Dividers | 1/2" x 6 1/2" x 6 3/4" | Poplar |
6 | Drwr fronts | 1/2" x 3" x 7 3/16" | Poplar |
12 | Drwr sides | 1/2" x 2 15/16" x 6 1/4" | Poplar |
6 | Drwr backs | 1/2" x 2 1/2" x 6 11/16" | Poplar |
6 | Drwr bottoms | 1/4" x 6 1/4" x 6 11/16" | Poplar |
1 | Back | 1/4" x 18 3/4" x 23 1/2" | Poplar |
6 | Knobs | 1" diameter | Poplar |