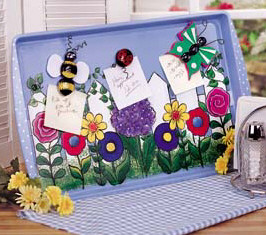
A Garden with Magnetism
|
Supplies |
Surfaces |
|
|
|
|
Instructions |
| Transferring Patterns
Lay tracing paper over pattern and draw the basic lines. Lay this tracing on the surface to be painted. Slip graphite paper between the tracing and the surface and secure. Trace with a pencil or stylus to transfer the design. Do not trace details until after basecoating has dried. Preparation Clean metal with 1:1vinegar/water mix; dry. Painting Instructions 1. Use #12 flat shader to paint entire cookie sheet with Soft Blue. Let dry. 2. Trace and transfer pattern on left side. Flip pattern and repeat on right side. 3. Paint picket fence Bright White. Use sponge to pounce on foliage with Jungle Green and Bright Yellow. 4. Paint flowers as follows, working from left to right: first flower Deep Fuchsia highlighted with Bright White; next flower Real Red highlighted with Deep Fuchsia and Bright Blue, with Bright White center; next flower Bright Yellow with Real Red and Bright Yellow center; next flower Bright Blue shaded with Coal Black and Bright Yellow center. Center flower is sponged with Bright Blue, Deep Fuchsia and Bright White (no pattern). Repeat flower colors for right side of cookie sheet. 5. Use liner and Jungle Green for stems and random vines around fence pickets. 6. Use appropriate flat brush double loaded* with Jungle Green and Bright Yellow for leaves. 7. Use liner and Coal Black to outline all and add details. Add Bright White dots to tray ends. Magnets 1. Ladybug: Use liner to add Coal Black dots, center line and head on flat side of marble. Let dry. Paint over black details with Real Red. 2. Bee: Paint flat side of mega marble with Coal Black stripes. Let dry. Cover unpainted areas with Bright Yellow. 3. Butterfly: Paint flat side of 3 small marbles Coal Black. 4. Cut 7" pieces of wire for antennae for each insect. Bend wire in center and curl ends around pencil. Finishing Instructions 1. Cut circles and bee shape from black foam, butterfly shapes from green and pink foam, bee wings and butterfly details from white foam. 2. Hold antennae wire under marble. Peel backing and adhere foam pieces to marbles (refer to photo). Use craft glue to adhere marbles to foam for butterfly. 3. Attach magnetic tape to bottom of each bug. 4. Punch holes with metal punch 3-1/2" from the top. Cut wire about 20" long. Put wire ends through holes, from back of cookie sheet. Curl ends around pencil. Techniques *Double Load: Dip a flat brush in clear water and lightly press on a paper towel only until the sheen leaves the bristles. Load two different colors of paint onto the brush, one color on each corner. Stroke the brush back and forth on the palette, blending the paint until the color gradually blends in the middle. |