Recreation & Hobbies
To print: Select File and then Print from your browser's menu.

This page can be found at:
http://www4.diynet.com/DIY/article/0,2058,7044,00.html

 Three-Panel Screen -- Stiles, Tenons and Mortises

From "Three-Panel Folding Screen" Episode WWK-105


Project Image
The basics of mortise-and-tenon joinery are demonstrated in the construction of this Asian-influenced three-panel folding screen. This stylized piece is made from Australian lace-wood panels, an ebonized frame and knuckled wood-hinges. The distinctive frame is highlighted by angle-cut accents and a crescent-ridge design.

Project Image
The crescent-ridge design and wedge-cut stiles provide a nice accent at the top of the screen, and the proximity of the cut angles adds to the dynamic tension of this piece.

Project Image
Figure A

Project Image
Figure B

Project Image
Figure C

Project Image
Figure D

Project Image
Figure E

Project Image
Figure F

Project Image
Figure G

Project Image
Figure H


Project Image
The wooden knuckle hinges are one of the refined touches that further distinguish this elegant piece.

Project Image
Figure I

Project Image
Figure J

Project Image
Figure K

Project Image
Figure L

Project Image
Figure M

Project Image
Figure N

   
This project features the major steps in the construction of an elegant folding three-panel screen. The look of this piece has an Asian influence, and it features lace-wood panels and an ebonized wood frame. This piece is a challenge to build, and its wooden knuckle hinges require some special woodworking techniques.

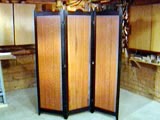
Matched pieces of Australian lace-wood are used to create the three separate wood panels. The maple-wood frame is "ebonized" (i.e., stained solid black) to provide a dark contrast against the lace wood. The crest rails and wedge-shaped details at the top of the screen add dynamic tension to the design.

In our demonstration, two of the panels had already been made and put together. Since the three panels are essentially identical, the construction of the third and final panel -- as demonstrated in the steps shown in this episode -- is representative of the methods and techniques used to make the full screen.


Materials:


Maple-wood stock
Table saw with stop block
Band saw
Multirouter
Hand router; flush-bearing bit
Table router
Jigsaw
Corner chisel
Scrap stock for making jig
Safety glasses or goggles

Note: Cut sizes may vary. For exact measurements, please contact David Marks through his Website -- information below under Resources.

Safety Alert: Always wear safety goggles or safety 
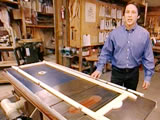
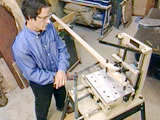
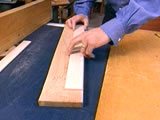
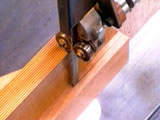
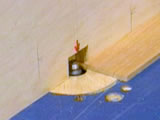
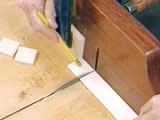
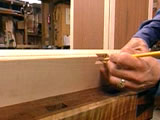
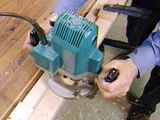
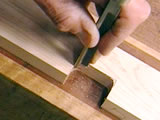
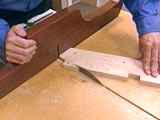
glasses when working with wood, saws, drills, routers, etc.


Once the maple stock for the frame has been cut to length and laid out (figure A), the first phase in construction of the screen panel is to begin making the joinery. A mortise-and-loose-tenon construction is used for the joinery. Because of the crest-rail design at the top of the piece, the top rail is slightly narrower than the bottom rail, so the mortises and tenons for each rail are cut to different sizes (figure B).

A multirouter is used to cut the mortises. The multirouter can be set up for cutting mortices in lengthy pieces -- such as the frame stiles -- and can be adjusted easily for cutting mortises of different sizes (figure C).


The Basics of Making Tenons


Steps:


  1. In furniture-making, the use of mortises and tenons are as basic as nails are to carpentry. In this piece, the stock that will be used to make the tenons is first run through the jointer to create one perfectly straight side. Then a table saw is used to rip the stock to the proper width (figure D).


  2. After the piece is cut to width, use a band saw to cut it to the proper thickness (figure E), leaving the thickness just slightly oversized.


  3. Use a power planer to plane the piece down to its final, exact dimension (figure F).


  4. With the stock cut to its final dimensions, use a table router to round the edges (figure G) so that they'll fit the rounded corners of the mortise.


  5. With the stock fully prepared, use the table saw -- with a stop block clamped to the proper measurement -- to cut the tenon sections to length (figure H) so that they'll fit precisely in the mortises.


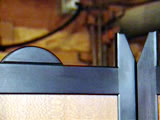
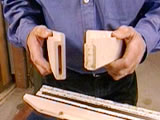
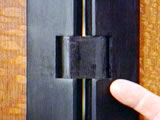
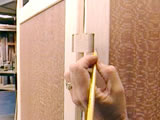
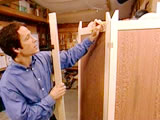
Using Jigs to Cut and Prepare the Frame for the Wood Hinges

In order for the frame to open and close smoothly, it's critical that the wooden hinges fit precisely in the notches cut in the frame stiles (figure I), and for the notches to be cut dead-on accurately in the frame. The easiest way to achieve precise and properly placed cuts for the notches is to create a wooden jig for cutting the stiles. The precut notches in the jig will ensure that the references for the stiles are accurately aligned.


Steps:


  1. With the jig made and the stock cut to length, place the stock in the jig. Use a pencil to mark the location and dimensions of the cuts to make the notches in the stile (figure J).


  2. With the notches penciled in, remove the stock from the jig and use a jigsaw to rough out the bulk of the wood for the notches.


  3. Once the notches are roughed out, clamp the stock back into the jig and use a hand router to finish cutting out the notches (figure K). Use a flush-bearing bit to follow the pattern on the jig and clean up the notch cutouts.


  4. The router bit leaves rounded corners. Since squared notches are required to ensure that the hinges won't bind, use a sharp corner chisel to cut square corners in the notches (figure K).


  5. The angled wedge cuts at the tops of the stiles provide one of the distinctive design elements of the piece, and the close proximity of the adjacent angles (figure M) is part of what creates the dynamic tension of the design. For precise fit and appearance, the angles must be cut very accurately. Because accurate cuts are critical for the symmetry of the piece, another jig is created to ensure that all of the wedges are cut identically. With the jig in place, identical cuts for each stile can be made on the table saw (figure N).

A DIY Wood Works Tip: It's often said that, when woodworkers are making furniture, they spend more time making jigs than they do making cuts. That's probably true -- and for a good reason. The proper use of jigs helps ensure accuracy, speed and uniformity when creating furniture elements.


The next phase of this project includes cutting the lace-wood panels and creating strong wooden hinges.


Resources
> Fine Woodworking
> The Small Wood Shop (The Best of Fine Woodworking)
> Woodworking Techniques: Best Methods for Building Furniture from Fine Woodworking
> Mastering Woodworking Machines (Fine Woodworking Book)
> David Marks Website
> The Complete Woodworker's Companion
> The Complete Book of Wood Joinery
> Advanced Woodworking
> Popular Woodworking Magazine (F & W Publications, Inc.)


Related Projects
> Freestanding Mirror -- Bent-Lamination Legs
> Freestanding Mirror -- Handcrafted Handles and Wood Finish
> Three-Panel Screen -- Lace-Wood Panels and Wooden Hinges
> Three-Panel Screen -- Faux-Ebony Finish
> Freestanding Mirror -- Building the Frame
> Three-Panel Screen -- Installing Wooden Hinges and Panels
> Freestanding Mirror -- Assembling the Base