DINING OUT
Build this outdoor table and bench set.
It's easy to understand the appeal of outdoor dining. Think of fresh air and bright sunshine with a soft breeze keeping pesky insects at bay. Then think of yourself surrounded by your family and friends. You're sitting there with a cold drink while some sumptuous food sizzles on the grill. Few of us would wish for much more than that.
Of course, to complete the picture, you'll need a table and a place to sit. And that's where our project comes in. This cedar table and bench set provides a perfect foundation for that alfresco dining experience. It accommodates up to eight people, but maintains a sense of intimacy if used by two. The table is designed to accept an umbrella to shelter you from the hot summer sun or untimely shower. Best of all, the project is not too difficult. Four weekends should be enough time to build it.
As far as the table umbrella is concerned, you can order it from a number of different mail-order suppliers. We bought ours from Smith & Hawken, 800-776-3336. (The umbrella is item No. 621508 and the base is No. 624460. Together, they cost about $794, plus postage.)
We chose red cedar for this project. This wood resists rot and insect infestation and it's readily available at lumberyards and home centers. If you can't purchase kiln-dried cedar for your project, you should buy the material several weeks before starting and stack it someplace where it will have a chance to air dry. Place evenly spaced strips of wood between each layer of boards to allow air to flow through the stack of lumber. Other suitable wood species for this project are redwood, teak and cypress. These woods are more expensive than cedar, however, and you may have a hard time finding them at lumberyards and home centers.
We should mention that we used Titebond II wood glue to assemble the furniture joints. This single-part glue is waterproof for all but the most extreme situations, such as when joints are subject to continuous submersion in water. Unlike epoxy or resorcinol adhesives that are truly waterproof, this glue is easy to use and readily available.
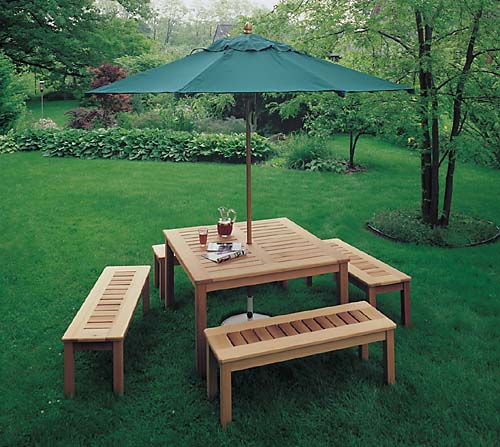
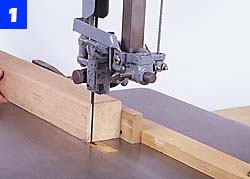
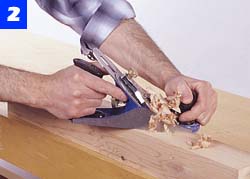
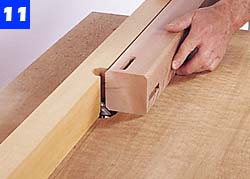
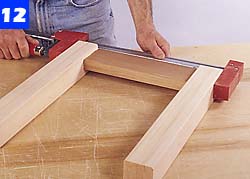
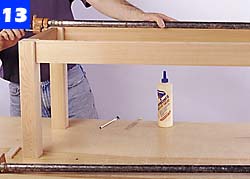
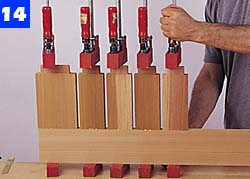
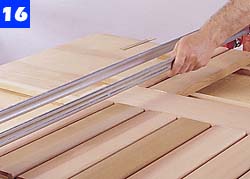
| Making The Parts The table legs are cut from 4 x 4 stock (or they can be glued up from thinner material). When using 4 x 4 stock, cut each leg to rough length. Next, clamp a fence to the band saw table, and rip the blanks to a 2 3/4 x 2 3/4-in. square (Photo 1). Then clamp the leg to a workbench, and use a razor-sharp plane to remove the saw marks (Photo 2). Unless you are very experienced with a hand plane, check the workpiece frequently as you go. The edges of the leg must remain square to one another. Remember that you are only smoothing the surface, so do not remove too much material. Use a miter gauge on the band saw to crosscut the leg blanks to finished dimension (Photo 3). Since the bench legs are smaller than the table legs, it is a better use of materials to glue them up from three pieces of 3/4-in.-thick stock. You can simplify the job if you plan to make the blanks large enough to cut four legs from each glued-up stack. Rip and crosscut material for the leg blanks slightly oversize, then use a foam roller to spread glue on the mating surfaces of each piece. Assemble the pieces into a stack, and clamp the pieces together (Photo 4). After about 20 minutes, scrape off the glue that has squeezed from the joints, then allow the glue to fully set. Now use the table saw to rip the blanks to 21/4 in. wide, and crosscut the bench legs to finished length. Lay out the mortise locations in all the legs for the apron joints. You can speed the process by clamping four legs together with their ends perfectly aligned. Then, mark across the stack using a square (Photo 5). Next, use the router and edge guide to cut the leg mortises (Photo 6). It's best to use a spiral up-cutting bit in the router because that type of bit pulls the dust and chips out of the cut, and reduces the strain on the motor. This also keeps the bit's cutting edge cooler. Rip and crosscut 1-in.-thick stock for the table and bench aprons as well as for the top frames and slats. Install dado blades in the table saw, and then use the miter gauge to guide the workpiece over the saw blades when cutting tenons (Photo 7). Note that you can use the rip fence as a stop to gauge the tenon length. Since the tenons are 1 in. long, you need to make two passes to complete each cheek. Cut the tenons across the width of each workpiece, then adjust the blade height and move each workpiece over the blade on edge to cut the shoulder (Photo 8). Clamp each workpiece upright in a vise and gently round over the tenon's edges using a wood rasp (Photo 9). Lay out the mortise locations for the tabletop and benchtop joints. Use a router with an edge guide and a spiral up-cutting bit to cut the mortises (Photo 10). It is best to clamp three workpieces of the same width together when routing to form a wide and stable base for the plunge router. Mark the location of the umbrella posthole in the center rail of the tabletop, and then use a Forstner bit in the drill press to bore the hole. After laying out the locations of the holes in the aprons for mounting the top, use a Forstner bit in the drill press to counterbore a recess for each screwhead. Next, use a 3/16-in.-dia. bit to drill the pilot holes for the screw shanks. Each of these holes is centered in a recess. To complete the part-making process, install a chamfer bit in the router table, then use it to cut the 3/16-in.-deep chamfer on the table and bench legs, aprons and top parts as shown in the plans (Photo 11). Note that not all edges are chamfered. Assembly Begin assembly with the benches, since they are smaller and are much easier to work with. After you refine your technique on them, you can assemble the table. It's worth noting that all the parts for the table and benches should be dry assembled before glue is applied. With the assemblies joined in this manner, make reference marks and numbers on the backs of the parts or in some other discreet location. Before proceeding to gluing and clamping, gather the parts together in batches so they are not confused during the assembly process. In some cases, you'll want to make a second dry fit midway through the assembly process, such as when gluing and clamping a stile or rail to multiple slats that have been glued to a stile or rail on the opposite side. This is a necessary evil to ensure that the parts go together smoothly--the parts may have fit the first time you tried them but shifted slightly when they were glued up as a subassembly. Apply glue to the mortises of two bench legs and on the tenons of one short apron. Use a small wood shim to spread glue on the mortise walls, and use a small brush to coat the tenons. Press together the apron and legs, and then clamp the subassembly to pull the joints tight (Photo 12). When the glue is dry on these parts, glue and clamp the long bench aprons to the end subassemblies (Photo 13). It's best to do this on a flat work surface to ensure that the base assembly is not twisted. Assemble the table base in the same manner as the bench bases. Make two subassemblies consisting of a pair of legs and one apron. When the glue has set on these, join the subassemblies spanned by a pair of aprons. Now move on to assembling the benchtops. Since there are several slats in each top, assemble each top in stages. First, glue and clamp the slats to one long rail (Photo 14). After the glue sets on those joints, apply the opposite rail. Approach the tabletop assembly in the same manner. Begin by gluing and clamping a slat at each end of the center rail. Fill in between these two slats with more slats (Photo 15). When the glue is dry on this subassembly, glue and clamp slats to the opposite side (Photo 16). Next, glue and clamp the side rails to this subassembly (Photo 17). When the glue is set on that subassembly, position clamps across it and then glue and clamp one stile to it (Photo 18). Complete the top by gluing and clamping the second stile.
Using this technique, you will not have to worry about getting all the parts together before the glue begins to set. Your results will be better, and the stress of a frantic assembly is eliminated. Mark the benchtops and tabletop for the 45 degree corner cuts, and make these cuts with a sabre saw. Sand the cut corners smooth, then use the chamfer bit in the router to shape the table edges and benchtops. Use the router and chamfer bit to shape the top edge of the umbrella hole as well. Rip, crosscut and miter the 1-in.-thick stock to make corner blocks. Bore and countersink pilot holes in each block, and then attach them with screws to the aprons for the table and benches (Photo 19). nvert the tabletop on a padded surface, then place the base over it. Adjust the base so there is an even reveal on all sides of the top, and then attach the base to the top with screws (Photo 20). Assemble the benches in the same manner.
|
 |
| Rip the table leg stock out of a cedar 4 x 4. Clamp a temporary rip fence to the band saw table to do this. | |
 |
|
| Clamp a table leg to a benchtop and remove saw marks with a hand plane. To make a smooth cut, push the plane at an angle. | |
 |
|
| Crosscut the legs on the band saw. Here, a shopmade crosscutting table and a miter gauge are used to make the cut. | |
 |
|
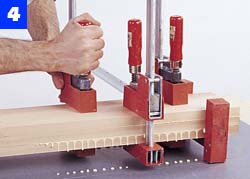
| For the bench legs, spread glue on 3/4-in.-thick stock. Lay disposable material under the pieces and clamp them together. | |
 |
|
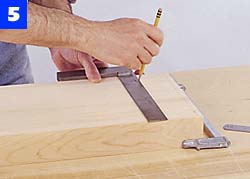
| Rip and crosscut the individual bench legs to size, and then clamp them together. Mark out mortise locations on the legs. | |
 |
|
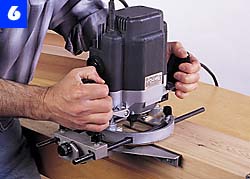
| Using a spiral up-cutting bit in a plunge router, cut the table leg mortises. Two legs clamped together provide a stable base. | |
 |
|
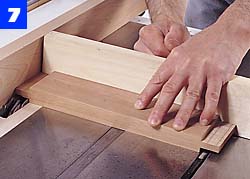
| Use a dado blade setup in the table saw to cut the tenons on the apron pieces. Butt each apron to the fence, and make the cut. | |
 |
|
| To cut the shoulders on a tenon, stand the apron up, and hold it firmly to the miter gauge. Butt it to the fence and make the cut. | |
 |
|
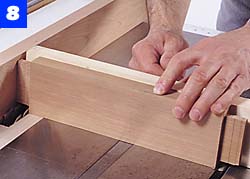
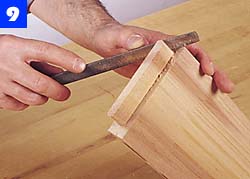
| Round off a tenon with a rasp. The tenon’s radius matches the radius left by the spiral up-cutting bit used to cut the mortise. | |
 |
|
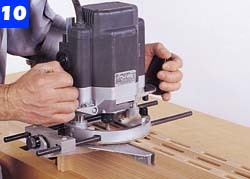
| To cut the long row of mortises in each stile and rail, clamp three of the work-pieces together to support the router. | |
 |
|
| Use a chamfer bit in the router table to cut the chamfer on all four edges of the legs for the benches and table. | |
 |
|
| Glue and clamp together a pair of bench legs and one short apron. Make two of these subassemblies. | |
 |
|
| Join two leg-apron subassemblies spanned by a long pair of aprons. Glue and clamp this to complete a bench base. | |
 |
|
| The first stage in assembling a benchtop is to glue and clamp slats to one stile. Use one clamp in the center of each slat. | |
 |
|
| Multiple subassemblies are made in assembling the tabletop. First, slats are joined to the center rail. | |
 |
|
| A second set of slats is glued and clamped to the center rail. Again, use one clamp in the center of each slat. | |
 |
|
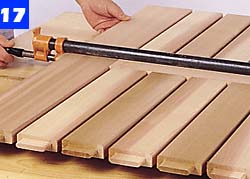
| Glue and clamp a side rail to the center rail. One clamp, carefully centered, should provide enough force. | |
 |
|
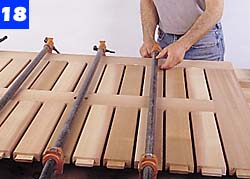
| Clamp one stile at each end of the top subassembly. Space clamps evenly and at the center of a tenon. | |
 |
|
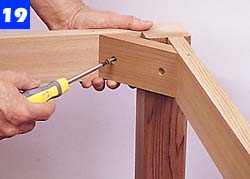
| A corner block is installed at each leg on the table and the benches. A pair of screws holds each block to the aprons. | |
 |
|
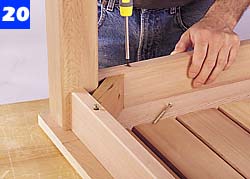
| Attach the tabletop to the base with several screws. Drive each screw into its matching counterbored hole in the apron. |
Sand all surfaces with 120-grit and 140-grit sandpaper, and remove all dust with a tack cloth. While cedar is resistant to rot and insect infestation, it will weather if left untreated. To preserve its natural color and protect it from the elements, apply a penetrating finish with a high-quality brush.
A pigmented stain could easily be used on this project. In fact, pigmented finishes provide greater protection against weather damage--even if they do obscure the wood's grain. Although most people prefer white, green or redwood-colored finishes for outdoor wood furniture, there's nothing to prevent you from being a bit more creative. The finish could be color matched to other outdoor furnishings, or to the house itself.
For maximum protection against the elements, use a paintable water-repellent preservative, followed by a compatible primer and topcoat. Visit your paint store to buy these three products and check that they are fully compatible.
| MATERIALS LIST--UMBRELLA TABLE AND BENCH | |||
| Key | No. | Size & Description (use) |
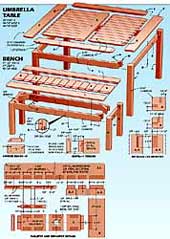 |
| A | 4 | 2 3/4 x 2 3/4 x 27" cedar (leg) | |
| B | 4 | 1 x 3 x 43 7/8" cedar (apron) | |
| C | 1 | 1 x 5 x 40 7/8" cedar (rail) | |
| D | 22 | 1 x 3 1/8 x 18 15/16" cedar (slats) | |
| E | 2 | 1 x 5 x 40 7/8" cedar (rail) | |
| F | 2 | 1 x 5 x 48 7/8" cedar (stile) | |
| G | 16 | 2 1/4 x 2 1/4 x 16 1/2" cedar (leg) | |
| H | 8 | 1 x 3 x 12" cedar (apron) | |
| I | 8 | 1 x 3 x 44 7/8" cedar (apron) | |
| J | 44 | 1 x 3 1/8 x 9" cedar (slats) | |
| K | 8 | 1 x 5 x 9" cedar (rail) | |
| L | 8 | 1 x 5 x 48 7/8" cedar (stile) | |
| M | 20 | 1 x 2 3/4 x 5 1/4" cedar (block) | |
| N | 40 | 2" No. 8 fh galvanized screw | |
| O | 48 | 3" No. 8 fh galvanized screw | |
| Misc.: Table umbrella No. 621508; umbrella base, No. 624460, Smith & Hawken Fulfillment Ctr., 11882 W. Burleigh St., Wauwatosa, WI 53222; sandpaper, waterproof wood glue. | |||