Secretary Desk

This style of secretary desk is very handy for writing out the bills and other necessary paperwork. One nice thing is that when you get sick and tired of all this accounting, you can just flip up the lid and all papers, envelopes and check stubs fall inside, neatly out of sight and mind. Seriously though, it provides good storage, takes little space, and gives a fair size desk area to work on.

Construction is none too complicated too, because it is mostly made from solid panels. These are easier to construct than frames with floating panels within, but you must be careful with solid panels to make provision for wood movement. Any wide piece of wood is going to move across the grain with moisture variations, and if you don't join the pieces such that they can move freely then surely something will break. This desk is a study in allowing for wood movement.


Desk Lid Hinge


Parts List- Secretary Desk

2- 3/4 x 16 x 38 sides
1- 3/4 x 22-1/2 x 15-3/4 desk top
1- 3/4 x 22-1/2 x 16 lid
1- 3/4 x 6 x 24-1/2 top plate
4- 3/4 x 2 x 22 top and bottom rails
6- 3/4 x 1-1/2 x 22-1/2 drawer frame rails
4- 3/4 x 1-1/2 x 13-1/2 mid and upper drawer frame runners
2- 3/4 x 1-1/2 x 12 bottom drawer frame runners
3- 3/4 x 7-1/2 x 23 drawer fronts
1- 3/4 x 1 x 11 feet from which to cut out base pieces
6- 1/2 x 6-7/8 x 15-1/2 drawer sides
3- 1/2 x 6-7/8 x 21-3/8 drawer backs
2- 3/8 x 4 x 6-3/4 cubby horizontals
1- 3/8 x 4 x 8-1/2 cubby horizontal
2- 3/8 x 4 x 6-1/2 cubby verticals (inside)
2- 3/8 x 4 x 6 cubby verticals (outside)
1- 1/4 x 23 x 37-1/2 plywood back
3- 1/4 x 14-3/8 x 21-5/16 drawer bottoms

PANELS

Photo 1- Edge glue stock together to get the wide parts you'll need. I make wide glue ups like this and then rip the glue up to get several parts. Using biscuit splines or dowels to align the boards during glue up makes the procedure go fast and easy.

Begin by gluing up the panels, as in photo 1. You'll need a panel for each side, one wide one for the desk top and lid, as well as several for the drawer parts. If you are lucky you'll find stock wide enough for the drawer parts, but I wasn't so I glued together pieces wide enough to rip out three drawer parts at once. Nesting the parts this way makes for less clamping since you are dealing with less panels.

You'll need thin stock for the drawers and cubbies. If you don't have a planer, visit a page on this site with info about making thin stock by clicking here.

Dealing with wood movement begins with laying out the sticks for this panel glue up. Not only will the panels tend to change dimension along their width, but if the sticks are flat sawn they will tend to cup slightly with moisture changes. This is because the moisture-related movement of most woods is greater in the direction parallel to the growth rings than it is perpendicular to the rings (see drawing). Since shrinkage (or expansion) is greater one way than the other, tensions build up which cause the wood to bend, or cup.

This cupping is usually not very great, but if all the sticks in a glued up panel that is 18" wide cup in the same direction, the combined effect can be enough to make the entire panel cup a quarter inch or more. If the panel is screwed to something straight, the cupping will pull against the straight part and the result could be a split panel or a very twisted piece of furniture.

The solution is to arrange the panels so that the individual sticks in it do not all cup in the same direction (see drawing). Do this by orienting the tree center direction of each stick on the opposite side from the adjacent sticks. This way if cupping occurs, the effect on the panel will be to make it follow an "S" curve, which will reduce the overall effect of the movement and keep the panel relatively flat.

DRAWER FRAMES

The drawer frames consist of rails that run between the desk sides, and runners that "run" along the sides. These runners serve double duty both as a place for the drawer above to rest and slide upon, and as the kicker for the drawer below. The kicker prevents the drawer from tilting down when it is pulled out. There is no drawer frame above the top drawer to act as kicker, so you must apply kickers for it later. The desk top would serve as this kicker, but then when the desk lid is opened it would hit the top of the uppermost drawer front, so it must have space between the lid and the top drawer. This space is provided by a front and rear rail. Note that the bottom drawer frame runners are shorter than the others. This frame fits between the two bottom rails, rather than on top of them, and thus has less room.

Photo 2- Use this table saw dado setup to cut grooves in the drawer frame fronts and rears to serve as mortises. If you don't have a dado set for your saw, you can use a regular combination blade, just do several setups to get a mortise that is 1/4" wide and centered in the part.

Join the frames with slot mortises and stub tenons cut on the table saw. Set up a 1/4" wide dado, 1/2" above the table as in photo 2. Clamp a stop on the fence as shown to limit the length of the slot to 1-1/2" at its deepest point. This stop must have the same slot cut in it so you can locate it over the blade. Center the slot along the 3/4" thickness of the parts and cut the slots on the inside edges of all front and rear rails.
Photo 3- Cut tenons on the ends of the drawer frame runners using your miter gauge at the table saw like so. Again, you don't need to use a dado set here, you can make the cuts with repeated passes using a combination blade.

To cut the tenons on the runners, leave the 1/4" dado setup on the saw, remove the stop, and put your miter gauge on the table. Set the fence 1/2" from the outside of the dado, and lower the blade to about 3/16" from the table top. Cut out the tenons as shown in photo 3, making two passes on each side to clear out the waste. With the dado at 3/16" above the table, the resulting tenon will be too thick to fit the mortises. Raise the blade a hair and recut the tenon, then check the fit. Adjust and fit until the tenon is a snug fit in the mortise- not so tight that it pushes the mortise walls apart, but not so loose that it rattles around in there.
Photo 4- Glue up the drawer frames. Before you put on the C-clamps, check to see that the frame is square by putting your tape on the diagonals across far corners. When these two measures are equal, the frame is square.

Glue up the frames by pulling them together with bar clamps, then cinching down the mortises onto the tenons with C clamps as in photo 4. Check that the frames are square before you put on the C clamps, after they are on you can remove the bar clamps.

CARCASE

When the panels are out of clamps sand them flat and smooth. You're a better woodworker than I if you can do this really well with a belt sander. I take mine to a local cabinet shop with a wide belt sander, which levels the panels accurately and leaves an excellent finish. They will have a minimum charge of 20 bucks or so, but it is well worth it. Machine sanding will also reduce the thickness of the panels significantly. If you start with stock that is 13/16" thick (as much standard 1x lumber is) you can have it all sanded to ¾ finish thickness. Have the drawer frames sanded to the same thickness at the same time, and do the same for the drawer and cubbie parts so that they have consistent thickness. This will help the dovetailing procedures a great deal.

Photo 5- A hand plane will smooth the angled cuts on the desk sides quickly and easily. It will do the same for all edges, though a block plane works best for end grain (that's what they were made to do). If you don't have a hand plane a belt sander will do the job, or a stationary belt or disk sander, or hand sanding, though this alternative will take time. A hand power plane will work well here too.

Rip the sides to width and cut them to length. A good way to cut wide stock to length is with a large cut off box on the table saw or you can use a miter gauge on the table saw with an extension fence screwed to it. I was able to cut the width on my 10" radial arm saw. Measure and scribe the angle on each of the sides, cut this out on the band saw or with a sabre saw. Smooth the resulting edge by sanding, or with a hand plane which is much faster (photo 5). Don't plane against the grain!
Photo 6- Cutting the dadoes in the desk sides with an overhead bearing flush trim bit. The bearing rides against the wood fence which is attached to a piece of plywood. The plywood is clamped to the desk side and bench with handscrews as shown. You could also use a straight flute bit and template guide in the router for this operation.

Cut dadoes in the insides of the desk sides for the drawer frames and desk top to fit into. Cut these using an overhead bearing flush trim bit in the router, along with a straight edge for the bearing to ride on (photos 6 and 7). Note in the photos that the straight edge is attached to a piece of plywood. This is because the clamps would get in the way of the router's travel if the straight edge were clamped directly to the desk side, and the plywood allows the straight edge to be clamped from behind. Also, the ply gives added spacing which I needed because of the height of my overhead bearing bit.
Photo 7-Your fence height and height of the overhead bearing flush trim bit need to be coordinated so that the bearing hits wood and the bit cuts the dadoes at the correct depth, 1/4". This may be easier to attain with a template guide and straight bit, but such a setup is a little trickier to align due to the offset of the template guide from the bit.

Cut stopped dadoes for the drawer frames, but cut the desk top dado through. This way the desk top has the added support of a through dado, needed because leaning on the desk lid will apply leverage on the top itself. But the drawer frames don't need this added strength and the front looks better with a minimum of through dadoes. Stop the dadoes at 1/2" from the front edge of the sides, and cut the dadoes at 1/4" deep.

Photo 8- Use this setup to put a stopped dado in the front corners of the drawer frames. If you don't have a dado set for your table saw, these cuts can be made with a band saw or by hand.

Cut the front corners of the drawer frames to fit around the stopped dadoes in the sides by setting up a 3/4" dado on the table saw as in photos 8+9. The fence needs to be set against the dado cutter so that it will cut along the full thickness of the drawer frames, so screw a board onto the fence as in the photo so you don't mar the fence itself. Clamp a stop on the fence as you did when cutting the slot mortises in the frame rails. The length of cut only needs to be enough for all surfaces to clear when the frame goes into the dado in the desk side. The depth of cut is critical-make it exactly the same as depth of the dadoes, so that the front rail ends contact the inside face of the desk sides in front of the dado.

Photo 9- A dado set makes the cut fast, easy and accurate since it cuts to a very even line and is easy to adjust for depth. Make test cuts on scrap to be sure you don't cut too deep, making a visible gap on the front of the drawer frame.

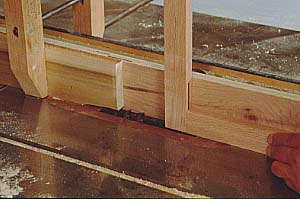
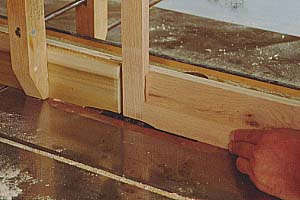
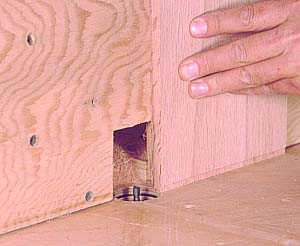
Join the four top and bottom rails to the sides with dowels, or with biscuits. In the case of the former, accurate drill press setups will be necessary to bore the holes in the desk sides, and a dowel jig will suffice for the rail ends. For biscuits, the lower rails can be joined 
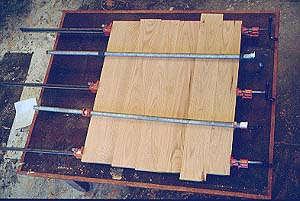
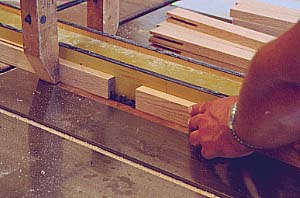
with a single setup of the biscuit joiner fence as in photo 10. Locate the biscuit at about 1/8" from the inside of the bottom rails. This is because on the back bottom rail you will cut a 1/4" rabbet on the outside of the rail to take the plywood back, and the biscuit must be out of the way of this rabbet. On the front there won't be a dado, but use the same setup as on the back to save some time.

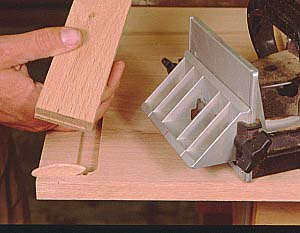
Photo 10- Use a biscuit joiner to locate biscuit splines for the top and bottom rails. Or, use a dowel jig for dowel holes in the rail end, and set up with a drill press to bore dowel holes in the desk sides. If you don't have a drill press, make a wood drilling guide by boring a hole of the dowel size you will use in a thick chunk of scrap. Align this chunk on the desk side so that when the drill bit is placed in it, the bit will be aligned correctly for the dowel. Use this to bore the dowel holes.

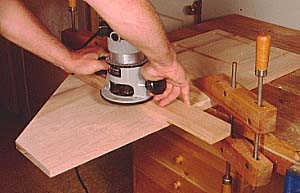
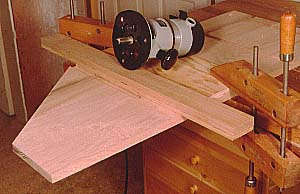
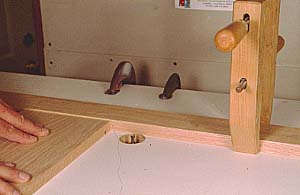
The top rails are positioned horizontally along their faces, unlike the bottom rails, and so require an extra step with the biscuit joiner. You can't cut the slots for the top rails in the desk sides by resting the machine's fence on the desk side's edge, as you did for the bottom rails. 
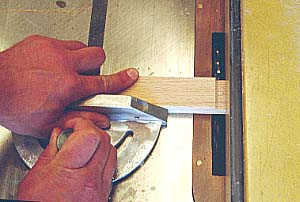
You must position a fence along the desk side as in photo 11, and butt the bottom of the machine against this fence. This requires careful measurement to locate the slot accurately, because you must account for the distance from the cutter to the outside face of the machine, which butts against the fence. On mine this measure was 13/32", which required some mathematical gymnastics to figure exactly where to locate the fence. Measure twice, cut once.
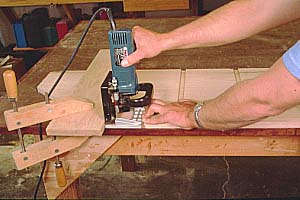
Photo 11- Aligning the biscuit joiner to a desk side for the top rail joint. You need to know exactly how far from the biscuit joiner base the blade is located in order to accurately locate the clamped on fence.

Locate the rear top rail 1/4" forward of the desk side rear edges, because it must be out of the way of the plywood back.

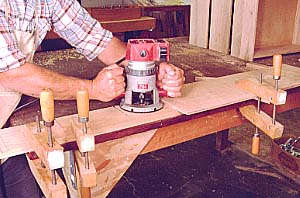
Cut rabbets in the rear edges of the desk sides for the plywood back, as well as in the top outside edge of the rear lower rail. Cut these on the table saw with a dado, or with a router and a 1/2" rabbeting bit. Don't cut the rabbet all the way through on the bottoms of the sides. Stop it where the rabbet on the rear lower rail begins. To do so on the table saw, you must start the cut in the middle of the panel for one side, and stop the cut in the middle for the other. For the latter, turn off the saw when the cut reaches the end point, and wait for it to stop before removing the panel. Don't try to "climb the cut" on a table saw, that is move the work onto the blade in the direction it is spinning. This is tempting for stopped cuts but extremely unsafe with a table saw.

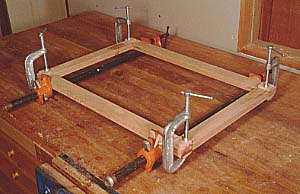
Cut out the desk top to fit in its dado, and prepare to assemble the carcase. The only parts that get glue are the biscuit joints that join the rails to the sides, and if you wish, the desk top to the sides. But you cannot glue the drawer frames onto the sides, because their grain direction runs at 90o to the grain direction of the sides. Cross-grain gluing like this over a wide expanse of panel will cause failure because the panel will expand and contract along its width with moisture variations, and the drawer runners will not expand and contract along their length. Truth is that the runners will do so along their length a tiny bit, but so little you can't measure it. But the side panels will move 1/8" or more, and if they are glued to the rails something must break. You can glue the desk top to the sides, however, because its grain direction runs the same as the sides, so it will expand and contract with the sides and thus stay aligned.

So how do you join the runners to the sides so that the panel can move? Use screws with holes that are larger than the screw shanks, so that as the panel moves it does not bear against the shank directly. Glue the 
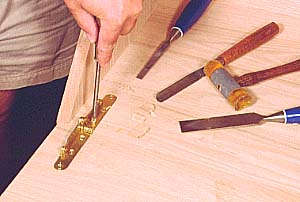
rails and desk top pieces, and assemble the carcase with the drawer frames placed within their dadoes. Scribe light lines across the sides where screws will hit the centerlines of the drawer runners. Use a tapered bit and countersink setup to drill holes for four screws in each runner. Set the countersink just deep enough to glue in a plug over the screw once it is set. Use a drill bit of a size for a good fit on the screws. Then- before you set the screws- use a larger bit to expand the diameter of the hole in the desk side by half the difference between the screw shank and the screw head. Don't make the hole too large, or the screw head won't have anything to grab. Then set the screws, and glue plugs in place.

As I said above you can glue the top in, but end grain gluing like this is not always the best. Since you are there with screws anyway, you might as well screw it down too. The hole depth you use in the runners may not be best for the holes in the top, since you are going into endgrain. A slightly less deep, or less wide, hole may prove better for a good grip. In general longer screws work better in end grain. Do tests in samples of the same wood.

There is one other accomodation you must make for the movement of the sides- the length of the runners. Be sure the total length, front to rear, of the drawer frames is slightly (1/16" or so) smaller than the space in which the frames fit. This is so that if the sides shrink they will not compress the plywood back of the cabinet against the ends of the drawer frames, in which case the frame would actually push the plywood out of its rabbet.

After the carcase is out of clamps, apply kickers under the desk top for the upper drawer. Use screws with larger shank holes in the kicker, just as you did for the drawer runners.

DRAWERS AND CUBBIES

The advantage of dovetails is that the parts are mechanically locked together. You can acheive the same effect with router-cut sliding dovetails, and they take less time. This project uses sliding dovetails to join the drawers together as well as to join the cubby parts to each other and to the top plate.

Photo 12- Cut dovetail slots for the drawers and cubbies on the router table with this procedure. Use a 3/8" wide router bit. Set the bit at 1/4" above the table for the drawer dovetails and 1/8" above for the cubbie dovetails.

Start by cutting the dovetail slots in the drawer fronts and in the rear end of the sides. Set up on the router table as in photo 12. Stop the cut 1/4" from the top of the drawer fronts by placing a clamp on the fence as shown. To stop the cut on the other side of each drawer front you'll need to move the clamp to the other side of the fence.
Photo 13- Cut the dovetails on the ends of parts for the drawers and cubbies with a router table setup like this. Having stock of very uniform thickness will help a lot to make uniform dovetail tenons that fit the grooves consistently.

To cut the dovetail tenons you'll need to hold the part upright while it goes by the cutter. Make a tall fence for the router table as in photo 13 to hold it so. Lower the bit in the table just a hair (1/64" or so) from the height at which you cut the slots, and make a cut on each side of the part to form the dovetail shape. Use test pieces for fitting while you try different locations of the fence. The fit of the tenon in the slot changes a great deal with minor changes in the fence location, because the change happens on two sides, doubling the final effect. Move the fence in very small amounts by relieving some- but not all- pressure on one of the clamps that hold it to the table and tapping the fence with a hammer. Then tighten the clamp. The tenon should fit into the slot without being banged in with a hammer, but with little or no slop in the joint.

Cut 1/4" dadoes in the bottom inside edges of the drawer fronts and sides, 1/2" up from the bottom. Don't cut these dadoes on the drawer backs. Assemble the drawers by gluing and sliding the drawer sides in the slots in the drawer front until the bottoms of both parts are flush. Then slide the plywood drawer bottoms into their dadoes in the sides and front. Next glue and slide the drawer back in place. To support the plywood at the drawer back, glue a 1/2 x 1/2 x 4" strip on the inside of the drawer back, under the plywood.

Photo 14- Use this set up to cut the dovetail slots in the top plate as well as the desk sides for the cubbie components. Do a lot of careful measuring to be sure you are centering your slots just where they need to go. Remember that the parts are longer by the dovetail tenons.

Cut the dovetail slots in the top plate for the cubbies to hang from by setting up with the router held by hand as in photo 14. Clamp a fence to the top plate as shown, and run the router base edge against this edge to refer the cut. As with making biscuit cuts in the middle of a board, you must measure carefully from the cutter to the edge of the tool in order to locate the fence correctly. Cut dovetails for the cubbie parts using setups similar to those for the drawers.

Cut two 3/4" dadoes at 1/4" deep in the ends of the top plate to join it to the sides, as well as a stopped rabbet in the rear for the plywood back. Glue and assemble the cubby structure on the top plate. Flush the rear of the structure to the inside of the rabbet for the plywood back. Place the top plate on the desk sides and screw in place. No need for wider shank holes because, as with the desk top, the expansion/contraction of the top plate follows the sides.

BASE AND HARDWARE

Make the base pieces by rounding over the edges of long pieces of stock, then cut them shorter. Don't give the edges a full roundover though, lower the bit in the table about 30% of its cut. This gives a softer effect.

To cut out the small parts, first cut miters on the ends of the long stock, then cut the small pieces to length. This is safer than trying to cut miters in pieces 2-1/2" long.

Assemble the bases by progressively stacking them together directly on the desk bottom. Turn the desk upside down, glue and screw the longer base pieces to the desk bottom, then glue and screw the middle ones to the long ones etc. until all are in place. Locate the screws carefully so you don't hit the ones below.

While the desk is upside down, glue and screw corner blocks where the bottom rails and desk sides meet. Also install corner blocks behind the miters on the bases, to hold each side of the individual bases together.

Photo 15- Desk lid hinges are designed to hold the lid open firmly in a horizontal position.

Special desk lid hinges are necessary to keep the lid from going past the horizontal when it is opened. To install these hinges, place one on the desk top in position and trace around it with a sharp pencil. Then follow inside this tracing with a chisel to outline the cut, and carefully clean out the waste. A carving gouge is handy for cutting the curve end of the hardware. Cut the mortise depth so the hardware is flush with the desk top (photo 15). Repeat the procedure on the lid. Note that the center of the hinge pin should come to the front upper edge of the desk top.

FINAL DETAILS

Once the lid is fitted onto the hinges, make the final cuts on the outside edge of it to fit it to the top plate. Close the lid, and scribe the angle and its location on the upper edge of the lid. Remove the hinge screws, and cut the angle on the table saw.

Round over the drawer fronts and desk lid with a 3/8" round over. Cut and fit a piece of 1/4" hardwood veneer plywood to fit in the rabbets for the back. Nail in place.

Polyurethane varnish is a good choice for a practical piece of furniture like this, because it is durable. Give it two coats, sand with 400 grit between coats, and then polish with extra fine steel wool before a coat of furniture paste wax.

An excellent book on applying finishes is Bob Flexner's Understanding Wood Finishes.