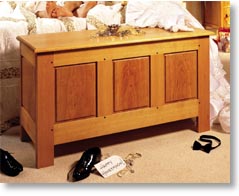
![]()
Mortise
and tenon joinery the easy way.
By Tom Caspar
I used to struggle with mortise and tenon joinery. I tried every new system that came along, but they all seemed way too complicated. One day a friend of a friend walked into my shop, said “Throw away those fancy jigs!” and showed me an elegant way to make these classic joints. This blanket chest is the ideal project to showcase this technique. One of the ways I used to get into trouble with joinery was to constantly measure everything. No more. Whenever possible, I use “the thing itself” to guide my cuts, especially in mortise and tenon work. That is, I use an object, not a ruler, to measure directly from one thing to another. Settle on the most important sizes first, make the pieces and then everything else falls into place.
 You’ll see how fool-proof the system
is in building this blanket chest. The design utilizes a form of frame and
panel construction that goes back hundreds of years. This joinery has proved to
be durable and reliable, so if you’re thinking of making an heirloom project,
here’s one that will last many generations.
You’ll see how fool-proof the system
is in building this blanket chest. The design utilizes a form of frame and
panel construction that goes back hundreds of years. This joinery has proved to
be durable and reliable, so if you’re thinking of making an heirloom project,
here’s one that will last many generations.
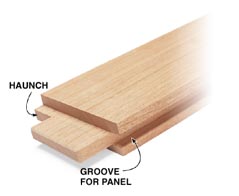
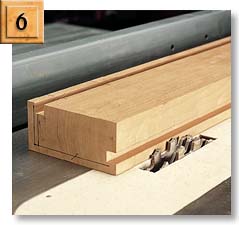
THE TENONS of this chest line up exactly with the grooves that hold the panels. This simplifies laying out the joints. Cut the grooves first and the rest naturally follows.
![]()
You should have some
experience milling rough lumber straight and square before tackling this
project. You’ll need a jointer and a planer to prepare the wood, a
carbide-tipped stack dado set to cut grooves and tenons and a miter gauge you
can trust to make square cuts. I prefer a mortising machine for its speed and
accuracy, but you can use a plunge router or a drill press to cut mortises.
You’ll need three different
thicknesses of rough hardwood. I used
|
|
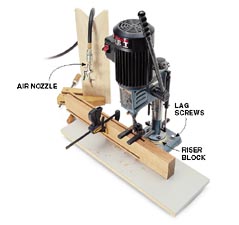
5 ways to soup up your
Mortiser
|
Begin by milling all the legs and rails to thickness, width and length (see Cutting List). Be sure to cut the rails to their overall length, which includes both tenons. Mill the stiles to thickness and width, too, but leave them a bit long for now. Make a few extra short rails to use as test pieces down the road
![]()
|
|
|
|||
|
|
|
|||
|
|
|
|||
|
|
|
|
||
|
|
|
|||
|
|
|
|
||
|
|
|
|||
|
|
|
|
||
|
|
|
|||
![]()
|
|
|
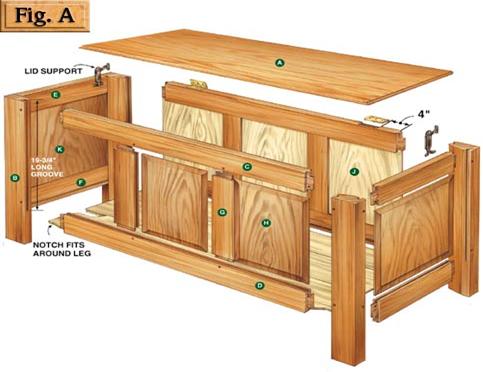
LEG AND RAIL
JOINTS |
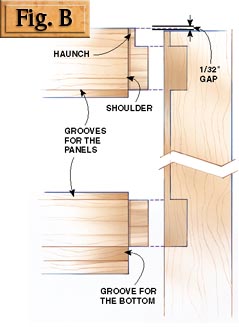
I’ve learned the hard way
that it’s best to make the mortises first, then size the tenons to fit them.
Begin mortising by making the grooves, because they define the sides of the
mortises. In addition, the depth of the grooves defines one end of the mortises
(see Fig. B). Notice how the bottom of the groove becomes
the edge of a tenon (see photo). In this project, the groove is
“the thing itself” that’ll guide your cuts.
Make the grooves on the
tablesaw with a dado set. It’s a simple set-up: the groove is 3/8-in. wide,
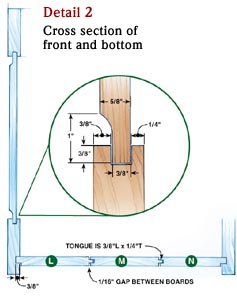
3/8-in. deep and 3/8-in. from the fence (Fig. A, Detail 2). Mark the face side of each piece
before you begin to cut. The face side always goes up against the fence. Groove
one edge of all the rails, including the test pieces, and both edges of the
stiles.
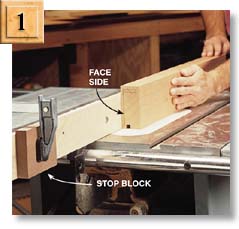
Cut one stopped groove in
each leg (Photo 1). You’ll have to limit the length of the
groove because it stops at the bottom edge of the lower mortise (Fig. A). Clamp a stop block to a long auxiliary fence
board.
Reset the fence to the left
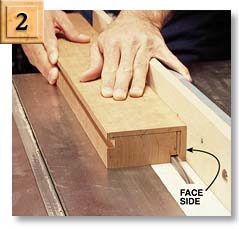
side of the saw blade to cut the other groove in each leg. Use one of the legs
as a measuring tool to position the fence. Unplug the saw, nestle the grooved
edge of a leg right on top of the dado set (face side pointing to the left) and
snug up the fence. Run the other face of each leg up against the fence when you
cut the groove (Photo 2).
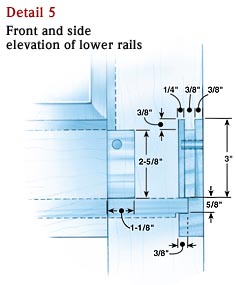
Next, cut the wider groove that holds the bottom in place (Fig. A, Detail 5). It will become the lower edge of a tenon. Use the top of the rail as your reference edge. The tenons on these lower rails fit exactly between the two kinds of grooves you’ve made (Fig. B).
![]()
Deepening parts of the
grooves creates the mortises. Where exactly do the mortises go? Pick up any
rail and you’ve got the information right in your hand.
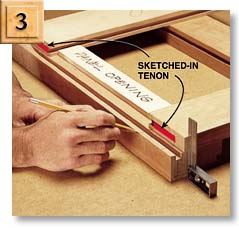
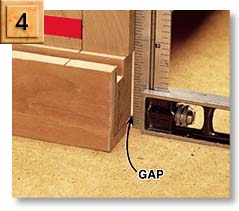
Lay the top rail on a leg
and you’ll be using “the thing itself” (Photo 3). Place the rail so it barely hangs over the
leg (Photo 4). Just follow the lines down from the grooves (Fig. B). Cut a
piece of wood the length of the panel opening (Cutting List) to precisely position the lower
rail.
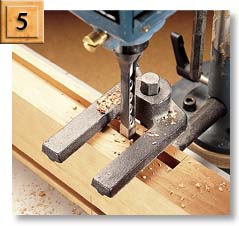
Once you’ve marked one leg,
clamp all the legs together and transfer the mortise marks from the first leg
to the others. Make the mortises 1/8-in. deeper than the length of the tenons (Photo 5).
|
|
|
|
THE GROOVE’S THE THING. Its size
and location determine where the mortises will go, so here’s the place to
start. |
SAW ONE STOPPED GROOVE in
each leg with a dado set. The end of the leg is marked with lines identifying
the two face sides. Put the face side against the fence. Re-set the fence to
the other side of the saw blade to cut the second groove. |
|
|
|
|
PUT AWAY YOUR RULER and lay out
the mortises directly from the rails. This is much easier and more accurate
than using a bunch of numbers. Sketch in the tenon on the end of the rail and
extend lines down onto the leg. To position the bottom rail, make a spacer
that’s the exact length of the panel opening and place it between the rails. |
THE
TOP RAIL should extend about 1/32-in. above the leg. This makes your life a
whole lot easier because after glue-up you are able to plane the rail to meet
the leg, rather than trying to plane the end grain of the leg. |
|
|
|
|
MORTISE THE LEGS.
A mortising machine with a tuned-up bit and chisel makes short work of these
deep mortises. The groove locks in the chisel, producing a mortise with
perfectly straight walls. |
SET
THE DADO BLADE HEIGHT for cutting the tenons. It should be even with the
groove in a leg. Fine-tune the setting by trial and error. It’s best to start
out low and work your way up. |
![]()
Having made the mortises,
cut the tenons to fit them. You won’t have to measure. Simply use the parts
you’ve got so far. To get started, install the dado set with all its chippers
and raise the blade the height of the outer wall of the groove (Photo 6). This is the same distance as the tenon’s
shoulder, because this is a flush joint.
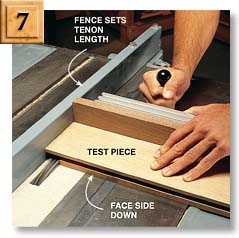
Try this dado setting on a
test piece (Photo 7). Adjust the height of the dado set until the
face of the tenon is exactly in line with the groove (Photo 8). Then cut both ends of all the long and short
rails. You’ll be revisiting this setting later, so improvise a simple paper
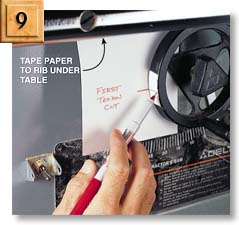
indicator to record it (Photo 9).
Cutting the opposite face
of the tenon requires lowering the dado set. Leave the fence where it is. Place
a rail with its face side up next to the blade. Lower the blade until it lines
up with the bottom wall of the groove, just as you did before. Cut a test piece
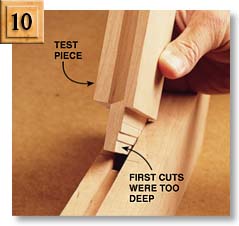
and try it in the mortise (Photo 10). This is a finicky setting, so it will take a
number of attempts to get it right. Record this blade height, too.
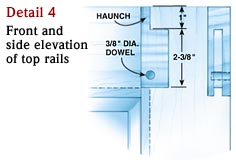
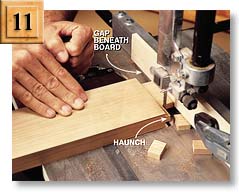
Saw each haunch on the
bandsaw (Photo 11). Lay it out directly from the mortise (Fig. A, Detail 3). The haunch serves three purposes:
It fills in the groove; adds more gluing surface; and widens the tenon to fight
racking of the case. It’s great. I use a haunched joint in table legs, too.
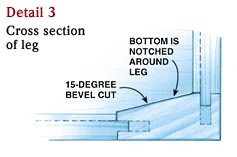
Finish the legs by beveling the inside corners (Fig. A, Detail 3). Tilt the blade away from the fence at a 15-degree angle. Clean up the saw marks on the jointer.
|
|
|
|
|
CUT A
CHEEK on the face side of a test piece. Set the saw’s fence to the length of
the tenon. Take two passes across the tenon’s face to remove all of the
waste. Make sure the end of the rail is tight against the fence during the
second pass. |
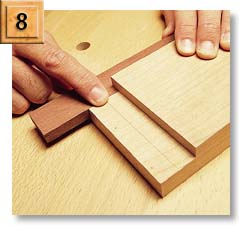
CHECK
THE ACCURACY of your cut by holding a tight-fitting stick of wood in the
groove. Run your finger across the tenon and stick. They should be perfectly
even. |
|
|
|
|
|
|
SAVE THIS SETTING! You’ll need it for cutting
tenons on the stiles. Mark the position of your hand wheel to record the
height of the dado set. Then lower the dado set and cut the back side of each
tenon. |
SIZE THE TENON by inserting the test piece into
the mortise. If it takes a mallet to get the tenon into the mortise, the fit
is too tight. If the tenon drops into the mortise with ease, it’s too loose.
The correct fit is somewhere in between. Adjust the height of the dado blade
to find that fit, then cut the back side of all the tenons. |
|
|
|
|
|
|
BANDSAW THE NOTCH that forms the haunch. A fence
helps keep the cut straight, but you can also cut freehand, following a
pencil line. Clamp a board onto the fence and raise it above the bandsaw’s
table. When the waste piece falls out of the notch, it will slide underneath
the board and won’t get trapped between the blade and the fence. |
OOPS!
|
|
![]()
There’s one more fussy operation to do, and
that’s fitting the stiles between the rails. You might think this is asking
|
|
|
JOINTS BETWEEN
STILE AND RAIL |

for trouble, but it only takes a minor
adjustment of your fence to get it right.
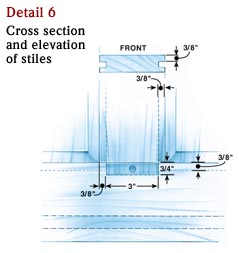
The first thing to figure out is the exact
length of the stile, which includes two tenons. Assemble the front of the
chest, without glue, by clamping together two long rails and two legs. Measure
the opening and add the length of the two tenons (Fig. A, Detail 6). You can do this
without a ruler by marking directly on a stile.
Cutting the opposite face of the tenon requires
lowering the dado set. Leave the fence where it is. Place a rail with its face
side up next to the blade. Lower the blade until it lines up with the bottom
wall of the groove, just as you did before. Cut a test piece and try it in the
mortise (Photo 10). This is a
finicky setting, so it will take a number of attempts to get it right. Record
this blade height, too.
Cut all the stiles to length. Then cut a
complete tenon on one end of each stile. Because you recorded the two heights
of the dado set to make a tenon, this should be easy. If you use all the dado
chippers, add a wooden face to your fence.
Fit the stiles to the opening when you cut the
tenons on the other end. You can fine-tune the stile’s length between its
shoulders by moving the saw’s fence.
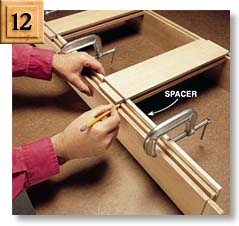
Now you can precisely mark the mortises directly
from the tenons (Fig. C and Photo 12). Take the front
apart and make three spacers the width of the panel openings. Mark alongside
the tenons on one rail, then clamp all the rails together and transfer these
marks across them. Cut the mortises.
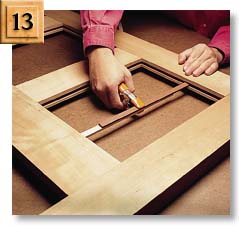
You can size the panels by another method of
direct measurement using “pinch sticks” (Photo 13). They’re two
narrow sticks, each a bit shorter than the opening. Reassemble the front with
the stiles in place. Butt one end of each stick into opposite grooves and pinch
them together with a small spring clamp. Wiggle the pinch sticks out of the
opening and you’ve got another “thing itself.”
Cut the panels 1/16-in. smaller in width and
height than the length of the pinch sticks. Shape the panels with a
3/4-in.-dia. round-nose bit on a router table equipped with a tall fence (Fig. A, Detail 2. Also see AW #73,
p. 39 for more information on raising panels and Sources, at right for the
bit). Sand and apply a finish to the outside of the panels before you glue up
the case.
![]()
The bottom is notched around the legs. Don’t
mess around with measuring angles to make the notches. Here’s a direct method: Put
the whole chest together without glue to figure out exactly how big the bottom
needs to be. Measure from the bottom of one groove to the opposite groove as
you did for the panels. Make the bottom from three loose boards connected by
tongue and groove joints (Fig. A, Detail 2). Cut the bottom
boards to length and width, put them together on a flat surface and place the
chest on top of them. Scribe around the legs onto the bottom, remove the bottom
from under the chest and cut out a notch in each corner on the bandsaw (Fig. A).
Glue up the top and cut it to fit the chest.
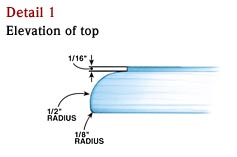
Rout a molding on the front edge and ends, but not the back (Fig. A, Detail 1).
|
|
|
|
PINCH
STICKS DIRECTLY MEASURE the size of the panels. Misreading a ruler can get
you in trouble, but these sticks are always accurate. |
|
|
|
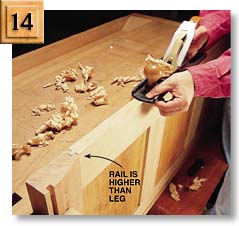
PLANE THE TOP RAIL flush with the leg after you glue up the chest’s
front and the back. This beats planing down the end of a leg to meet a rail! |
![]()
Glue up the front and back. Plane down the top
rails so they’re even with the legs (Photo 14). Cut the
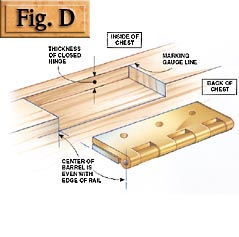
double-deep mortises for the hinges on the back rail (Fig. D). Set in the dowel
pins and cut them off flush (Photo 15). Plane, scrape or
sand all the joints flush.
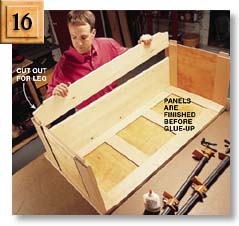
Glue up the entire case (Photo 16). Plane the top of
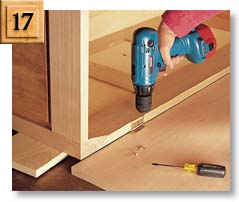
the side rails even with the legs. To install the hinges, lay the case on its
back supported by boards that are the same thickness as the top. Butt the top
up to the back rail and mark the positions of the hinges (Photo 17). Install the top
and add spring-loaded lid supports (see Sources, below) to prevent
the top from squashing a kid’s fingers as it closes.
Cherry naturally darkens with age, especially
under a thin finish. Patience, rather than stain, will yield the best results.
If you oil your chest it will turn a beautiful deep color in a year or two. You
can leave the interior of your chest unfinished, or use shellac or wax to avoid
unpleasant odors.
|
|
|
|
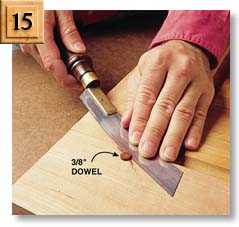
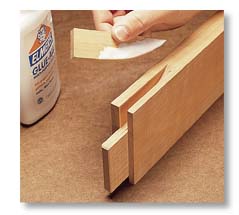
CUT OFF
THE DOWEL PINS that lock the joints with a Japanese-style flush-cutting saw
(see Sources, below). Its
teeth have no set, so they won’t cut into the wood around the pins. Glue the
pins in the front and back assemblies and saw them flush before you glue up
the entire case. |
SLIP IN
THE BOTTOM BOARDS during the final glue up. They fit in a groove that goes all
the way around the inside of the chest. Tongue and groove joints hold the
boards together so you don’t have to glue them to each other. |
|
|
|
|
POSITION
THE HINGES on the top and mark the screw holes with an awl. Each hinge sits
snugly in a mortise that’s as deep as the thickness of a doubled-over hinge,
so there’s no need to mortise the top. |
DETAIL OF HINGE MORTISE |