How to build frames and mount
your favorite artwork.
TEXT AND PHOTOS BY NEAL
BARRETT
Our six picture frames are
simple to build, and you can vary them to suit your
requirements. Frames 1 and 2 are made from ordinary pine
stock and moldings. Frames 3 through 6 feature hardwoods
that contrast in both color and grain figure.
Whether they're family photos, favorite prints or
maybe even the fruits of your kids' Saturday art
classes, everyone has pictures they love--and love to
show off. But, while those fridge magnets may be the
ideal solution for snapshots of last summer's vacation,
your kitchen probably isn't the place for the more
important images you've collected over the years. These
demand a bit more respect--and proper frames that give
each piece its due. The trouble is, having your favorite
artwork framed properly can be very expensive, and basic
metal frames or off-the-shelf options might not be to
your taste. If you build frames for yourself, though,
you can be as elaborate or as simple as you like--and
end up with a job tailored to your needs.
To get you started, we've designed six frames using
materials that range from simple pine moldings and flat
stock to hardwood lumber that you might have around your
shop. We'll also show you how to mount and mat your
artwork for gallery-like quality. Of course, the actual
frame and mat dimensions are up to you and must be
judged to suit each piece you decide to hang. When
sizing your mounting material and frames, keep in mind
that all our designs include a 3/8-in.-wide rabbet to
house the mounted work. This means that the frame will
hide a 3/8-in. border on all edges--so plan accordingly.
Painted Pine Frames Our first two frames
are made from pine and are great candidates for a paint
finish. They feature standard moldings available at
well-stocked home centers (below we give the molding's
reference number in addition to its common name). For
all the frames, it's best to cut the rough materials
about 2 or 3 in. longer than necessary before ripping to
width or machining.
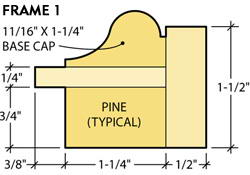
Frame 1 uses base cap molding (No. WM 166) and flat
pine stock. Rip four 3/4 x 1-1/4-in. pine pieces and
glue lengths of 1/4 x 1-5/8-in. lath to each. Place them
face to face with the edge of one piece flush with the
adjoining piece. Use spring clamps to hold the assembly
while the glue sets. Then, spread glue on the back of
the molding and clamp it to the top of the lath (Photo
1). Make sure that the outer edge of the molding aligns
with the flush edge of the flat-stock assembly.
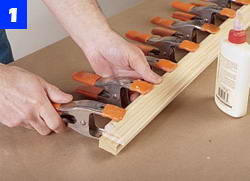
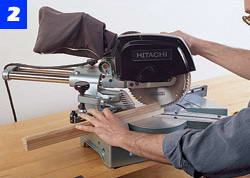
Next, cut the four laminated frame members to size
with a miter saw (Photo 2). Use a small brush to spread
glue on the mitered ends and assemble the frame in a
miter clamp (Photo 3). Check that all corner joints
remain tight as you tighten the clamp. After the glue
has cured, remove the frame from the clamp and drive
small brads into the corners to reinforce the
joints.
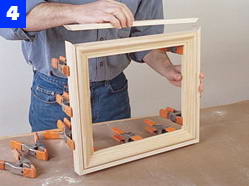
Next, rip pieces of 1 x 2 to 1/2 in. thick and miter
them to fit around the perimeter of the frame. Apply
glue and clamp them to the frame with spring clamps
(Photo 4).
After gluing a 1/4-in.-thick lath to a
3/4-in. backer, add the molding to the lath. Use
spring clamps to apply
pressure.
Use a miter saw to make the 45° cuts at
both ends of each piece. Make sure opposite pieces
are the same length.
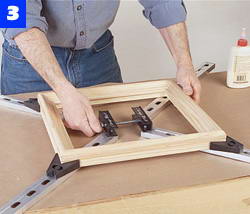
Spread glue on the mating surfaces and
assemble the sides in a frame clamp. Use brads to
strengthen joints.
Cut banding strips of 1/2 x 1-1/2-in.
pine to length with mitered ends. Glue these to
the outside of the frame.
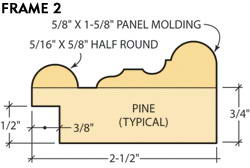
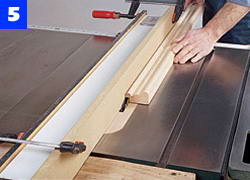
Frame 2 features a panel molding (No. WM 8174) and a
5/8-in. half round (No. WM 123), glued to 1 x 3 pine.
After cutting the stock to rough length, spread glue on
the back of the molding and use spring clamps to hold it
to the 1 x 3 until the glue sets. Keep the panel molding
flush to one edge and the half round flush to the
opposite edge. When the glue is dry, use a dado blade in
your table saw to cut the rabbet along the inner edge of
the 1 x 3 (Photo 5). Then, miter the frame stock to
exact length.
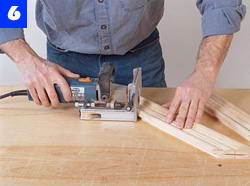
Since this frame is wider than the first, you can use
No. 0 joining plates to reinforce the corners and
eliminate the need for brads. Mark centerlines for the
plate slots in the mitered ends of the frame stock and
cut the slots (Photo 6). Spread glue on the mitered
faces, in the plate slots and on the plates, and
assemble the pieces in the frame clamp to pull the
corners tight. After about 20 minutes, use a small
chisel or putty knife to remove any glue that has
squeezed from the joints.
To finish these painted frames, first lightly sand
with 150- and 220-grit sandpaper. Then apply an aerosol
spray finish, following the manufacturer's instructions.
We used Rust-Oleum Hammered Gold (No. 7210) and Hammered
Silver (No. 7213) for our frames.
Frame 2 uses two moldings glued to 1 x 3
stock. Cut the frame rabbet with a dado blade and
table saw.
Reinforce the corners of wider frames
with plate joints. Mark the centerlines and cut
slots for No. 0 plates.
Hardwood Frames Another approach to
building frames is to use hardwood with either a clear
or stained finish. In each of the following designs,
we've combined different woods to create patterns of
contrasting colors and textures. After building four
oversize pieces of frame stock for each design, use a
dado blade or router table to cut the 3/8-in.-wide frame
rabbet on the inner edge of each piece. Then, use a
miter saw to cut the pieces to precise length and join
the corners with plate joints.
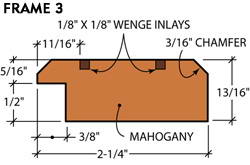
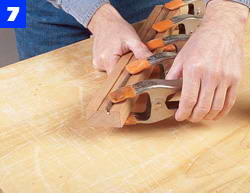
Frame 3 is constructed of mahogany with wenge inlay.
Begin by ripping 13/16-in. mahogany to 2-1/4 in. wide.
Crosscut the stock to rough length, then readjust the
saw blade and cut two 1/8-in.-deep kerfs in the face of
each piece. Use a band saw to rip 1/8 x 1/4-in. inlay
strips of wenge. Run a bead of glue into each saw kerf
and press the inlay strips into place. Use spring clamps
to hold them while the glue cures (Photo 7). When the
glue is dry, use a plane or sharp cabinet scraper to
trim the wenge flush to the mahogany surface. Then,
install a chamfer bit in your router table and bevel the
two top edges of the frame stock.
Frame 3 has two inlaid strips. Cut the
slots on a table saw. Glue the strips in place and
rout a chamfer on the edges.
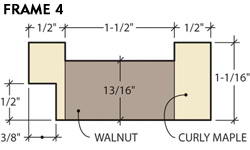
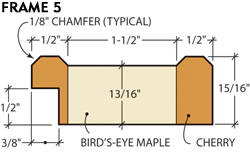
Frames 4 and 5 are variations on the same theme. For
the first design, rip curly maple strips to 1/2 x 1-1/16
in. and glue them to the edges of a 13/16 x 1-1/2-in.
walnut field (Photo 8). Keep all pieces flush on the
back side of the frame.
For the second variation, rip 1/2-in.-thick cherry
stock to 2-1/2 in. wide. Use a router table with a
chamfer bit to shape all four edges of the cherry, then
rip the molded stock into 15/16-in. strips (Photo 9).
Glue these strips to both edges of a bird's-eye maple
field.
Clamp maple strips to both edges of a
walnut field to form Frame 4. Make sure the pieces
are flush on the back.
After routing chamfered edges on cherry
stock, rip two strips. Glue them to the edges of a
maple field for Frame 5.
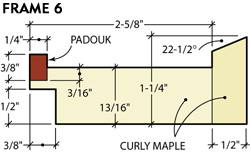
For Frame 6, we've chosen curly maple for the field
and raised outer band, with a padauk inlay that accents
the inner edge. After ripping the maple stock to width,
use a dado blade or router table to cut a 3/16-in.-deep
x 1/4-in.-wide rabbet along one edge of each of the four
frame pieces. Then, cut pieces of padauk to fit the
rabbet in each piece. Glue the inlays in place, securing
them with strips of masking tape until the glue sets
(Photo 10).
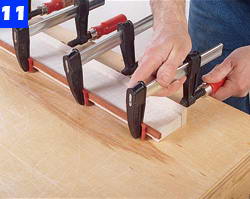
To make the outer band, rip a 22-1/2° angle on the
edge of a 1/2-in.-thick piece of maple. Re-adjust your
saw to 90° and rip this beveled strip from the board.
With four band strips made, glue each to the outer edge
of the maple field pieces (Photo 11).
After sanding to 220 grit, we finished our hardwood
frames with clear shellac. This finish is easy to apply,
it dries quickly, and it won't react with delicate
artwork and mounting materials. Brush on a light coat
with a good-quality bristle brush and let dry for at
least 2 hours. Lightly sand with 320-grit paper to
remove any roughness, and dust off. Apply one or two
additional coats as needed. When the last coat is dry,
rub it with 4/0 steel wool for a warm, satin
gloss.
For Frame 6, glue padauk strips in a
rabbet on the edge of a maple field. Use masking
tape instead of clamps.
Glue the angled band strips to the
outside of the maple frame pieces. Be sure that
the strips are flush on the
back.
Mounting Equipment Now that you have your
wooden frames ready, it's time to gather the materials
for mounting. You can buy what you need at any
well-stocked art supply store.
Photos and prints are typically mounted within a
broad mat-board window that highlights the artwork. Mat
board is available in a variety of colors and a few
textures as well. Make sure to get acidfree, or
archival, mat board to protect the artwork from
deterioration. This same material can be used as the
mounting board behind the artwork. You'll also need
archival mounting tape. This tape is made of linen cloth
and is activated by wetting its glued surface. Backing
board, installed behind the mounting board to keep it
flat, can be either stiff corrugated cardboard or foam
core stock. After the backing board, you'll need kraft
paper to act as a dust cover over the back of the
frame--a glue stick is a convenient way to attach the
paper to the frame.
Most artwork requires a pane of glass to protect it
from dirt and changes in humidity. In most cases, normal
window glass will work, although a special
ultraviolet-protective glass is available to help
prevent fading. Nonglare glass is also used for framing.
However, this type has a slightly dull appearance.
Acrylic sheet can be a practical alternative to
glass--especially if weight is an issue. But acrylic
scratches easily, attracts dust and doesn't have the
same degree of transparency as glass.
As for special tools, you'll need a straightedge and
a mat cutter. Mat cutters come in a variety of
configurations, ranging from basic $15 models to
professional versions costing a few hundred dollars. We
achieved good results with a medium-priced Logan Model
3000 Pro-Am mat cutter and Adapt-A-Rule straightedge and
ruler.
Mounting The Artwork Measure and mark the
size of your mat and mounting boards. It's best to work
from the back of the boards to prevent soiling the face.
Place the boards on a piece of scrap cardboard and use a
utility knife and straightedge to cut both pieces to
size.
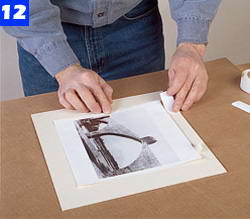
Position the artwork on the mounting board and mark
the corners with light pencil marks. Rip two
1-1/2-in.-long pieces of linen mounting tape and moisten
about 1/2-in. of each piece. Adhere the tape to the back
side of the artwork, along the top edge so that about 1
in. extends beyond the top. When the glue dries, turn
the piece face side up and position it on the mounting
board. Rip two more strips of tape, each about 3 in.
long, and moisten them. Apply them across the extending
tape strips so the artwork is hinged to the mounting
board (Photo 12). This system allows the print to expand
and contract with changes in humidity, without
wrinkling.
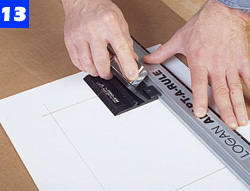
Mark the cutlines for the opening, or window, on the
back side of the mat board. Typically, a mat extends
over the image by no more than 1/4 in. on each edge. Use
the straightedge and mat cutter to make the cuts (Photo
13). It's a good idea to practice on scrap board to
learn how to start and stop the cuts exactly at the
corners.
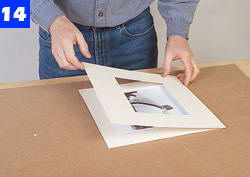
Place the cut mat over the mounted print (Photo 14).
It's not necessary to attach the mat since the whole
assembly will be sandwiched in the frame.
Use linen tape to attach photos and
prints to the mounting board. Hinge the artwork at
the top edge.
To cut the mat opening, mark cutlines on
the back side of the mat board and use a mat
cutter to make the cuts.
Place the mat over the print and
mounting board. It's not necessary to fasten the
two boards together.
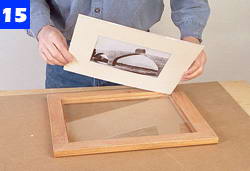
Turn the frame upside down and install the glass.
Then place the matted print into the frame (Photo 15).
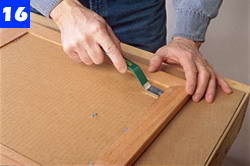
Cut the backing board to size and place it over the
mounting board. Use framer's points to hold the back in
place (Photo 16). You can use a special driving tool or
a flat-blade screwdriver to install the points. On
hardwood frames, the driving tool is worthwhile since
the points are a bit harder to install.
Cut a piece of kraft paper slightly larger than the
overall frame size. Rub a glue stick on the back side of
the frame and apply the paper, letting it overhang on
all edges. Press the paper to the frame to get a good
bond and use a straightedge and utility knife to trim it
1/8 in. in from each edge. The simplest method of
hanging a frame is to use a sawtooth-type hanger. Center
the hanger on the back of the top rail of the frame and
drive brads to hold it in place (Photo 17). On a
hardwood frame, use an awl or bore small pilot holes for
the brads.
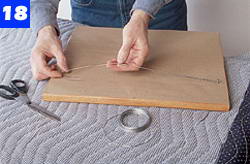
Large or heavy frames are best hung with picture
wire. Bore pilot holes, and install screweyes or D-ring
hangers in the side frame rails about 3 or 4 in. from
the top edge of the frame. String a length of picture
wire between the hangers, leaving about 1-1/2 in. of
slack. Twist the wire together to lock it to the hangers
(Photo 18).
With the frame lying face side down,
install the glass panel. Then, place the mounted
artwork in the frame.
Place a corrugated or rigid foam backing
board over the mounting board and hold it in place
with framer's points.
A sawtooth hanger is fine for supporting
light frames. Use brads to secure it to the center
of the frame.
Hang heavy frames with picture wire.
Install screweyes or D-ring hangers and string
picture wire between them.