Remember the old console TVs? Mounted in wooden
cabinets, those early sets were as much furniture as new
technology. The designers knew, or at least thought,
that no one would want the naked machine in their home.
After all, it just didn't match anything else. In fact,
many of the TV cabinets had doors to keep the tube
tastefully under wraps until the family's favorite
weekly show came on.
Well, everything old is really new again--only with a
twist. After living with plastic TVs and vestigial
wood-grain accents for the last several decades, we're
all ready to reincorporate The Box into the design
scheme of our homes. TV cabinetwork is finally
back--only now we do it ourselves.
A television cabinet, though, does more than just
keep the interior decorator of the house happy. With
most sets wired to a VCR at least, the modern household
needs a central location for everything--including a
place to hide the wires and store videotapes. Plus, an
independent cabinet means we're not wedded to this
year's TV when next year's model looks too good to pass
up.
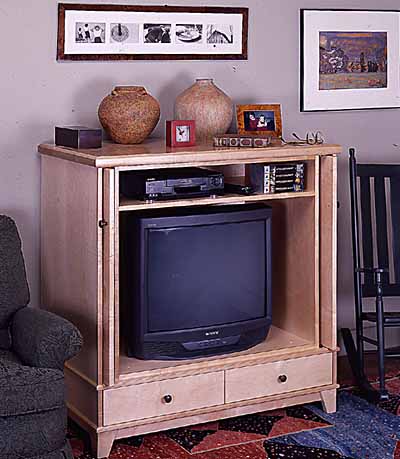
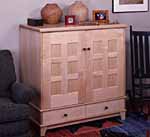
With the doors closed, our TV
cabinet blends into any decor. Open (above), the doors
hide inside to provide a clear view of the screen.
Shelves and drawers accommodate DVDs, tapes and
accessories.
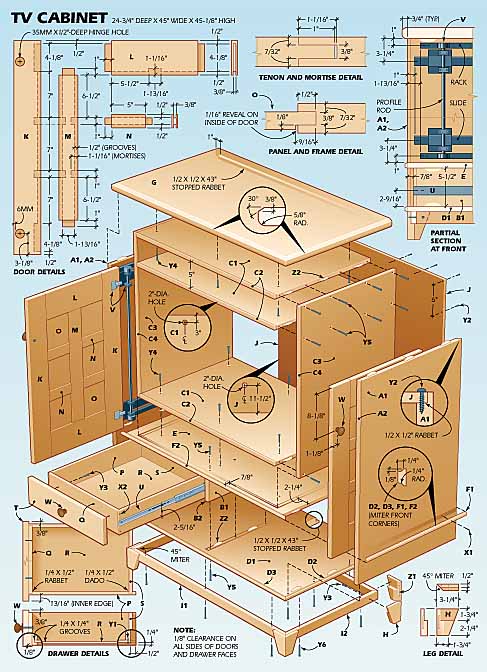
We designed our TV cabinet with enough room for a
typical 27-in. set. There's a shelf for a VCR and cable
or satellite box, and two roomy drawers for tapes and
DVDs. The full-width front doors on the cabinet are
mounted on retractable slides that allow the doors to
slip back into the case sides for unobstructed viewing.
We constructed our cabinet out of a combination of
solid maple and maple-veneer panels. The case sides,
shelves and back are made from veneer-core panels, while
we used flat, stable MDF (medium-density fiberboard)
stock with maple veneers for the door panels. The
doorframes and the 1 5/8-in.-thick case top are made
from solid maple stock.
The Case Panels
Begin by cutting 3/4-in. panels to rough size for the
case sides, shelves, drawer partition and insert-case
parts. Rip maple edge-banding strips from 13/16-in.
maple, and glue the strips to the front edges of the
case sides, drawer partition and insert panels. Center
the strips so they protrude beyond the panel faces an
equal amount on both sides.
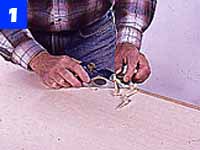
Let the glue set for about 20 minutes, then scrape
off any excess. When the glue is dry, use a block plane
to trim the strips flush with the faces (Photo 1).
Then, cut the panels to exact size.
Use a plane to
trim the edge banding flush with the panel surfaces. If
the wood tears, try planing in the opposite direction.
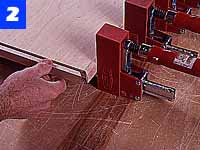
Install edge banding on the case bottom ends and
front edge, using miter joints at the corners (Photo
2), and plane the strips flush. Do not edge-band the
middle shelf at this time. The edge molding for that
shelf will be applied after you've assembled the case.
Cut the case
bottom panel to finished size. Glue mitered edge-banding
strips to the front and both ends of the panel.
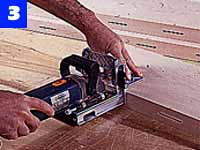
Make the 24 3/4-in.-wide maple top by gluing up
several narrow pieces of stock. Cut each piece an inch
or two longer than finished dimension and joint the
mating edges. While simple glued butt joints are fine,
joining plates help align the pieces during assembly.
After cutting the slots (Photo 3), spread glue,
install the plates and clamp the boards. Scrape off
excess glue after about 20 minutes. When the glue has
fully cured, use a circular saw and straightedge guide
to cut the panel to size.
Glue up solid
maple stock to form the case top. Joining plates in
mating surfaces help keep pieces aligned during
assembly.
Case Assembly
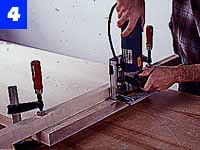
Lay out the joining plate positions for the case
panels and cut the slots. For slots in a panel face, use
a straightedge guide to position the plate joiner
(Photo 4).
Cut joining-plate
slots in case parts. Clamp a guide across the panels to
help position the joiner for slots in the panel faces.
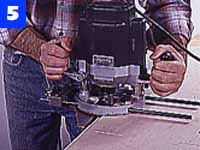
Use a router with a straight bit and edge guide to
cut the rabbets along the back edges of the case sides
(Photo 5). Note that the rabbets for the top and
bottom panels stop short of the panel ends. Use a sharp
chisel to square the rabbet ends after they've been
routed.
Use a straight bit
and edge guide to rout the rabbets along the back edges
of the case sides and the top and bottom panels.
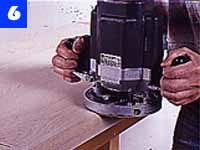
Rout the edge profile on the case top in two steps.
First, use a 5/8-in.-rad. rounding-over bit to cut the
profile along the bottom edge of the top panel (Photo
6). Then, turn the panel over and use a 30 degree
chamfer bit to cut the top profile.
Use a 1/4-in. cove bit to rout the edge band on the
case bottom edge. Adjust the depth of the bit so it
makes only a 1/8-in.-deep cut, and test the cut on a
piece of scrap stock before moving on to the actual
piece.
Use a 5/8-in.-rad.
rounding-over bit to shape the bottom edge of the case
top. Rout a 30-degree chamfer around the edge.
Use the same bit in the router table to cut the
molding for the middle shelf and case sides. Start with
a maple blank about 48 in. long, 4 in. wide and 3/4 in.
thick. Rout both corners of one edge of the blank, and
use a table saw to rip the molding from the blank.
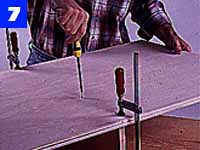
Join the drawer partition to the middle shelf with
joining plates and screws (Photo 7). Because this
joint is hidden, use plates to align the parts and use
screws instead of glue. Clamp the parts together while
you bore pilot holes for 2-in. No. 8 screws and drive
the screws.
Because screwheads
will be hidden, use screws to join the partition to the
case’s middle shelf. Plates keep parts aligned.
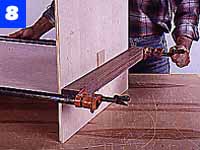
Next, spread glue in the plate slots to join the case
sides with the middle shelf and assemble. Use cauls to
distribute the clamping pressure (Photo 8). Apply
glue to the slots to join the top and sides, position
the top and use clamps to pull the joints tight.
Glue the case
sides to the middle shelf. A caul with a thin veneer
shim at the center distributes pressure across the
panel.
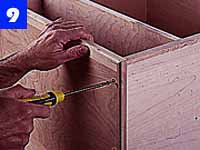
Bore and countersink screwholes in the case bottom,
and pilot holes in the case sides and drawer partition.
Then, install joining plates and screw together the
parts (Photo 9).
Use a combination
of joining plates and screws to fasten the case bottom
to the sides and drawer partition.
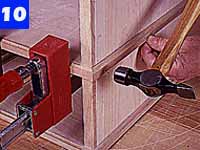
Miter the molding to length for the middle shelf and
case sides. Spread glue on the shelf strip and clamp it
in place. Install the side strips using glue and 1-in.
brads (Photo 10). Now you're ready to set the
nailheads and fill.
Use glue and 1-in.
brads to fasten molding to the case sides. Set the
nailheads and fill with a matching, sandable wood
filler.
Making The Base
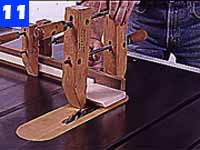
Cut 4-in.-sq. leg blocks of 1-in. maple, with one
edge of each parallel to the grain beveled to 45
degrees. Cut a No. 0 plate joint slot in the beveled
edge. Next, use a dado blade in the table saw to shape
the rabbet at the top inside edge of each leg block
(Photo 11).
Spread glue on the beveled edges and plate slots,
insert the plates and assemble the legs. When the glue
has dried, make the angled cuts to taper each leg.
Use a clamp to
hold the leg blanks to the table saw miter gauge when
cutting the rabbet along the top inside surface.
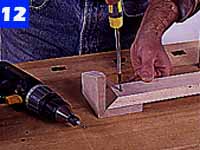
Cut the base rails to size with mitered ends. Glue
and screw the rails to the legs (Photo 12). Bore
and countersink pilot holes for attaching the rails to
the case, and then install the base.
Cut the case back from a sheet of 1/2-in.-thick
plywood. Mark the location of the 2-in.-dia. cord-access
hole in the back panel and bore the hole with a
multispur or Forstner bit. Then, mount the back to the
case with 1-in. No. 6 screws.
After cutting the
base rails to size with mitered ends, use screws and
glue to fasten the rails to the mitered legs.
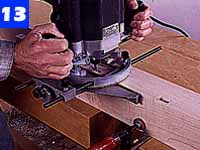
Rout the mortises
in the doorframe components. Clamping stiles together
provides an extra-wide base for the router.
Door Construction
For all door parts, rip and crosscut 13/16-in.-thick
maple to size. Lay out the joints and use a router with
a spiral up-cutting bit and edge guide to cut the
mortises. Clamp the stiles together to form a wide,
stable base for the router, and cut the four mortises in
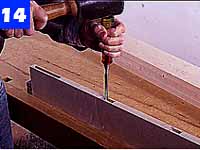
each stile (Photo 13). Next, cut the mortises in
the top and bottom rails and mullions. Use a sharp
chisel to square the rounded ends of each mortise
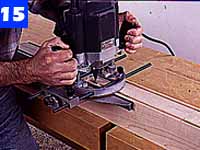
(Photo 14). Then, rout the panel grooves in the
edges of stiles, rails and mullions (Photo 15).
When the routing
is done, use a sharp chisel to square the ends of the
mortises in stiles, mullions and rails.
Adjust the router
bit cutting depth and shape the panel grooves in the
edges of the door stiles, rails and mullions.
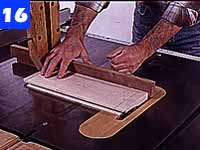
Use a dado blade in the table saw to cut the tenons
on the rails and mullions. First, cut the tenon cheeks
(Photo 16), and then readjust the blade height to
cut the shoulder at the outside edge of the top and
bottom rails. Clamp the short rails to the miter gauge
so your hands stay safely away from the blade.
Use a dado blade
in the table saw to cut the rail and mullion tenons. A
stop clamped to the miter gauge positions the work.
Cut the door panels to size and use a straight bit in
the router table to shape the rabbet around the inside
edges of each panel. Sand the panels with 120-, 150-,
180- and 220-grit sandpaper before beginning the door
assembly.
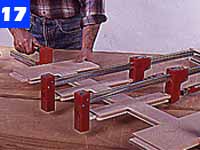
Spread glue in mullion mortises and corresponding
short rail tenons, assemble these parts and clamp. Next,
spread glue on the mullion tenons and top and bottom
rail mortises and join (Photo 17). When the glue
has set, slide the panels into the grooves. Then, spread
glue on the rest of the joints, add the stiles and
clamp.
After joining
short rails to the mullion, apply glue and clamp the
rails in place. Then install panels and stiles.
Study the instructions included with the door
hardware so that you understand the operation of the
slide before beginning the installation. Secure the door
slides to the inside of the cabinet sides. Cut small
spacer blocks to help position the slides accurately
from the case top and bottom and parallel to each other.
Next, attach the rack drives to the case sides. Secure
the pinion wheels and mounting hardware to the profile
rods as shown in the slide instructions. Mount the rod
assembly on the slides (Photo 18) and fasten the
mounting plates.
Screw the
pinion-wheel/mounting-block assembly to the door slide.
Detailed instructions are included with the hardware.
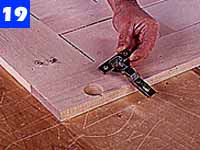
Use a Forstner or multispur bit in a drill press to
bore a 35mm-dia. x 1/2-in.-deep recess in the doors for
each hinge. Install the hinges (Photo 19) and
mount the doors on the slides. Use the mounting-plate
screws to adjust the doors for proper operation and a
uniform 1/8-in. margin.
Final Steps
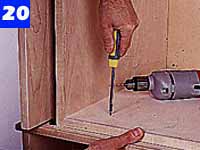
Bore the 2-in.-dia. wire-access hole in the insert
shelf. After assembling the case insert with joining
plates and screws, slide the insert into the cabinet,
bore and countersink pilot holes, and secure the insert
to the cabinet top and middle shelf with screws
(Photo 20).
Bore 35mm-dia.
recesses in the door stiles for the hinge cups. Then,
install the hinges to the doors and adjust for proper
operation.
Cut 1/2-in. maple to size for the drawer parts. Use a
dado blade to make the rabbet and dado joints in the
drawer sides and the grooves for drawer bottoms.
Assemble the drawer boxes with glue and 4d finishing
nails.
Cut bottom panels from 1/4-in. maple plywood, slide
them in place and screw each to a drawer back. Cut
drawer faces from 13/16-in. stock, and screw them to the
drawers. Mount the drawer slides following the
manufacturers instructions. Bore pilot holes for the
door and drawer knobs but don't install them until the
case is finished.
Disassemble the case and remove the hardware for
finishing.
After assembling
the case insert, bore pilot holes and fasten it to the
cabinet top and middle shelf with screws.
Sand all case parts to 220 grit, dusting carefully
between grits. Wipe all surfaces with a tack cloth
before applying the first coat of finish. We applied
three coats of Behlen's Water White Restoration Varnish,
following the manufacturer's instructions. When the last
coat is dry, buff the finish with 4/0 steel wool and
polish it with a soft cloth. Finally, reassemble the
case and install the doors, drawers and hardware.
MATERIALS
LIST--TV CABINET
Key
No.
Size and description (use)
A1
2
3/4 x 25 5/8 x 38 3/4" plywood (case
side)
A2
2
3/8 x 3/4 x 25 5/8" maple (edge band)
B1
1
3/4 x 5 1/2 x 22 1/4" plywood
(partition)
B2
1
3/8 x 3/4 x 5 1/2" maple (edge band)
C1
3
3/4 x 22 1/4 x 36" plywood (insert
shelf)
C2
3
3/8 x 3/4 x 36" maple (edge band)
C3
2
3/4 x 22 1/4 x 32 1/2" plywood
(insert side)
C4
2
3/8 x 3/4 x 32 1/2" maple (edge band)
D1
1
3/4 x 24 x 43 1/2" plywood (case
bottom)
D2
2
3/8 x 3/4 x 24 3/8" maple (edge band)
D3
1
3/8 x 3/4 x 44 1/4" maple (edge band)
E
1
3/4 x 23 1/2 x 42" plywood (middle
shelf)
F1
2
3/8 x 3/4 x 24 3/8" maple (molding)
F2
1
3/8 x 3/4 x 44 1/4" maple (molding)
G*
1
1 5/8 x 24 3/4 x 45" maple (top)
H
8
1 x 3 1/4 x 4" plywood (leg)
I1
2
3/4 x 1 3/4 x 42 1/2" maple (base
rail)
I2
2
3/4 x 1 3/4 x 23" maple (base rail)
J
1
1/2 x 39 3/4 x 43" plywood (back)
K
4
13/16 x 4 x 32 1/4" maple (stile)
L
4
13/16 x 5 1/8 x 14 13/16" maple
(rail)
M
2
13/16 x 2 13/16 x 24" maple (mullion)
N
8
13/16 x 2 x 7" maple (short rail)
O
12
1/2 x 6 x 7" plywood (door panel)
P
4
1/2 x 4 3/4 x 22 1/2" maple (drawer
side)
Q
2
1/2 x 4 3/4 x 19 1/8" maple (drawer
front)
R
2
1/4 x 19 1/8 x 21 3/4" plywood
(bottom)
S
2
1/2 x 4 1/4 x 19 1/8" maple (drawer
back)
T
2
13/16 x 5 1/4 x 20 13/16" maple
(drawer face)
U**
2
pair 22" drawer slides (Accuride No.
3832-22)
V**
2
pocket door hardware
W†
4
knob
X1
as reqd.
1" brad
X2
"
4d finishing nail
Y1
"
1/2" No. 6 rh woodscrew
Y2
"
1" No. 6 rh woodscrew
Y3
"
1" No. 8 fh woodscrew
Y4
"
1 1/4" No. 8 fh woodscrew
Y5
"
2" No. 8 fh woodscrew
Y6
"
2 1/4" No. 8 fh woodscrew
Z1
"
No. 0 joining plate
Z2
"
No. 20 joining plate
Misc.: 30
degree chamfer bit (No. 160-325), Wesley Tools Ltd.,
346 Maple Ave., Westbury, NY 11590; glue; 120-,
150-, 180- and 220-grit sandpaper; tack cloth; 4/0
steel wool; Behlen Water White Restoration Varnish
(No. 849-328), Woodworker's Supply, 1108 N. Glenn
Rd., Casper, WY 82601; 800-645-9292.
* Laminate
from narrower stock.
** Pocket
door hardware (No. 31131) and drawer slides (No.
32516) available from Rockler Woodworking and
Hardware, 4365 Willow Dr., Medina, MN 55340;
800-279-4441.
† Knob
(No. 74RE4) available from Whitechapel Ltd., P.O.
Box 136, Wilson, WY 83014; 800-468-5534.