| Garden Grace |
| How to build a classic cedar
garden bench. |
| TEXT AND PHOTOS BY NEAL
BARRETT |
|
 |
|
 |
|
|
|
|
|
|
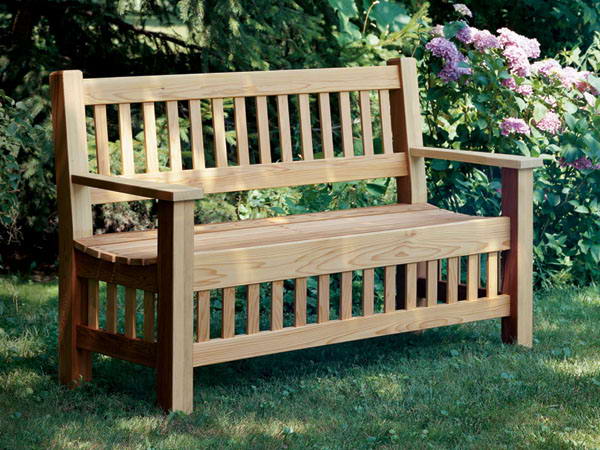
If the only thing you do in your yard is mow the
lawn, maybe it's time to add some creature comfort to
your outdoor space. Our stately cedar bench is ideal for
relaxing in the fresh air, enjoying the greenery and
just getting away from it all. And, it's more than just
a great place to sit. Featuring a design influenced by
the Arts & Crafts style, the piece will bring an upscale
look to any yard. Best of all, the construction details
are solid and simple, giving you a long-lasting piece of
outdoor furniture that's relatively easy to build.
We used red cedar for the bench--a material that's
generally available at lumberyards and home centers
throughout the country. Since cedar is widely used for
outdoor decking and trim, it's usually not kiln-dried
and is often sold with a high moisture content. For the
best results with this project, buy the material at
least two to three weeks before beginning construction.
Stack the lumber in a dry location with spacers between
the boards, allowing for good air circulation so the
material will dry. And, be sure to use a glue designated
for exterior use. We used Titebond II to assemble our
bench. | |
|
|
|
|
|
|
|
|
|
Нажмите для увеличения
|
|
|
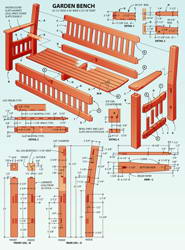
| MATERIALS LIST--GARDEN BENCH |
| Key |
No. |
Size and description (use) |
| A |
2 |
2-3/4 x 5 x 35-1/2" cedar (rear
leg) |
| B |
2 |
2-3/4 x 2-3/4 x 23-1/2" cedar
(front leg) |
| C |
2 |
1 x 3 x 51" cedar (back rail) |
| D |
2 |
1 x 4 x 51" cedar (seat rail) |
| E |
1 |
1 x 2-1/2 x 51" cedar (front
rail) |
| F |
2 |
1 x 2-1/2 x 17-3/8" cedar (side
rail) |
| G |
2 |
1 x 3-1/4 x 17-3/8" cedar (side
rail) |
| H |
1 |
1-1/2 x 3-3/8 x 17-3/8" cedar
(center rail) |
| I |
22 |
3/8 x 1-1/2 x 6-1/4" cedar
(bottom slat) |
| J |
14 |
3/8 x 1-1/2 x 8-3/4" cedar (back
slat) |
| K |
6 |
3/4 x 2-1/4 x 54-1/2" cedar (seat
slat) |
| L |
2 |
1 x 4-1/4 x 20-5/8" cedar (arm) |
| M |
36 |
1-1/2" No. 8 fh woodscrew |
| N |
36 |
3/8"-dia. cedar plug |
| Misc.: Exterior
glue; 120-grit sandpaper; Cabot No. 1400 Decking
Stain, Clear (Samuel Cabot Inc., 100 Hale St.,
Newburyport, MA 01950; www.cabotstains.com). | |
|
|
|
| |
|
|
|
|
|
| |
|
|
|
|
|
|
Preparing The Legs
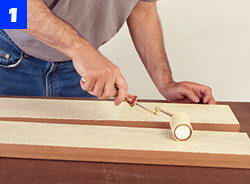
The 2-3/4-in.-thick legs
are made by gluing together thinner stock. To make each
rear leg, crosscut a pair of 2 x 6 cedar pieces to about
40 in. Use a roller to spread glue on the mating
surfaces of the boards (Photo 1) and clamp the pairs
together to form the leg blanks. For the front legs,
follow the same procedure with 30-in.-long 2 x 4 stock.
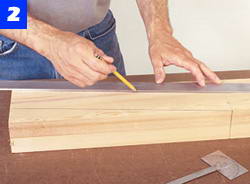
When the glue dries, rip the rear blanks to a width
of 5 in. and use a band saw to trim them to 2-3/4 in.
thick. Then saw the front legs to 2-3/4 in. square.
Plane the cut surfaces smooth and crosscut the front
legs to finished length.
Lay out the side profile of the rear legs on the
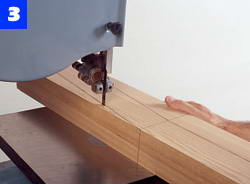
cedar blanks (Photo 2) and cut to the waste side of the
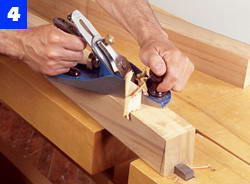
lines with a band saw (Photo 3). Then plane the sawn
surfaces (Photo 4). Use a sanding block or scraper to
smooth the inside corner of each leg where the plane
won't reach.
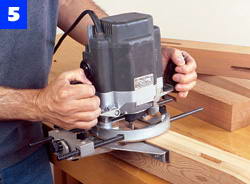
Use a plunge router with a spiral up-cutting bit and
an edge guide to remove most of the waste in each leg
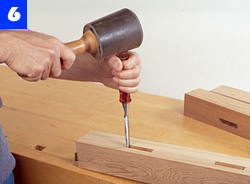
mortise (Photo 5). Square the mortise ends with a sharp
chisel (Photo 6).
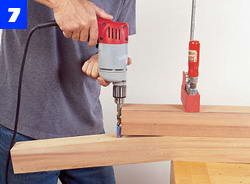
Notice that the arm mortises in the rear legs are cut
at a 7-1/2° angle to allow the arms to be level. To
start the angled mortises, clamp a block with a square
end to the vertical face of a leg and use it as a guide
to drill out most of the waste (Photo 7). Then, use a
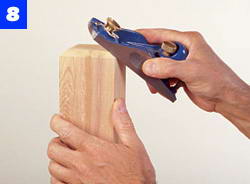
sharp chisel to finish each mortise. Crosscut the top
end of each rear leg so that it's square to the angled
face of the leg. Chamfer the ends with a block plane
(Photo 8). |
|
| Apply glue to pairs of 2 x 6s, and then
clamp them together to form the rear leg blanks. Use
2 x 4s for the front legs. |
| Band saw the rear leg blanks to 5 in.
wide and 2-3/4 in. thick. Plane them smooth and lay
out the side profile. |
| Use a band saw to cut the rear legs from
the blanks. Be sure to keep the saw kerf on the
waste side of the layout line. |
| Use a sharp plane to smooth the sawn
surfaces. Switch to sandpaper or a scraper at the
back inside corner. |
| Mark the mortise locations on the front
and rear legs, and use a plunge router and edge
guide to make the cuts. |
| After the routing has been completed,
use a sharp chisel to square the rounded ends of
each leg mortise. |
| To cut the angled arm mortises, clamp a
board to the leg to act as a guide. Bore holes, then
finish with a chisel. |
| Crosscut the leg top so that it's square
to the angled face of the leg. Use a chisel or block
plane to chamfer the end. |
|
|
|
| |
|
|
Bench Rails
Rip and crosscut 1-in.-thick
stock for the rails. Also, cut a piece of 2 x 4 stock to
size for the center seat-support rail. Use a scrap stick
as a beam compass to mark the 39-3/4-in. radius on the
top side rails and center rail, but don't cut the curves
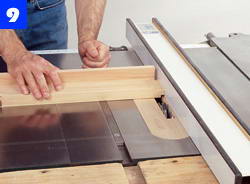
at this point. Install a dado blade in the table saw and
cut the tenons on the ends of the side, front and back
rails (Photo 9). Use the table saw rip fence as a stop
to ensure that the tenons are of equal length. Readjust
the blade height to cut the shoulder at the top and
bottom edge of each tenon.
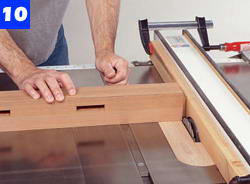
Clamp a scrap fence to the table saw fence and
position it so that only 1/2 in. of the dado blade will
be exposed. Turn on the saw and raise the blade to a
height of 7/8 in., and cut the tenons on the top ends of
the front legs (Photo 10). Readjust the saw again to cut
the tenons on the ends of the center seat-support rail.
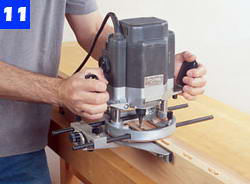
Next, mark the locations of the slat mortises in the
side, front and back rails and use a plunge router to
cut them (Photo 11). Since the rails are narrow, clamp a
second board to the workpiece to help support the router
base. Square the mortise ends with a sharp chisel. Work
carefully when making these cuts, as there are no
shoulders on the slats to hide oversize mortises.
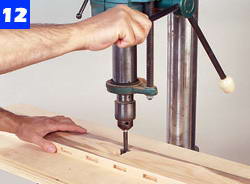
Lay out the mortises for the center seat-support rail
in the front and back rails. Use a Forstner bit in a
drill press to remove most of the waste (Photo 12), and
square with a chisel. Then, cut the curved profiles on
the side and center support rails, and rip and crosscut
the bench slats to finished size.
Assembly
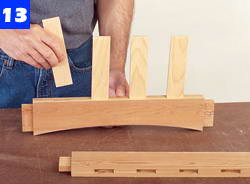
Begin assembly by joining a set of
slats to the side rails (Photo 13). It isn't necessary
to glue the slats in place since they will be held
captive between the rails, but if they fit too loosely,
you can place a spot of glue in the mortises to prevent
them from rattling.
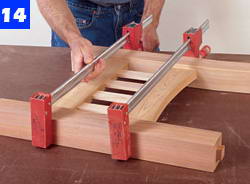
Spread glue in the leg mortises and on the side rail
tenons, assemble one of the bench sides, and clamp until
the glue sets (Photo 14). Repeat the process for the
other side. |
|
| Use a dado blade in the table saw to cut
the rail tenons. The rip fence acts as a stop to
ensure tenons of equal length. |
| To cut the tenons on top of the legs,
raise the dado blade into a scrap fence to yield a
1/2-in.-wide x 7/8-in.-high cut. |
| Rout the slat mortises in the bench
rails. Clamp a second board to the workpiece to help
support the router base. |
| Mark the mortise locations for the
center seat-support rail. Use a Forstner bit to
remove most of the waste. |
| After cutting the curved rail profiles,
press the side slats firmly into their mortises.
It's not necessary to use glue. |
| Spread glue in the leg mortises and side
rail tenons, and assemble one of the bench sides.
Clamp until the glue sets. |
|
|
|
| |
|
|
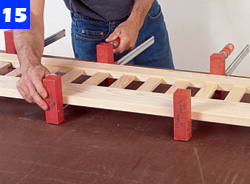
Join the slats to the front rails. If necessary, use
three or four clamps to press the slats all the way into
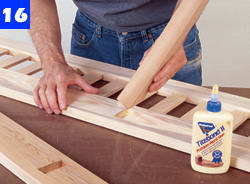
the joints (Photo 15). Then, spread glue in the front
and back rail mortises and on the center rail tenons,
and join the parts (Photo 16). Use a clamp to pull the
joints tight, and set the assembly aside to let the glue
dry (Photo 17).
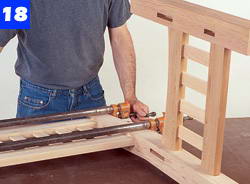
Assemble the back rails and slats and join this
subassembly to one of the bench sides (Photo 18). When
the glue cures, join the front and back seat rail
assembly to the same side. Complete the bench frame by
joining the opposite side to the rail ends.
Rip and crosscut 3/4-in. stock to size for the seat
slats. Adjust the table saw blade angle to 9-1/2° and
bevel one edge of the front and back slats. Leave the
rest of the slat edges square. Use a combination bit to
bore screw pilot holes and 3/8-in.-dia. x 5/16-in.-deep
counterbores in the seat slats. Then, fasten the slats
with galvanized deck screws. Maintain an equal space
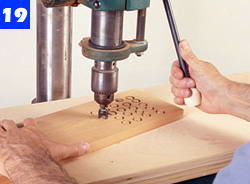
between the slats. Use a 3/8-in. plug cutter in your
drill press to cut screw plugs in a cedar board (Photo
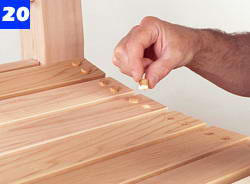
19). Then, spread glue in the screwholes and on the
plugs, and insert a plug into each hole (Photo 20). When
the glue dries, pare each plug flush.
Rip blanks to 4-1/4 in. wide for the arms, and
crosscut them a few inches longer than finished length.
Use a dado blade in your table saw to cut a square
shoulder tenon on the end of each blank. Then, lay out
the angled shoulder and cut the finished tenon with a
sharp backsaw (Photo 21). Refine the cuts with a sharp
chisel where necessary. With the tenons done, crosscut
the arms to finished length.
Mark the location of the mortise on the underside of
each bench arm, and use your drill press with a Forstner
bit to bore overlapping holes that remove most of the
waste. Then, use a sharp chisel to square the mortise
walls. Note that the arm mortise is elongated so the
tenon at the opposite end of the arm will easily slide
into the leg mortise.
Lay out the finished shape of the arms on the blanks
and cut to the lines with a band saw. After smoothing
the sawn edges, join the arms to the bench using two
clamps to ensure pressure is applied to both joints
while the glue sets (Photo 22).
Finishing
Sand the bench with 120-grit
sandpaper. Brush off all sanding dust before applying a
finish. We applied a coat of Cabot Clear Decking Stain
to our bench. This finish is easy to apply and provides
good protection for outdoor pieces. Brush on a liberal
coat and allow it to dry for at least 24 hours before
using the bench. |
|
| Use three or four clamps to squeeze the
front rail assembly, pressing the slats to the
bottom of the mortises. |
| Spread glue in the shallow center rail
mortises and on the seat-support rail tenons. Then
join the parts. |
| Use a clamp to pull the front rail and
back rail assembly tight to the center seat-support
rail. |
| Join the back to one of the bench sides.
When the glue cures, add the front and back seat
rail assembly to the same side. |
| Use a plug cutter to make cedar plugs to
cover the seat screws. Pop the plugs free with a
flat-tip screwdriver. |
| Spread glue in the holes and on the
plugs and place a plug into each hole. Pare each one
flush with a sharp chisel. |
| After cutting square tenons at the arm
ends, use a backsaw to cut the angled shoulders.
Refine tenons with a chisel. |
|
|
| |
|