BED AND STORAGE BOXES
A platform bed that's more than just a place to sleep.
TEXT AND PHOTOS BY NEAL BARRETT

Íàæìèòå äëÿ óâåëè÷åíèÿ

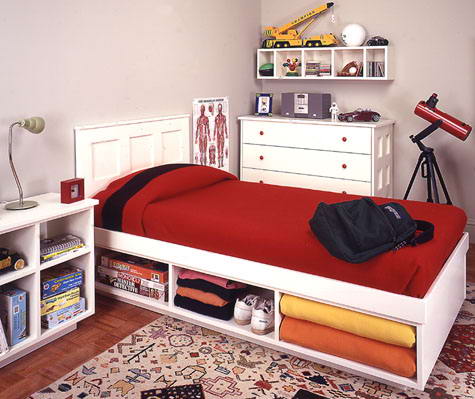
Beds are for sleeping, right? Well, not if you're a kid. If you're a kid, bed is the place to read, dream, plot and scheme—or just while away a rainy afternoon. It's gossip central after school is out and the intensive care unit during a bout with the flu. It's the place to return to when the day is done—and sometimes, it's just the best place to be alone.

Now that you know it's special, the job is to build a bed that's up to snuff. Our design takes care of all the basics, with a little extra just for fun. It's made of plywood and poplar and we've designed it to go together without a cabinet shop full of clamps. Underneath, there's ample storage, with enough space for a pile of games, books and the family cat. As for good looks, we've incorporated a strong but simple visual theme that matches the rest of our bedroom suite.
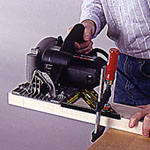
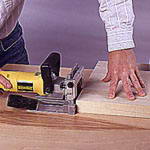
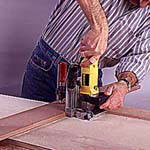
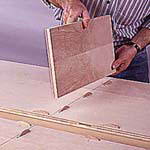
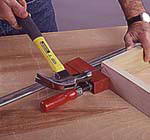
 

Building The Headboard

First, cut 1 1/2 x 3 1/2-in. poplar to length for the headboard stiles, mullions and top rail. To make accurate cuts with a circular saw, use a Speed Square to guide the cut (Photo 1). Position the square the appropriate distance from the cutline based on your saw's base plate. Then, clamp the square in place.

1--Crosscut the 1 1/2-in.- thick poplar headboard pieces to length. A square clamped to the work helps guide the cut.

Prepare the stock for the wide bottom rail by crosscutting the available widths a few inches longer than finished dimension. Apply glue to the mating edges of each piece and use clamps to pull the joints tight. Add clamps across the thickness of the assembly at each seam–at the ends especially–to help keep the boards aligned (Photo 2).

After about 20 minutes, scrape off any excess glue, and let the glue set for at least 1 hour before removing the clamps. Cut the glued-up panel to finished length using a straightedge guide clamped across the work to guide your circular saw.

2--Apply glue to the wide headboard rail pieces and clamp. Use clamps at the ends to help keep the faces aligned.

Mark the locations of joining plate slots for the headboard joints. Note that these joints are formed by a double row of plates. Using a flat table as the registration surface, hold both the joiner and workpiece against the table and cut the slots nearest one face (Photo 3). Then, flip each piece over to cut the remaining slots.

3--To cut the double plate slots, use a flat surface to register the slots on one side. Then, flip over work for remaining slots.

To cut the headboard panel grooves, first dry assemble the headboard with joining plates and use clamps to hold the joints tight. Install a 1/4-in. piloted slotting cutter in your router (Bosch cutter No. 85520, arbor No. 82811) with the pilot bearing mounted on the top of the bit arbor. Rout a 1/4-in.-wide x 1/2-in.-deep groove around each panel opening and 1/2 in. from the stock face (Photo 4).

4--Dry assemble the headboard with plates and install clamps. Rout the panel grooves with a piloted slotting bit.

Flip the headboard over, and again run the router around each opening to finish the grooves. Before routing the actual headboard stock, make a test groove in a 1 1/2-in.-thick block to make sure your router is set up correctly.

Disassemble the headboard parts and use a sharp chisel to square the rounded slot ends left by the router (Photo 5). Cut the 1/2-in.-thick plywood panels to size, lightly sand them and thoroughly dust them off.

5--After the grooves have been routed, disassemble the headboard and use a sharp chisel to square the rounded ends.

Spread glue in the headboard joint slots and on all joining plates. Insert the plates and join the mullions to the wide rail. Slide the panels in place (Photo 6) and install the top rail. Position the stiles and clamp the assembly. Compare opposite diagonal measurements to check that it's square. If the measurements are different, adjust the clamps until they're the same.

6--Slide the panels into place, and join the top rail to the mullions. Finish the assembly by joining the stiles to the rail ends.

Cut a piece of 3/4-in.-thick poplar to size for the headboard cap. Secure the cap to the top of the headboard using glue and nails (Photo 7). Set the nailheads below the surface and fill the holes with wood filler. Sand the entire headboard with 120-, 150- and 180-grit sandpaper, dusting off the assembly thoroughly between grits. Carefully ease all sharp edges when you sand.

7--Use glue and finish nails to attach the 3/4-in.-thick poplar cap to the headboard. Set the nails and fill the nail holes.

Storage Boxes

The main support for the bed is provided by two back-to-back storage box units. Use your circular saw guided by a straightedge to cut the plywood parts for these boxes–a fine-tooth blade will minimize tearout (Photo 8).

8--To cut the plywood storage box pieces, guide your circular saw with a straightedge clamped to the workpiece.
 

Mark the locations of joining plate slots in the box parts and use your plate joiner to cut the slots. Clamp guides and fences to the panels and worktable to help register the plate joiner when making these cuts (Photo 9). When you cut the slots in the end of a panel, you can use your worktable as the registration surface (Photo 10).

9--Clamp a guide across the top and bottom panels of the storage boxes to help locate the plate joiner when cutting the slots.
 
10--Use your worktable as a registration surface when cutting the slots in the storage box partition panels.
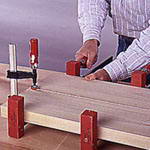
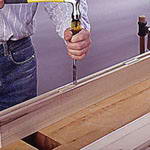
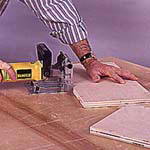
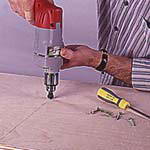
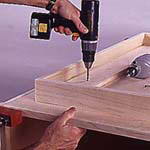
To minimize the need for clamps, some of the plate joints in the bed are used only to align the joint, and screws are used in place of glue. Use dry plates to assemble the partitions, back panels and top and bottom panels (Photo 11). Then install screws to hold the parts together (Photo 12).

11--Install the plates and position the partitions followed by the backs. Finally, place the top panel in position.
12--With all parts aligned, bore screwholes through the top and secure the panel. Turn the assembly over and fasten the bottom.
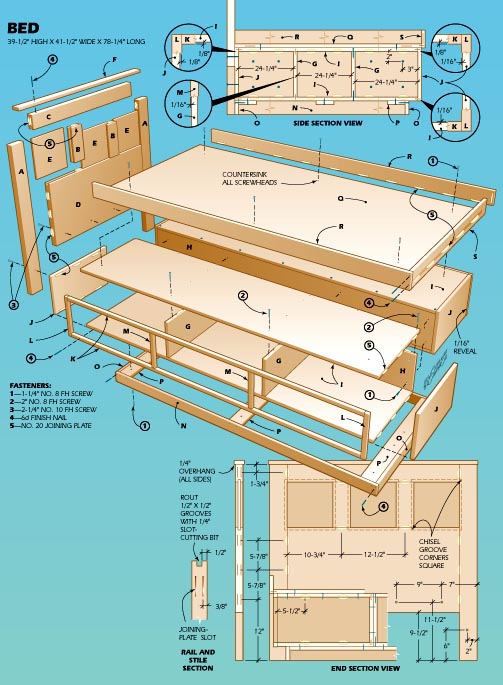
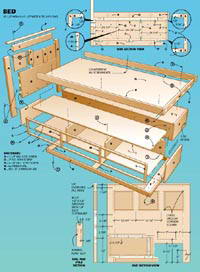
Spread glue in the plate slots and on the joining plates for the end pieces. Position the ends and use 6d finish nails to hold the joints tight (Photo 13).

Rip strips of 3/4-in. poplar to a width of 7/8 in. for the facing. Cut the pieces to length using a miterbox and backsaw.

13--Use 6d finish nails in place of clamps to hold the ends tightly in place while the glue on the joining plates sets.

Apply the facing to the outside edges of the boxes (Photo 14) as shown in the drawing below. Pay careful attention to the overhang of each facing strip. Set and fill the nailheads.

14--Use glue and nails to fasten the facing strips to the storage boxes. Use a clamp to hold the strips while you drive the nails.

Toe Kick And Platform

Cut the parts to size for the toe kick base. Apply glue to the joints and then use clamps to hold the pieces while you nail them together (Photo 15). Use glue and finishing nails to secure the cleats.

15--Assemble the toe kick base with glue and finish nails. Use clamps to keep the pieces from shifting as you nail.

Cut the mattress platform and poplar edges and end to size. Then, cut the joining plate slots for fastening the 3 1/2-in.-high edges and end to the plywood, apply glue to the joints and assemble the pieces (Photo 16). Use 6d finish nails to hold the joints tight.

16--Join the platform and edges with plates and glue. Drive nails to hold the joints tight while the glue sets.

Assembly

Start assembling the bed by joining the two storage box units back to back. Use clamps to hold the units together while you bore pilot holes and drive screws through the back of one unit into the back of the other. Turn the box assembly upside down and position the toe kick base so there is a uniform setback on both sides and at the foot of the bed. Fasten the toe kick by screwing through the cleats into the bottom of the box (Photo 17).

17--Turn the storage box assembly upside down and place the toe kick base over it. Secure the base with screws.

Place the panel assembly right side up, position the headboard and temporarily clamp it in place. Bore and countersink pilot holes and screw the headboard to the end of the base assembly (Photo 18).

18--Position the headboard and clamp it in place. Bore and countersink pilot holes and screw the headboard to the storage box.

Position the platform over the storage boxes, with its open end against the headboard. Bore and countersink pilot holes, then fasten the platform with screws (Photo 19).

Inspect the bed and fill any remaining nail holes with wood filler. Sand all bed parts, finishing with 180-grit sandpaper, and dusting off between grits. After the final sanding of the barewood surfaces, completely dust the bed with a tack cloth. Apply a good quality latex primer to all exposed surfaces. When the primer is dry, lightly smooth the bed by hand, sanding with 180-grit paper to remove any surface imperfections. Clean the bed again and follow with two coats of a good latex enamel, following the manufacturer's instructions.

19--Place the platform assembly on the storage unit and tight against the headboard. Secure the platform with screws.


MATERIALS LIST–BED

Key No.</ B> Size and description (use)
A 2 1 1/2 x 3 1/2 x 38 3/4" poplar (stile)
B 2 1 1/2 x 3 1/2 x 9" poplar (mullion)
C 1 1 1/2 x 3 1/2 x 34" poplar (rail)
D* 1 1 1/2 x 16 3/4 x 34" poplar (rail)
E 3 3 1/2 x 10 x 10" plywood (panel)
F 1 3/4 x 2 x 41 1/2" poplar (cap)
G 4 3/4 x 9 x 18 1/4" plywood (divider)
H 2 3/4 x 9 x 74 1/4" plywood (back)
I 4 3/4 x 19 x 74 1/4" plywood (top/bottom)
J 4 3/4 x 10 1/2 x 19" plywood (end)
K 4 3/4 x 7/8 x 74 1/16" poplar (facing)
L 4 3/4 x 7/8 x 10 9/16" poplar (facing)
M 4 3/4 x 7/8 x 81 3/16" poplar (facing)
N 2 3/4 x 2 3/4 x 73 1/4" plywood (toe kick face)
O 2 3/4 x 2 3/4 x 33" plywood (toe kick end)
P 3 3/4 x 3 1/2 x 33" plywood (cleat)
Q 1 3/4 x 39 1/2 x 75 3/4" plywood (platform)
R 2 3/4 x 3 1/2 x 76 1/2" poplar (platform edge)
S 1 3/4 x 3 1/2 x 39 1/2" poplar (platform end)
Misc: Misc.: No. 20 joining plates; 2 1/4" No. 10 fh woodscrews; 2" No. 8 fh woodscrews; 11/4" No. 8 fh woodscrews; 6d finish nails; glue; sandpaper; latex primer and enamel.
Note: All plywood birch veneer
*Laminate from narrower stock