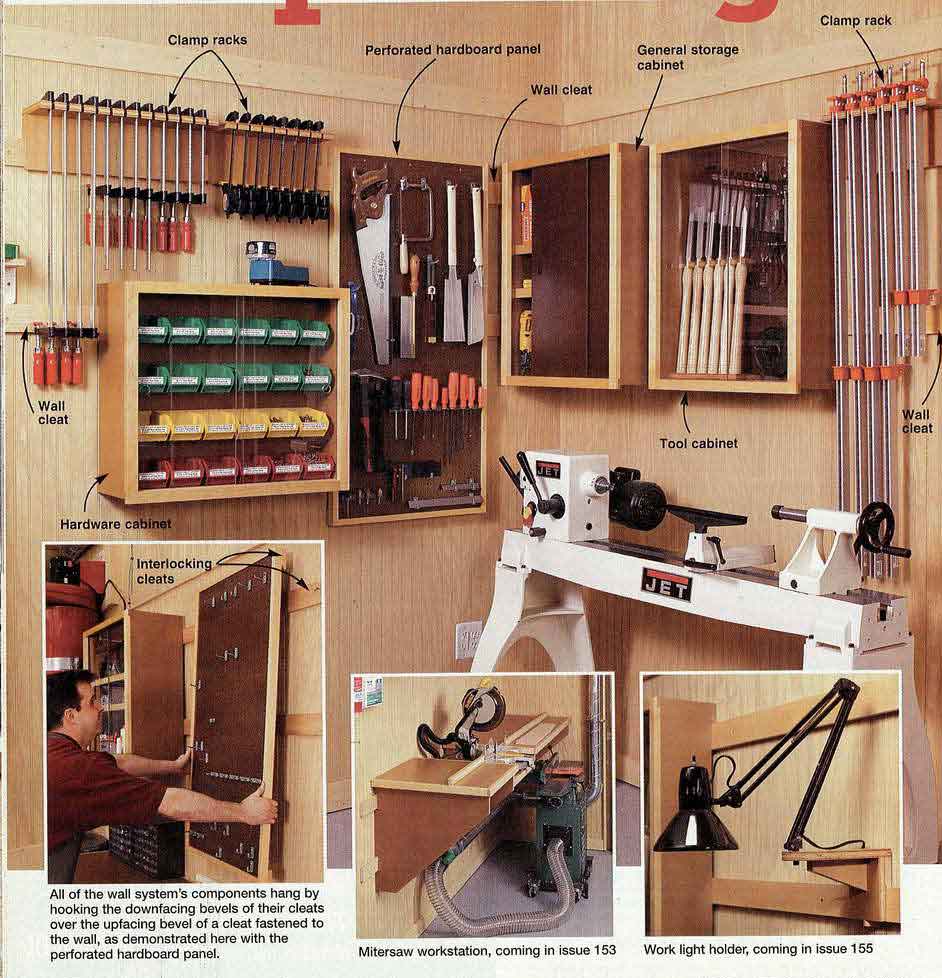
| Presto chango! With this simple system, adding to or rearranging your workshop wall storage is (almost) as easy as waving your hand.
Adding new tools or supplies to your workshop is always a good thing. But sometimes, finding a place to set up a tool or store more sup -plies means juggling the existing layout of wall cabinets or tool racks. With its interlocking hanging cleats, shown in the inset photo,far left, this Idea Shop 5 sys-tem transforms a major hassle into a minor task accomplished in minutes. Here, you'll learn how to build racks for bar and pipe clamps, a perforated hardboard panel for hanging hand tools, and wall cabinets with either clear acrylic or hardboard doors for see-through or covered-up storage. Featured in three handy sizes—12 1/4" deep for general storage, 8 3/4" deep for hardware, and 7 1/2" deep for tools—all the cabinets share identical construction details. The inset photos, left, show even more ways to make your wall system work for you. |
Clck on picture to view large picture |
|
|
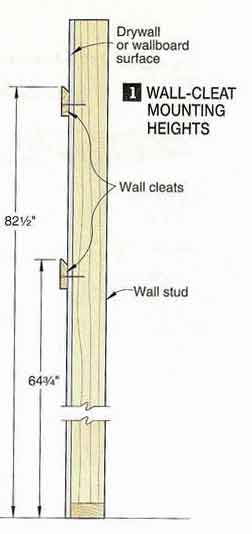
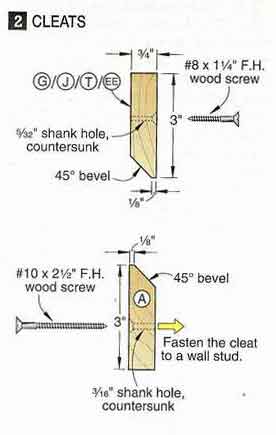
Start with the wall cleats 1 Measure your shop for the total lin-ear feet of wall cleat (A) you'll need. The Idea Shop has cleats at the levels shown on Drawing 1, although not necessarily on every wall. Plan your wall-cleat mounting heights according to your needs. Joint one edge of your boards straight, rip them to 3" wide, and then bevel one edge, where shown on Drawing 2. Sand the cleats, and apply two coats of satin polyurethane. 2 Locate the wall studs, and drill countersunk shank holes in the cleats at these locations. Leveling the cleats, drill pilot holes, and drive the screws. |
 |
 |
|
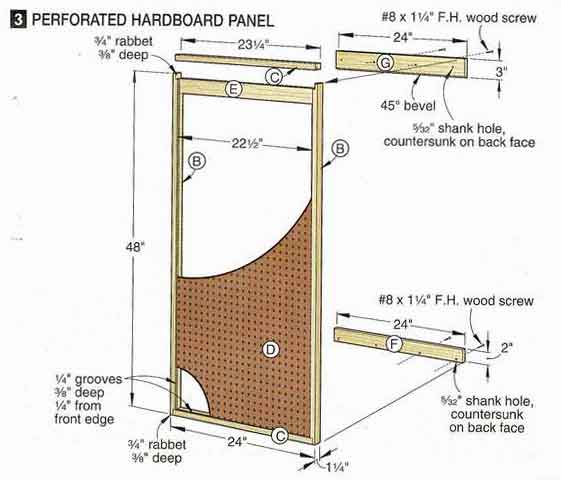
Add a perforated hardboard panel 1 Cut the frame sides (B) and frame top and bottom (C) to size. With a dado blade, cut 1/4" grooves 3/8" deep in the sides, top, and bottom, where shown on Drawing 3. Then cut the 3/4" rabbets 3/8" deep in the ends of the sides. 2 Cut the panel (D) to size. Squeeze glue into the frame members' grooves, and clamp them to the panel. 3 Cut the back rail (E) and spacer (F) to size. Glue and clamp the rail to the back of the panel (D). Clamp the spacer in place, drill screw holes through the spacer and into the frame bottom (C), and drive the screws. 4 Cut the cleat (G) to size, and then bevel one edge, where shown on Drawing 2. Glue and clamp it in place, flush with the top of the frame top (C). Drill screw holes, and drive the screws. |
 |
|
|
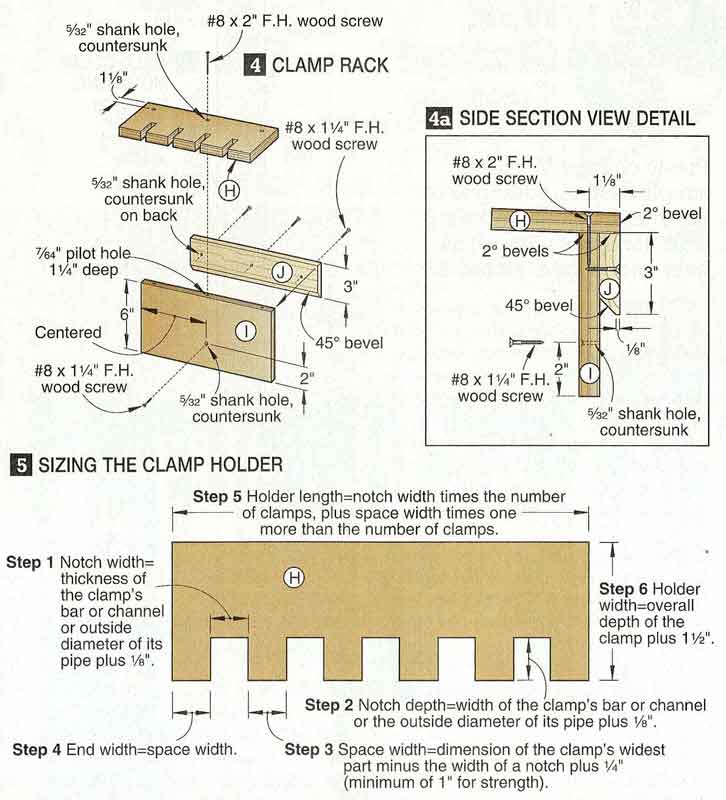
Now make clamp racks 1 To determine the size of the holder (H), shown on Drawing 4, and the size and spacing of the notches for the bar or pipe clamps that you have, see the six steps shown on Drawing 5. Cut the holder (H) to size. Then cut the upright (I) and cleat (J) to the widths listed in the Materials List and the same length determined for the holder. Cut 2° bevels on all the parts, where shown on Drawing 4a. Then cut the 45° bevel on the cleat. To lock the completed rack onto the wall cleat, drill a countersunk screw hole centered in the length of the upright, where shown on Drawing 4. 2 Lay out the notches on the holder (H). With a dado blade in your tablesaw, and an auxiliary extension attached to your miter gauge to prevent chip-out, cut the notches. For a method of cutting the notches that avoids tedious layout, see the Shop Tip, below. 3Glue and clamp the cleat (J) to the upright (I) with their top edges flush, where shown on Drawing 4a. Drill screw holes, and drive the screws. Then glue and clamp the holder (H) to assembly I/J, keeping the back edge of the holder flush with the back face of the cleat. Drill screw holes, and drive the screws. |
 |
|
|
Shop tip |
||
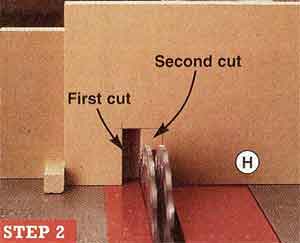
| Save time notching with a simple step-and-repeat jig
When making several clamp racks, speed things up by adding an indexing pin the same widths as the notches you wish
to cut to a miter-gauge auxiliary extension. Then use it just like a box-joint jig to cut the notches. When making racks that call for notches of more than one width, make your jig for the narrowest notch, and cut these : holders first. Then use the same jig to cut the wider notch-es. The photos, below, show you how to cut 1" notches with a jig originally made to cut 1/2" notches. |
||
 |
 |
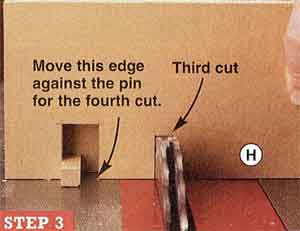 |
| Lay out the holder's first notch, and align it with the dado blade. Adjust the auxiliary extension so the distance between the indexing pin and the end of the holder is the same as the difference between the width of the dado blade and the width of the desired notch. Secure the extension to the miter gauge, and make the first cut. | Slide the holder over against the indexing pin, and make another cut. In this case, the notch is formed in two cuts because the dado blade is half the width of the desired notch. When the dado blade's width is less than half the desired notch's width, you'll have to make more than two cuts to complete the notch. | Place the notch just cut over the indexing pin with one side against the pin, and make the third cut. Push the notch's other side against the pin, and make a fourth cut. Once again, if using a narrower dado blade, clean out between the two cuts with additional passes. Now repeat these steps until all the notches are cut. |
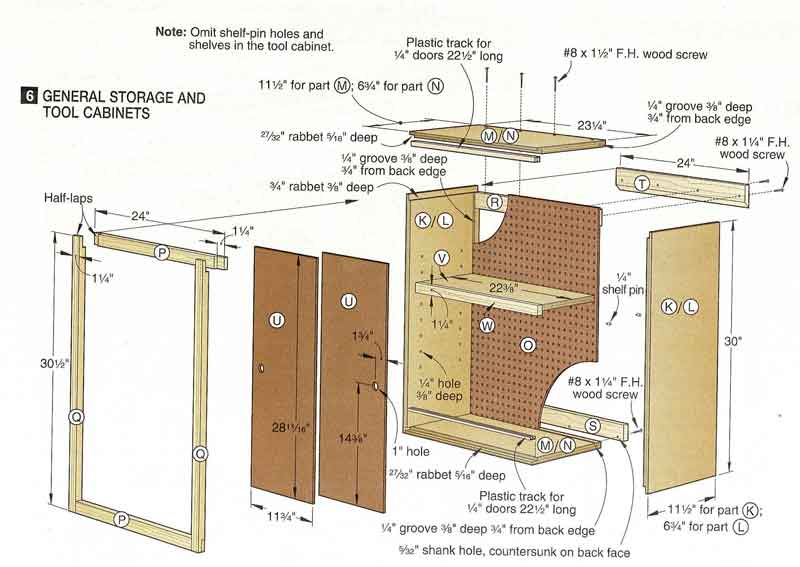
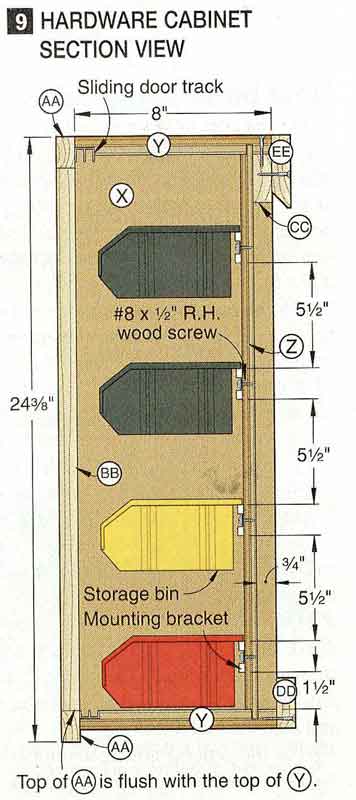
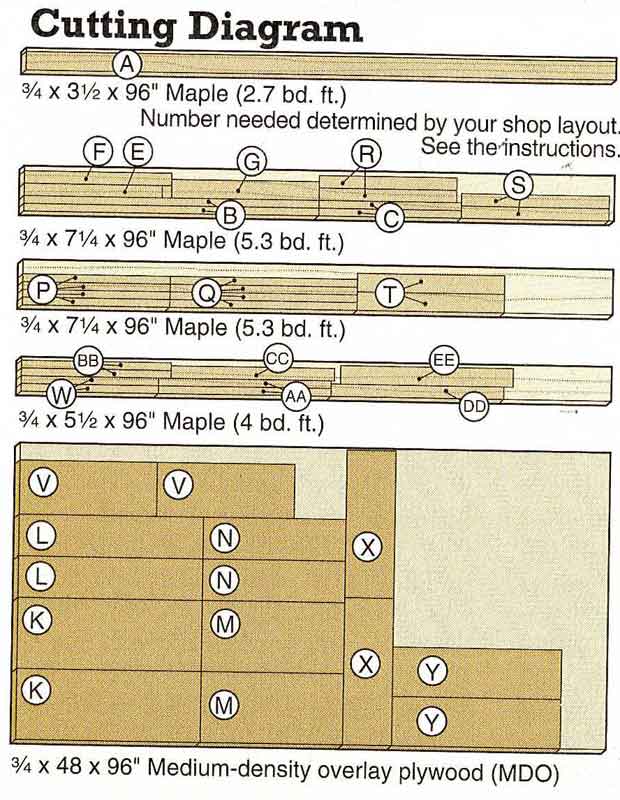
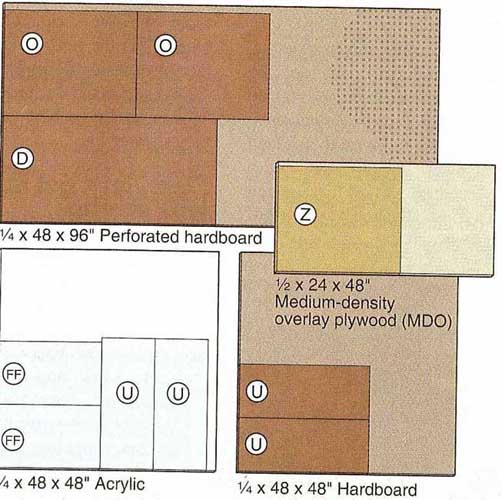
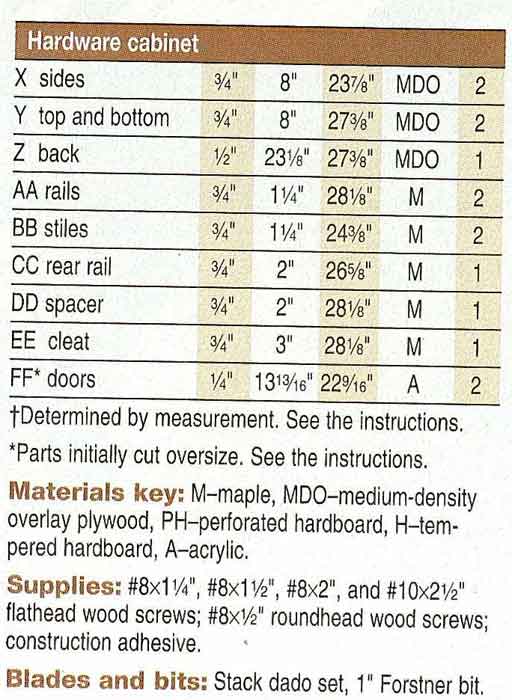
| Next build some cabinets Note: The general storage and tool cabinets differ only in the widths of the sides, top, and bottom, as shown on Drawing 6, and whether or not they have shelves. All the other parts are identical. Although all the parts of the hardware cabinet, shown on Drawing 8, differ in size from the other cabinets, the machining operations are the same, except for the backs. The Materials List indicates parts to build one of each cabinet. 1 Cut the sides (K, L, X) and the tops and bottoms (M, N, Y) to size. With a dado blade, cut 3/4" rabbets 3/8" deep in the sides, where shown on Drawings 6 and 8. Then, for the door track, cut the 27/32" rabbets 5/16" deep along the front edges of the tops and bottoms. Finally, cut 1/4" grooves 3/8" deep in all the parts for the backs (O, Z). 2 Drill shelf-pin holes in the sides (K) of the general storage cabinet, where shown on Drawing 7. Do not drill shelf-pin holes in the sides (L, X) of the tool and hardware cabinets. |
 |
|
|
3 For the general storage and tool cabinets, cut perforated hardboard for the backs (O) to size.
Squeeze glue into the top, bottom, and side grooves, and apply it to the sides' rabbets.
Capturing the back in the grooves, clamp the case together. For the hardware cabinet back (Z),
cut a piece of 1/2" plywood to size. Then cut a 3/8" rabbet 1/4" deep along its edges, where shown on
Drawing 8.
Orienting the back to leave a 3/4" recess at the cabinet's rear, where shown on
Drawing 9,
glue and clamp the hardware cabinet case together. 4 Checking the cases' exact widths, cut the rails (P, AA) to length, and clamp them in place, where shown on Drawings 7 and 9. Note that the top edges of both rails (P, AA) are flush with the top faces of the tops and bottoms (M, N, Y).Now measure the exact length of the stiles (Q, BB), and cut them to size. Cut half-lap joints in the ends of the parts, and glue and clamp them in place. |
 |
|
|
5 Cut the rear rails (R, CC), spacers (S, DD), and cleats (T, ЕЕ) to size. Bevel the cleats, where shown on
Drawing 2.
Glue and clamp the rear rails to the backs (O, Z), and the spacers to the bottoms (M, N, V), where shown on
Drawings 6, 7, 8, and 9.
Drill screw holes, and drive the screws. Then glue and clamp the cleats in place, drill screw holes, and drive the screws. 6 Cut the doors (U, FF) 1/16" larger in length and width than the sizes listed. Depending on what you wish to store in the cabinets, choose either tempered hardboard or clear acrylic. (We used both hardboard and acrylic for general storage cabinets, and acrylic for the tool and hardware storage cabinets.) Clean up the edges by jointing off Ум", and then ease the sharp corners with a sanding block. Chuck a 1" Forstner bit in your drill press, and drill the finger holes. Chamfer their edges with sandpaper. When drilling finger holes in acrylic doors, ran your drill press at 250 rpm. |
 |
|
| 7 For a general storage cabinet, cut the shelves (V) and the shelf edges (W) to size. Glue and clamp the shelf edges to the shelves. |
 |
|
1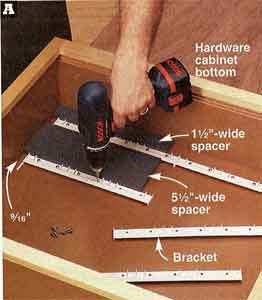 |
||
| Place the 1 1/2" spacer between the cabinet's bottom and the first bracket, and align it with the mark. Drill pilot holes, and drive the screws. Slide the spacer over, and mount the second bracket. Now, using the 5 1/2" spacer, mount the remaining brackets. | ||
| Finish and hang 1 Sand the exposed plywood edges of the clamp racks smooth, and ease all the comers with a sanding block. Sand the perforated hardboard panel frame, cabinet frames, and shelf edges, and ease their corners with a sanding block. Apply two coats of satin polyurethane to all the parts, sanding between coats. 2 Cut sliding door tracks to fit between the cabinet sides, apply a Ms" bead of construction adhesive, and clamp the tracks in place. 3 Lay the hardware storage cabinet on its back. Cut 1 1/2"- and 5 1/2"-wide spacers from scrap, and make bracket-alignment marks 9/16" from one end. Fasten the bin-mounting brackets, where shown on Drawing 9, and as shown in Photo A. 4 Lay the perforated hardboard panel on its back, and arrange your tools on it. Once you work out an efficient arrangement, attach perforated hardboard hooks and tool holders. 5 Hang the clamp racks, perforated hardboard panel, and cabinets on the wall cleats. To keep from accidentally dislodging the clamp racks, use the hole drilled in the rack's upright as a guide to drill a pilot hole in the wall cleat. Drive the screw. Install the shelf pins, shelves, and plastic bins in their respective cabi-nets, and then add the doors. Now, hang up your clamps, refill the perforated hardboard, and arrange your other tools and supplies in the cabinets. |
 |
|
 |
||
 |
 |
|