Corner cabinet
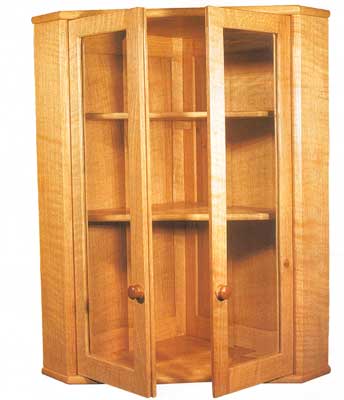
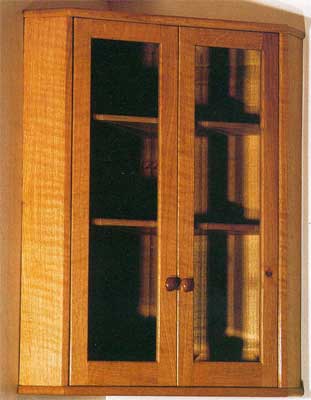
Many people are fond of corner cabinets.They may not hold a great deal, being about half the volume of a rectangular cabinet the same height and width, but they make good use of awkward spaces.They also display their contents well and add character to a room.
I have been asked to make guite a few corner cabinets over the years, all different but variations on a theme.The little glazed wall cabinet I will describe in this article, together with its big brother standing on the floor below, were made from an attractive piece of rippled oak that came from a tree felled in Tatton Park — the same estate that provided the oak to the 'One Tree' project. At the request of the new cabinet owners, 1 carved the date along with the words Tatton Oak' inside the cabinet.
Design factors
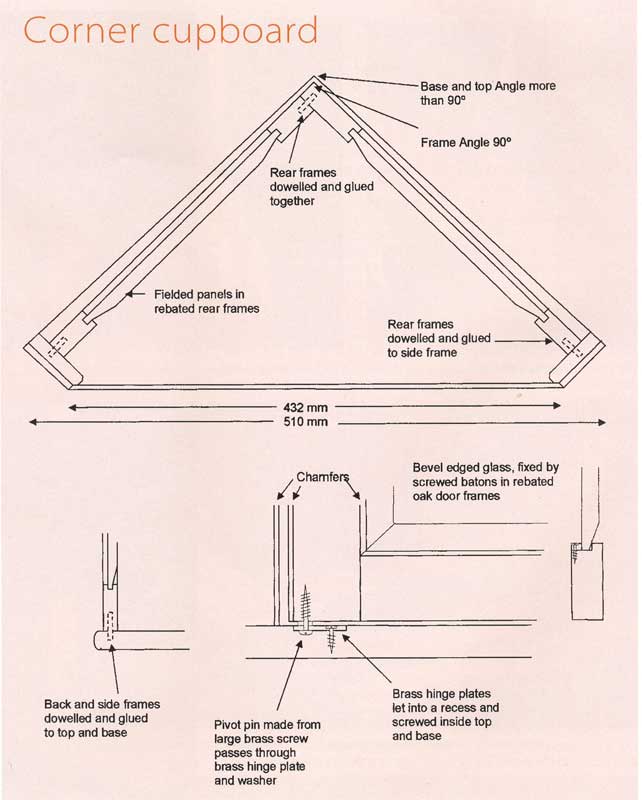
The front of the wall-mounted cupboard had the shape of a golden rectangle with dimensions 700mm high by 432mm wide across the face.This matched the shape of the lower cabinet I had previously made.
The parts that dictate the size and shape of the cupboard are the top and base panels, like triangles with their corners cut off (actually they are irregular pentagons) and the vertical frames down each side.
Everything else has to fit between these pieces.The owners had three sizes of giassware they particularly wanted to fit in the cabinet so the shelf spacing was arranged to take this with some clearance.
The rear of the cabinet, which is visible with the doors open or closed, has solid oak frames and panels. I used dowels for all the joints between the frames, sides, top, and base.
The door frames are the same as the rear frames but narrower.The owners liked the idea of using bevel edged glass to echo the style of the fielded panels in the rear.
wanted to create a simple, timeless style with this frame and panel furniture, but shiny new hinges around the doors can spoil it.
don't like new hinges that pretend to be old, so having no visible hinges at all seems a good option.
A few years ago, when trying to disguise a video recorder door as a drawer in a chest — I came up with a simple system of invisible hinging.
I felt pleased with my'new invention'— until I came upon a 1 7th century dresser door using the same method. Oh well — at least I know it should outlast its maker!
Buying timber
It is not always easy to judge exactly how much wood you will need for a project when you are buying rough-sawn timber.This is especially true when it is waney edged — complete with sapwood and bark.
had agreed with the owners to buy enough timber to make one large corner cabinet, and hopefully there would be enough for a smaller one to match. If not I would have made them something else. In the event, the quantities turned out right and I was able to make this little glazed cabinet.
Quarter sawn oak is very stable with good figuring. It certainly is good material to work with, but sometimes when you attack it with a smoothing plane, shreds of medullary rays can peel off leaving a torn surface.
Apart from keeping a razor-keen blade and the plane-mouth set narrow, it is important to keep friction low so you can feel whether the blade is sizzling nicely through the fibres or stuttering as it tears them out.
Freguent wipes across the sole with a chunk of beeswax or the side of a candle give an improved feeling. It also saves you from wasting a lot of hard work heating the plane by friction.
Cutting time
Having decided on the dimensions and bought your timber, marking out the components for cutting can be a worrying stage, especially if it is a particu-arly fine wood and you haven't any extra to spare.
cut the pentagons for the top, bottom and the two loose shelves from a single guarter sawn plank of inch thick material.
To reduce waste I cut the pieces in alternate directions. The top and bottom pieces were arranged with heartwood to the front because it is harder and more durable.
The internal shelf-fronts were cut so their front edges came just short of the sap-wood. It is best not to use the actual sapwood itself because it does not contain much tannin,the natural preservative that gives oak furniture its incredible lifespan.
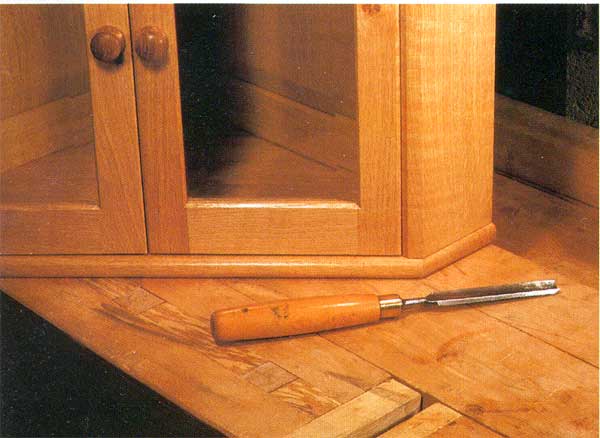
After cutting and planing, made barrel shaped edges on the top and bottom front and side edges using a traditional moulding plane. I keep a few basic shaped moulding planes in good condition because I enjoy the smooth finish they leave on fine wood.
In the past, cabinetmakers often had dozens of them — they were the standard way of shaping edges before routers were available.
A separate plane was needed for each shape — there are thousands of these planes to be found in junk shops, often changing hands for about £5 each.
The internal shelves were thinned down by cutting a gradual bevel on the underside of the front edge to stop them looking chunky but to make sure they retain their strength. To mark out the lines of bevels use a pencil in my gauge to avoid scoring the wood, and then I pared up to the lines with a tilted smoothing plane.
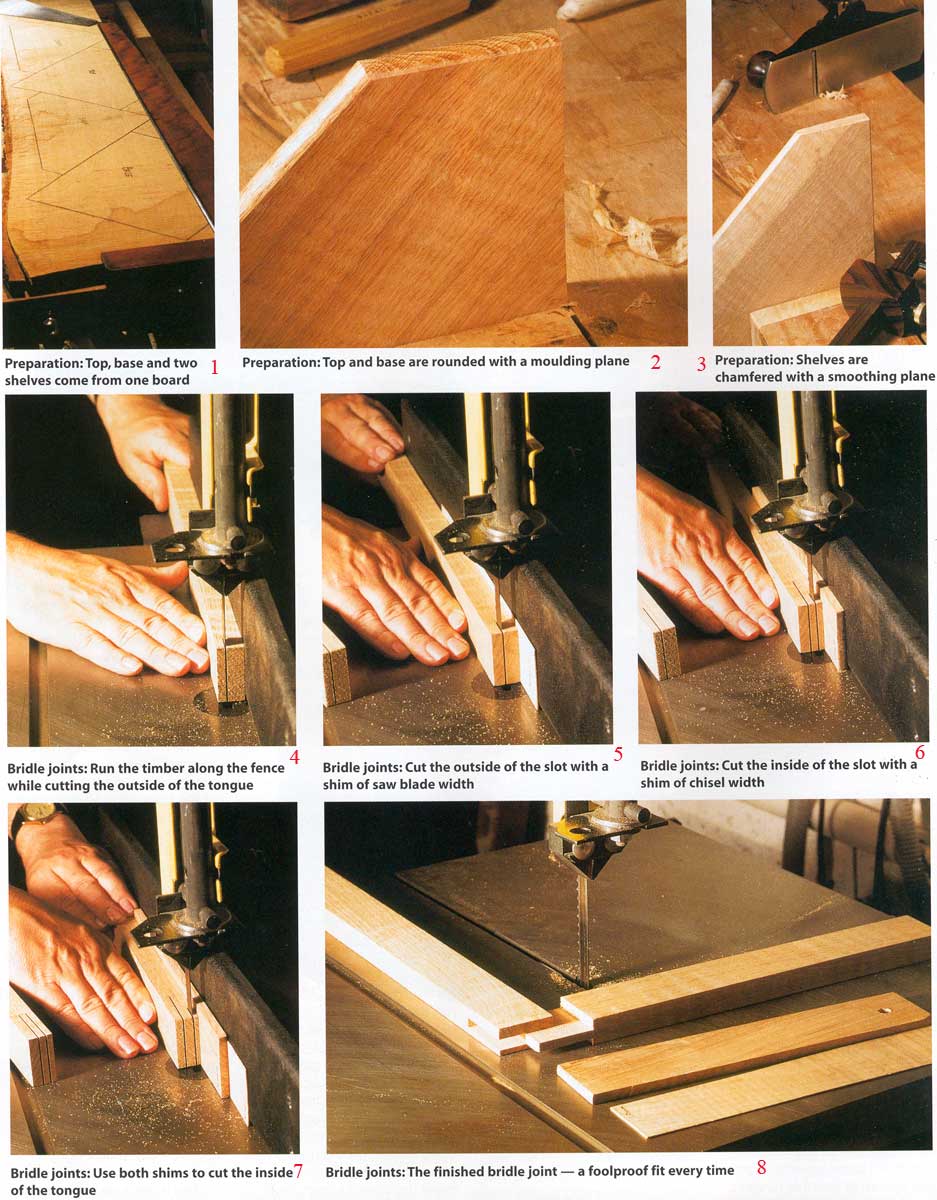 |
| 1 Preparation: Top, base and two shelves come from one board |
| 2 Preparation: Top and base are rounded with a moulding plane |
| 3 Preparation: Shelves are chamfered with a smoothing plane |
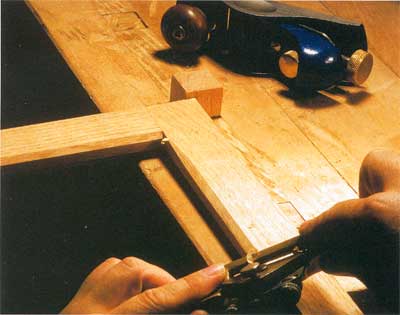
| 4 Bridle joints: Run the timber along the fence while cutting the outside of the tongue |
| 5 Bridle joints: Cut the outside of the slot with a shim of saw blade width |
| 6 Bridle joints: Cut the inside of the slot with a shim of chisel width |
| 7 Bridle joints: Use both shims to cut the inside of the tongue |
| 8 Bridle joints: The finished bridle joint — a foolproof fit every time |
It's best not to use the sapwood itself because it doesn't contain much tannin
Corners
Surprisingly, room corners vary guite a bit. Something that did not occur to me, when I made my first corner cupboard many years ago, I found that the back edges needed to meet at an angle greater than a right angle.
This is because walls nearly always meet in corners at more than 90°. You may find the walls actually curve in towards the corner — it must be something to do with the way plasterers work.
There are several ways to tackle this. One is to be generous with the angle so the cupboard will fit most corners.This has the advantage that the cupboard can be confidently moved to another room or house but the disadvantage that there is likely to be a gap at the rear.
This would need to be filled or covered afterwards with a matching strip of wood, or in the traditional way with a large cornice so the end panels are barely visible.
Alternatively, you can go for , the made-to-measure approach.
The best way to do this is to use a large roofing square and a ruler to measure the divergence of the corner at several points, then draw out the shape on paper or card and offer it into the corner to check it fits.
The rear frames themselves are positioned a little way forward of the back edge so they can meet at a right angle without risk of fouling the wall.
Cutting frame joints
For all 16 corners on the rear frames and doorframes, I cut bridle joints.These are simple open-sided mortice slots with full width tenons made by an accurate and foolproof band-saw technique.
To make the joint you need a bandsaw with a decent side fence and a pair of shims to place between the fence and the wood.These shims will set the accurate positions of all the ripping cuts that form the mortice and tenon walls cheeks.
One shim is the thickness of the bandsaw kerf, the other is the width of the mortice.To find the blade's kerf-width, carefully cut a short, straight slot, then tested it with mechanic's feeler-gauges (the blade I used was 1.5mm).
set the mortice width to 9mm to match my most suitable chisel. I cut my shims out of ash but you could use any stable, resilient material. After cutting the shims on the band-saw check the thickness at several places and adjust as necessary with a fine set block plane.
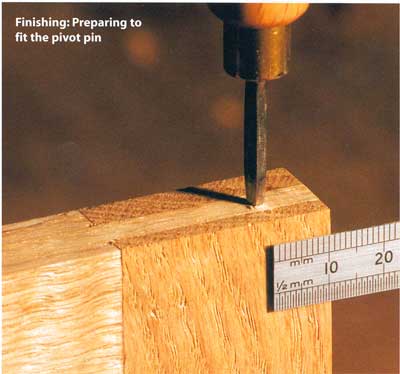
The bandsaw fence must be locked in a position that will cut the outer cheek of the tenons. Position the tenon centrally as it will then be possible to fit the hinge pivot pin in its centre.
Decide which side of each frame part will be the front face and always cut with these pressed against the fence. Cut the mortice inner shoulder using the blade-width shim and the outer shoulder using the tenon-width shim. Cut the tenon inner shoulder without a shim.The outer shoulder is cut using both shims together.
Use the sliding fence to bandsaw off the tenon cheeks. Remove the mortice centre with a drill and chisel.Test that the two parts fit snugly together with hand-tight friction without any tendency to force the mortice slot apart. When you glue them, use'G'cramps across the outside of the mortice to improve the pressure.
Fitting panels
The inside edges of the rear frames were slotted to accept the fielded rear panels which were trapped in place when the frame was glued up.This work is easiest done on a router table, alternatively a bearing-guided hand-held router could be used.
The glass in the door panels was fitted to a rebate, cut inside the back of the frame.lt was held in place with fine oak batons fixed with small brass screws.
The doors were made with a half-inch overlap in width so they can be rebated down the meeting edges to form a dust seal.
This involves making one of the stiles half an inch wider than the other. When it is rebated at the front and the doors are closed, the extra width is tucked into the rebate behind the second door and you see two stile fronts of the same width.
The inside bevels on the door rails can easily be planed before they are glued up. I cut the bevels inside the stiles after gluing, using a spokeshave and a block plane, and then finishing up to the corners with a cranked chisel. A router with a 45° bush guider cutter could do the job after the frame joints are cut and fitted.
The rear frames would need to be dry-fitted and clamped together so the panel could be fitted in its slot later. Using a router,you would need to finish the inside corners with a chisel to avoid the rounded effects they leave.
Do not cut the outside door bevels until you come to hang the doors.
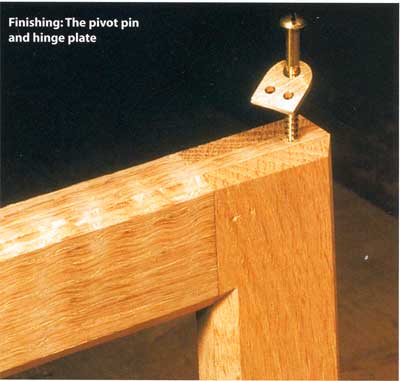
Hinging the doors
The door hinge-pins are simply dome-headed, brass screws pivoted through small brass plates recessed into the cabinet. Brass washers maintain the clearance.
The positions of these are critical to the movement and fit of the doors. I positioned the pivot 10mm from the frame edge and 8mm from the outer face to give a 2mm clearance with the door swung open.
The brass plate was cut from 3mm thick stock, carefully filed, and drilled.The recesses in the cabinet top and bottom were cut with carving gouges to accept the hinge plates.
The chamfers on the outside of the doors need to be planed deep enough to clear the frame as the door swings, with a small extra margin.
Finishing touches
The bevel edged glass had to be made to order — there was the normal cost of the glass plus a charge per inch for bev-
elling. I ordered 6mm glass, which is heavier than you would normally use in a cupboard but allows for the depth of the bevel. For safety, have the glass toughened.
The doorknobs were turned from brown oak on a small lathe using a basic gouge and skew chisel.
Because I was lucky with the guality of the oak I bought, and I cut all the outside surfaces and edges with sharp hand plane blades, this brought them to a crisp finish.There was very little surface preparation needed — just a light application of fine silicon carbide sandpaper.
If you do need to apply
heavier sanding to obtain the reguired smoothness, make sure to use a flat block applied evenly across the wood so it cannot make dips or round over the edges, making them look soggy.
The finish I applied was a beeswax paste.
This keeps the oak looking fresh, but takes a lot of coats and needs replenishing guite often. A more durable traditional finish would be thinned down Danish oil soaked into the wood and wiped off again before it sets as a skin on the surface. If this is repeated several times, it gives oak a rich warm colour.